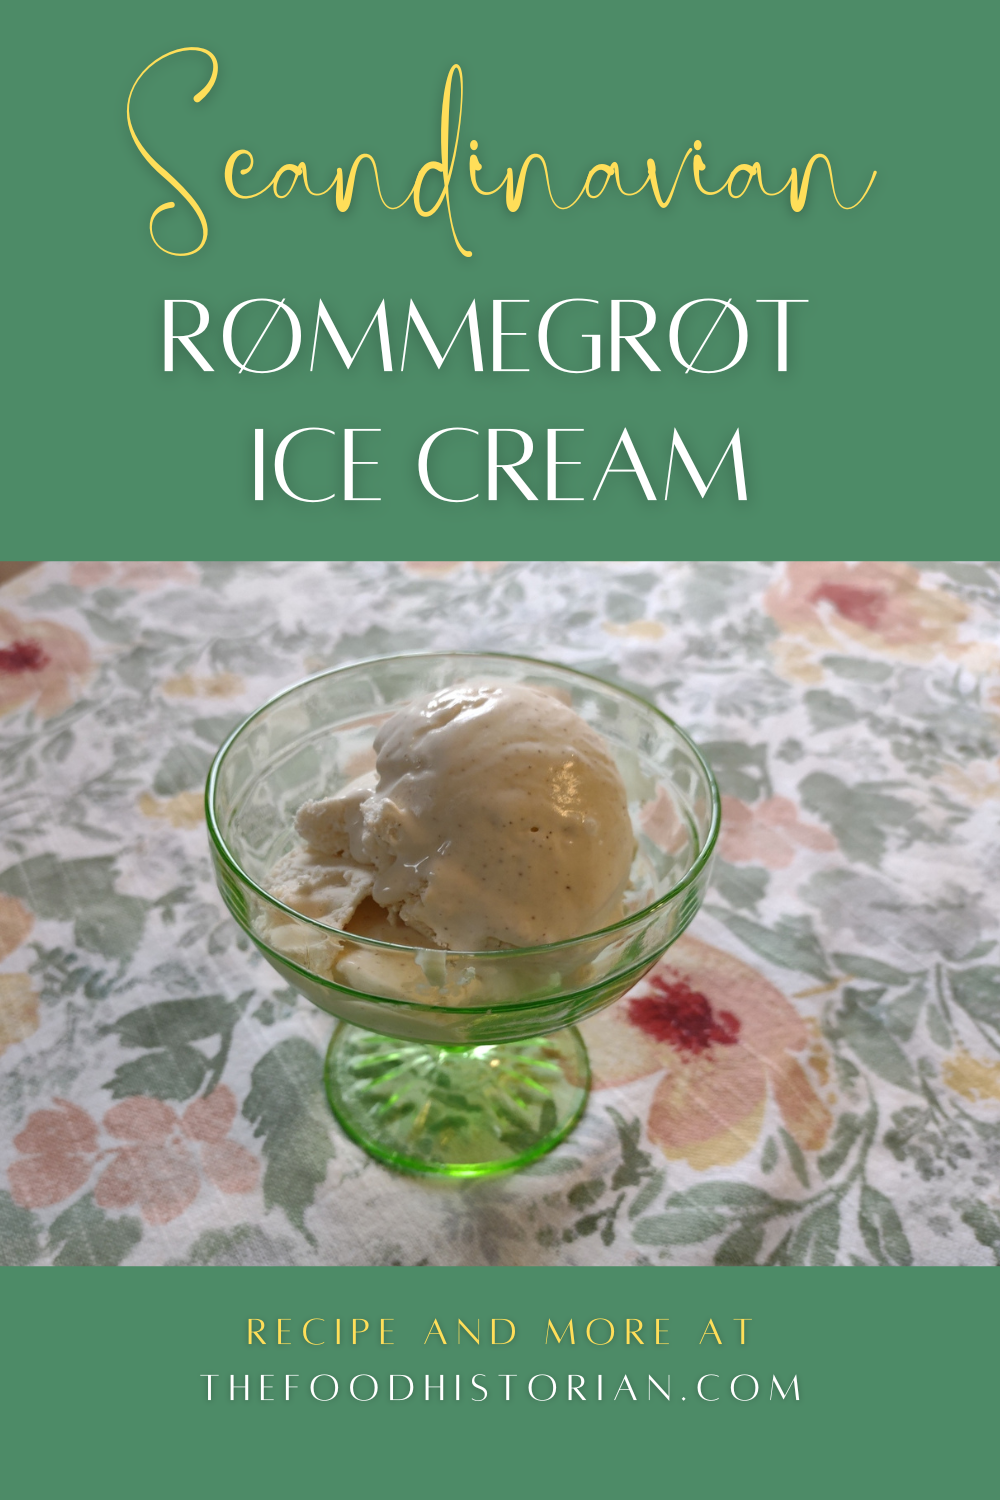
 I can take zero credit for coming up with this genius recipe. That 100% goes to Nevada and her North Wild Kitchen, which is where I first found her recipe for rømmegrøt ice cream. You may be asking yourself, what on earth is rømmegrøt? Rømmegrøt is a traditional Norwegian porridge made from flour and heavy cream, usually served with cinnamon and sugar at Christmastime. The term rømmegrøt means "sour cream porridge," and in Norway the traditional recipe often calls for a mixture of sour cream and milk. But for whatever reason, here in the States, it is almost exclusively made with plain heavy cream. Interestingly, as far as I can tell, the taste is not particularly different, because this ice cream is made with sour cream and it tastes exactly like the rømmegrøt I grew up eating. (If you're interested in the original rømmegrøt, check out my patrons-only post on Patreon, complete with a recipe!) The "real" rømmegrøt is incredibly rich. The flour makes for a smooth, creamy pudding-like texture and as it cooks with the heavy cream it "splits" and "makes" its own melted butter sauce as the flour binds to the dairy proteins in the heavy cream. Historically its richness made it the perfect food for winter holidays, which is why it is so often associated with Christmas. This is also perhaps why soured cream was used, instead of fresh. Cows generally stop producing milk once their offspring are weaned, so winter is the time a lot of cows would "dry up" until they got pregnant again. If a family only had one cow, it would be impossible to get fresh dairy year-round. Rømmegrøt is also a traditional dish for new mothers - the rich but easily digested food helped them recover from the trauma of childbirth, and ensured they got enough calories to keep their babies well-fed. But while this food is, indeed, delicious, eating a rich, stick-to-your-ribs dish in the summer heat is not exactly appealing. Enter the genius rømmegrøt ice cream. Any purchases from links below will result in a small commission for The Food Historian. Rømmegrøt Ice CreamI'm giving you this recipe because although Nevada's North Wild Kitchen recipe is marvelous, I tweaked hers just a little. Fair warning that you will need an ice cream maker for this one. (We got this one as a wedding present and love it.) 12 ounces full fat dairy sour cream (1/2 of a 24 ounce carton) 1 1/2 cups heavy cream 3/4 cup granulated sugar 1/2 teaspoon ground cinnamon In a pourable container, mix all ingredients and whisk well to combine (you could stop at this point and just eat the pourable mix with a spoon, and I always lick the bowl). Pour into the ice cream maker and start. When the ice cream is no longer turning over in the maker, it's pretty much done. You can pack it into a freezer container (these are nice) or serve immediately. Rømmegrøt ice cream has a tangy sweet flavor and including the cinnamon in the ice cream makes all the difference, for me. You can eat it on its own, but it also pairs well with apple pie or crisp, blueberry, blackberry, rhubarb, or strawberry desserts, and gingerbread. I had originally intended to make a big strawberry rhubarb crisp for the party to go with this ice cream, but ran out of time. And since I made two batches of rømmegrøt ice cream in advance, it almost got forgotten altogether! I pulled it out last minute for anyone who had room for a little more dessert. While everyone enjoyed it, I think I was the only one who had ever tasted rømmegrøt before, so perhaps it's slightly less of a delight without the taste memories to work with. I guess this just means I'll have to throw a Scandinavian Christmas party to introduce everyone to the joys of original rømmegrøt! 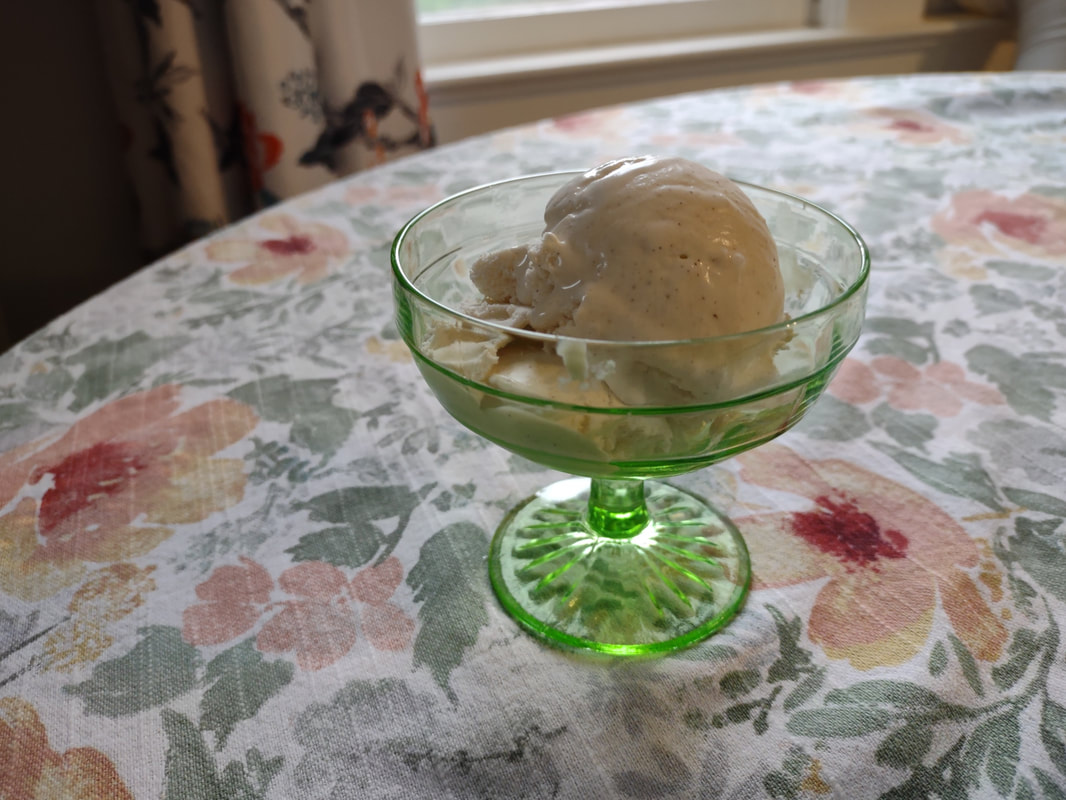 A lonely little vintage green uranium glass sherbet cup of rømmegrøt ice cream. Not quite forgotten! And so delicious. The Food Historian blog is supported by patrons on Patreon! Patrons help keep blog posts like this one free and available to the public. Join us for awesome members-only content like free digitized cookbooks from my personal collection, e-newsletter, and even snail mail from time to time! Don't like Patreon? Leave a tip!
0 Comments
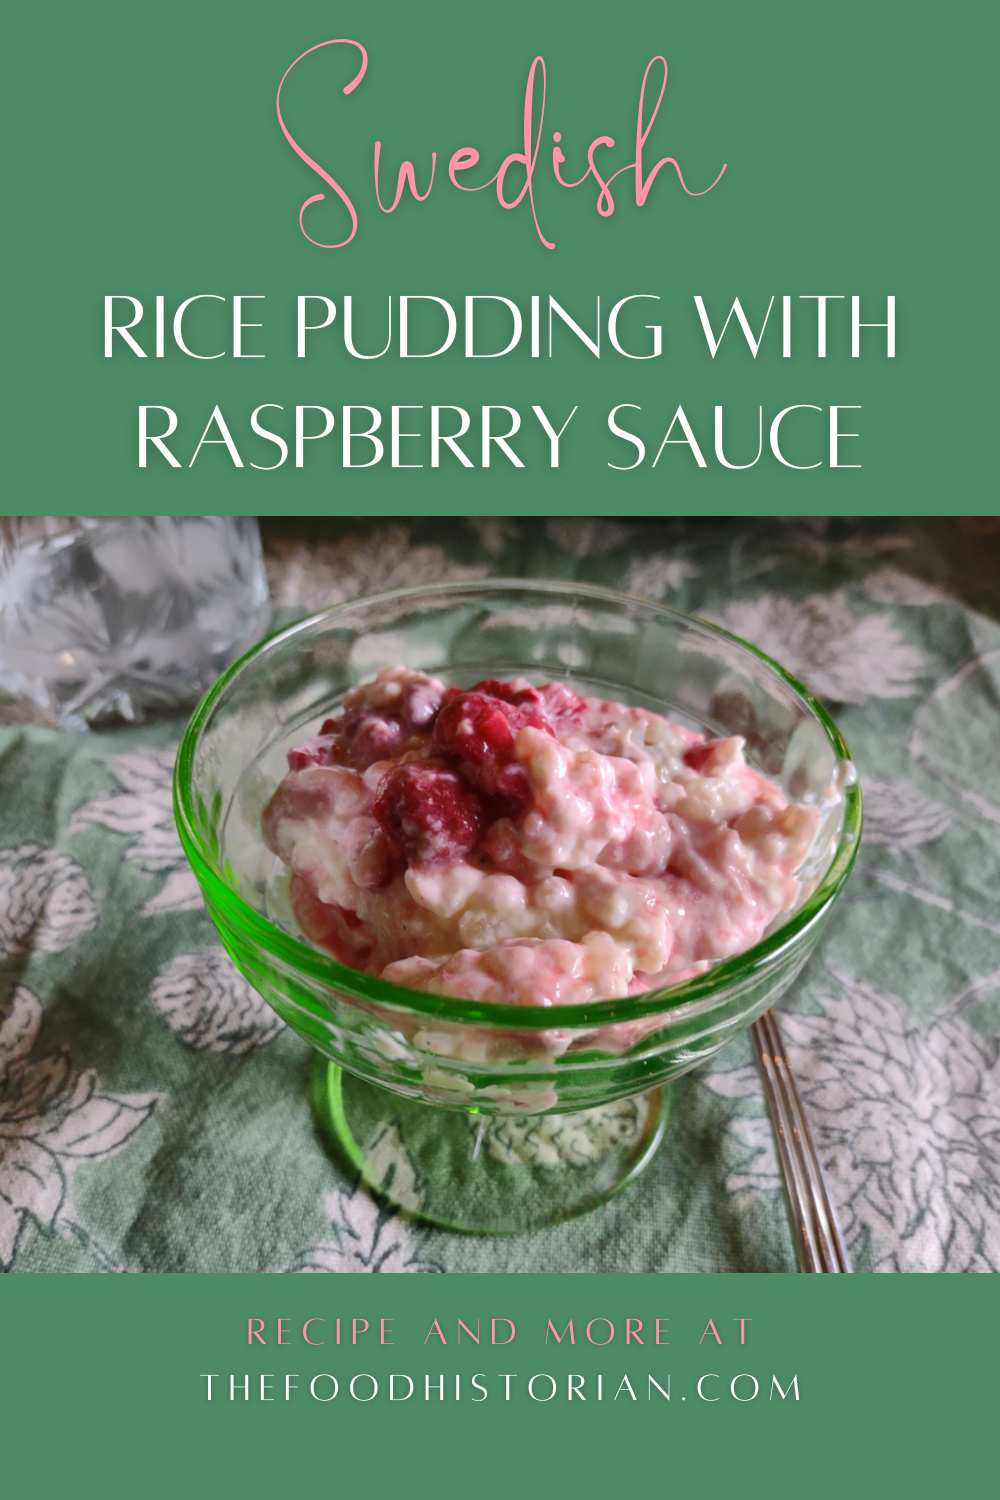 Nothing says midsummer to me like creamy, cold, Swedish rice pudding with raspberry sauce on top, so I knew this had to be one of the desserts I made for my Scandinavian Midsummer Porch Party, as it's one of my favorite desserts. Rice pudding is very typically a Scandinavian Christmas dish, but I grew up eating it much more often at midsummer than any other time of year. Our local Swedish Society would always make vats of it (and still does!) for the Scandinavian Festival in my hometown every year. Although I've been offered it in the past, I sadly don't have that original recipe! So I did the best I could doctoring up my favorite recipe for rice pudding, and it turned out better than I imagined, so I'm not sure I'll ever go back. Scandinavia has a long history of porridge - grains cooked in water or milk - and the stick-to-your-ribs-ness of porridge spills over into holiday traditions. Christmas was an especially important time to consume a lot of calories, not only to celebrate, but to keep warm. But rice is not native to Scandinavia, so what gives? This article gives a great overview of the history of Christmas rice pudding in Scandinavia in general, but suffice to say that, like most European Christmas traditions, it all goes back to the Medieval period and expensive imports from the Far East. Rice replaced locally grown grains like barley and its relative expense and scarcity joined other imported goods like cinnamon (and ginger, black pepper, and cardamom), sugar, raisins, and almonds supplemented by butter, cream, and milk to make up the bulk of holiday ingredients for what are now traditional Scandinavian treats. As Swedes got wealthier and rice and sugar got cheaper and more widely available, rice pudding became more of a year-round treat. In the Midwest, you're more likely to find people with memories of eating "glorified rice" (basically a rice and cool whip "salad" with canned fruit, especially maraschino cherries) outside of the holidays than cold rice pudding. But although I also loved glorified rice growing up, it is the taste of creamy, cold, eggless rice pudding topped with sweet-tart raspberry sauce that brings back so many fond memories. It doesn't hurt that it's absolutely delicious. Swedish Rice Pudding with Raspberry SauceThis is a very straightforward recipe, with just a few changes from my original version. I also did 1.5 times the original recipe, as I knew I was serving a crowd. We still had quite a bit leftover, but I didn't mind in the least, and the leftovers disappeared after just a few days. 1 1/2 cups arborio rice (also known as "pudding rice" or "risotto rice") 9 cups whole milk 3/4 cup sugar 1 cup golden raisins 1 cinnamon stick 1+ cups heavy cream 1 bag frozen raspberries, thawed sugar In a large, heavy-bottomed pot, combine the rice, sugar, raisins, cinnamon stick, and milk, and give it a stir to make the rice separate. Bring the pot to a near-boil (the milk goes from flat to boiling over in an instant, so keep an eye on it!), stirring occasionally to keep it from sticking/burning, then reduce the heat to a low simmer and continue to cook, stirring occasionally at first and more frequently later on until most of the milk is absorbed and the remaining liquid has thickened into a sauce. Because you want to serve this chilled, leave it to be fairly soupy, as the rice will continue to absorb liquid as it cools. Once the pudding is cool and you are ready to serve it, add the now very-thick rice pudding to a very large bowl (I used one closer in size to a punch bowl than a mixing bowl) and with a wooden spoon stir in heavy cream until the rice pudding is soft and creamy again. Open the bag of raspberries and add a few tablespoons of sugar and stir to combine. You can do this before you add the heavy cream to the rice pudding so that the thawed raspberries have time to macerate in the sugar. When ready to serve, top the extra-creamy rice pudding with the raspberries and devour. You probably won't have the same memories I do, but your tastebuds will thank you. 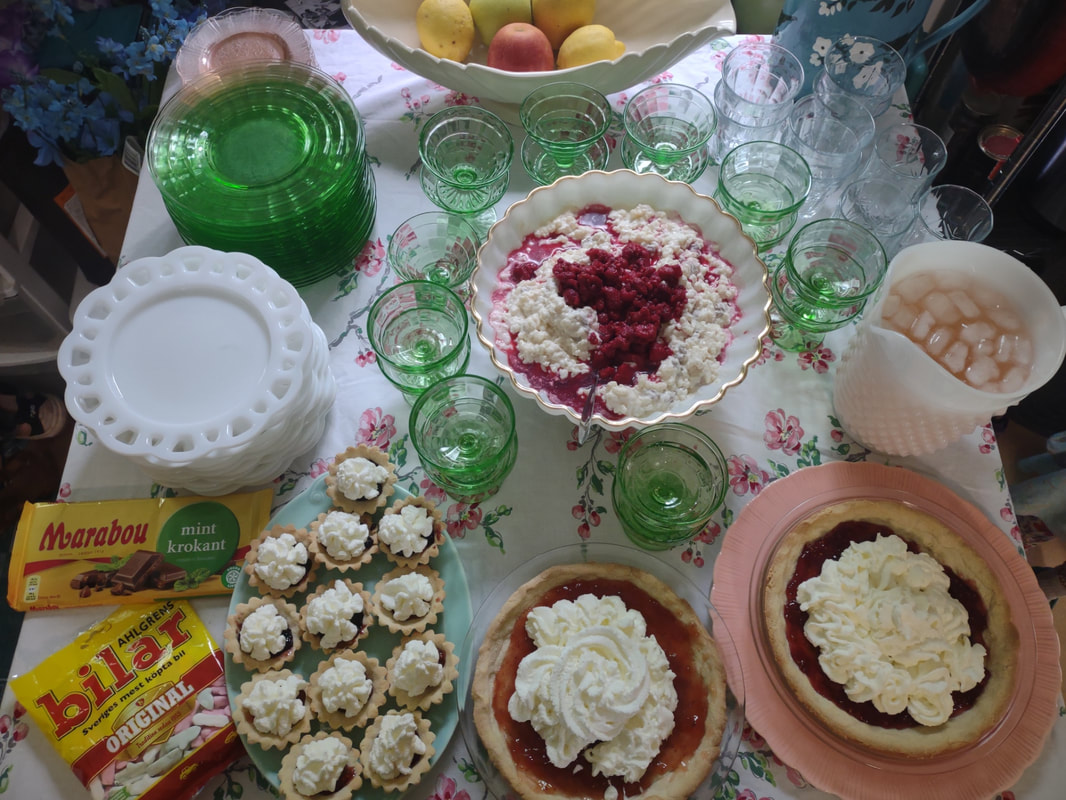 The giant milk glass bowl of rice pudding and raspberry sauce is the centerpiece of this dessert table, which also includes sandbakkelse and Swedish chocolate and gummies. 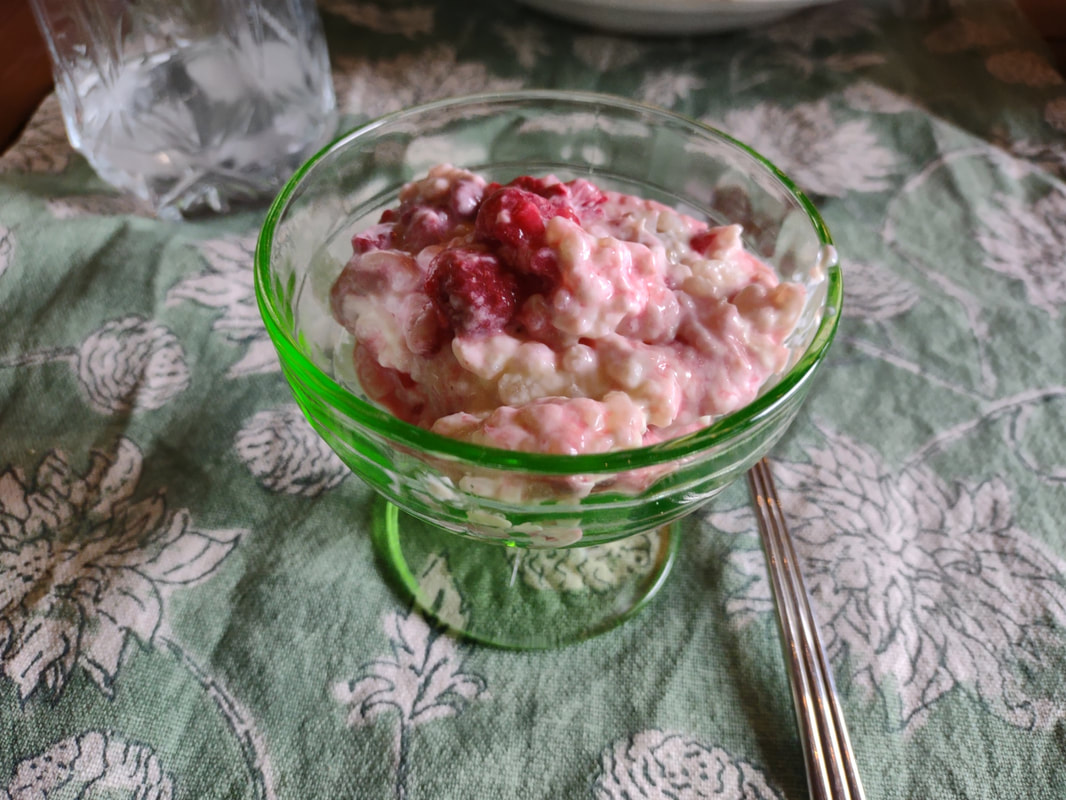 A scoop of rice pudding with raspberries in a vintage green uranium glass sherbet cup. I may or may not have had three of these bad boys over the course of the evening. The Food Historian blog is supported by patrons on Patreon! Patrons help keep blog posts like this one free and available to the public. Join us for awesome members-only content like free digitized cookbooks from my personal collection, e-newsletter, and even snail mail from time to time! Don't like Patreon? Leave a tip!  For a lot of Norwegian-Americans, sandbakkels (the plural in Norwegian is actually sandbakkelse, but we can Americanize) remind them of Christmas. The crisp, buttery cookies are essentially dense tart shells, similar to shortbread, but more crumbly. Meaning "sand pastry," sandbakkels are baked in special fluted tins and contain either ground almonds or more commonly in the U.S., almond extract. Despite the fact that they are usually served plain here in the states, those little tart shells just begged to be filled. So when I was planning my Scandinavian Midsummer Porch Party, I thought they would make the perfect little dessert. The problem was, what recipe to use? One of my best-loved talks is on the history of Christmas cookies, and I've got a whole section on Scandinavian ones. So I turned to my former research and remembered the PAGES of sandbakkel recipes from Recipes from Many Lands, a little cookbook of recipes submitted by North Dakota housewives and home economists around the state and published in July, 1927 as Circular 77 of the Agricultural Extension Division of North Dakota State University. I've clipped all the Sandbakkelse recipes (also Americanized to "Sand Tarts") and posted them below. 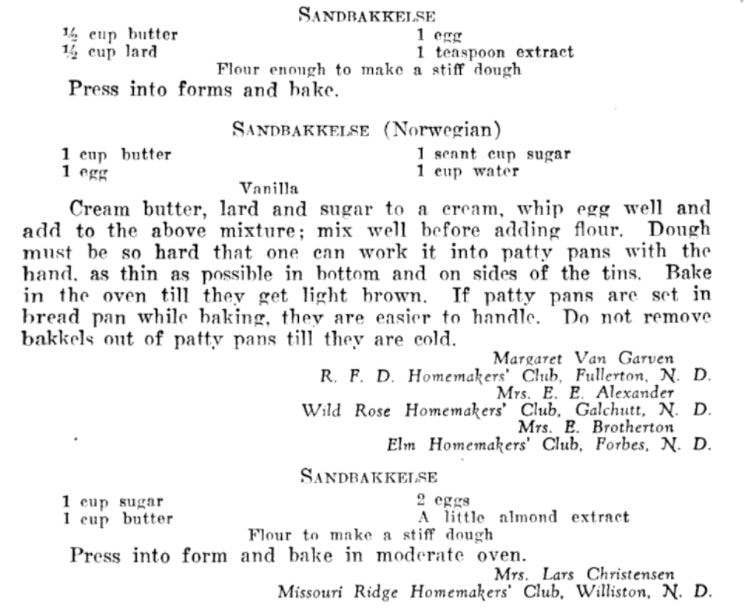 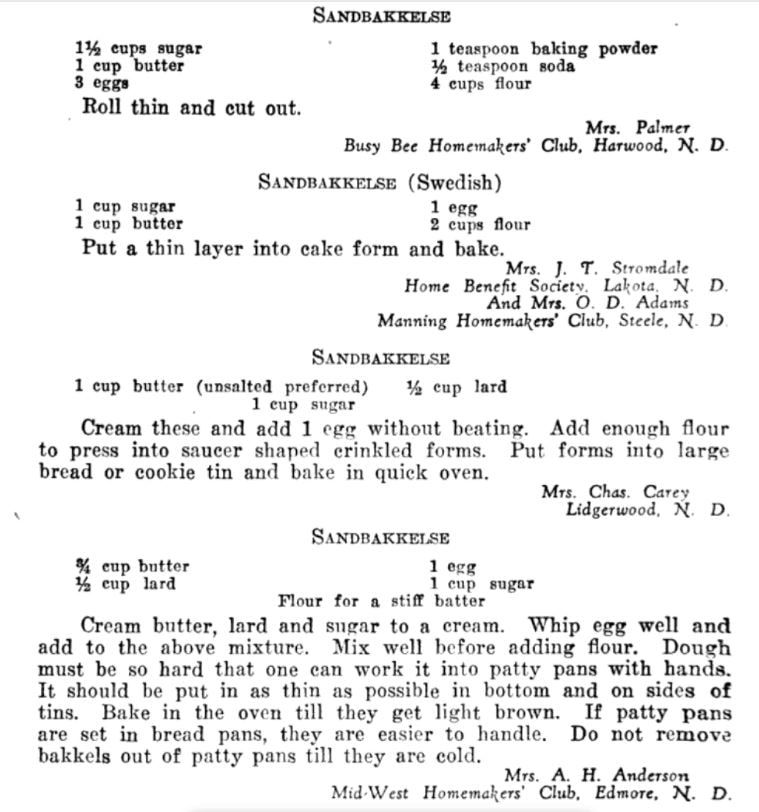  The vast majority of these recipes are very similar - almost all call for a mixture of butter and lard, sugar, an egg or two, almond extract, and flour. The instructions are usually quite vague. Some don't even include amounts of flour. Some just say to press into tins and bake. So I decided to take the best advice from all the recipes and the Swedish Sandbakkelse recipe (which actually had measurements for everything) and go from there. But first, I had to find my sandbakkel tins! At some point I either stole them from my mother (she always had too many and never used them), but I had a little original box of vintage sandbakkel tins in mint condition hiding in the bottom of a kitchen drawer. Alas, I only had a dozen of them, so I had to make due with the recipe in other ways, which you'll see below. But how cute is this box? With the original hardware store price tag!  The little white box with a drawing of the fluted tin reading "Sandbakkel Set Tart Tins" and a pink "Our Own Hardware" pricetag in the corner for $1.09.  The box reads "Sandbakkel Set (Round) Style No. 45 The Gladd Company, Minneapolis, Minn." because there are several styles of fluted sandbakkel tins, including heart-shaped and diamond-shaped, in addition to the more common round ones. Scandinavian Sandbakkelse Recipe (1927)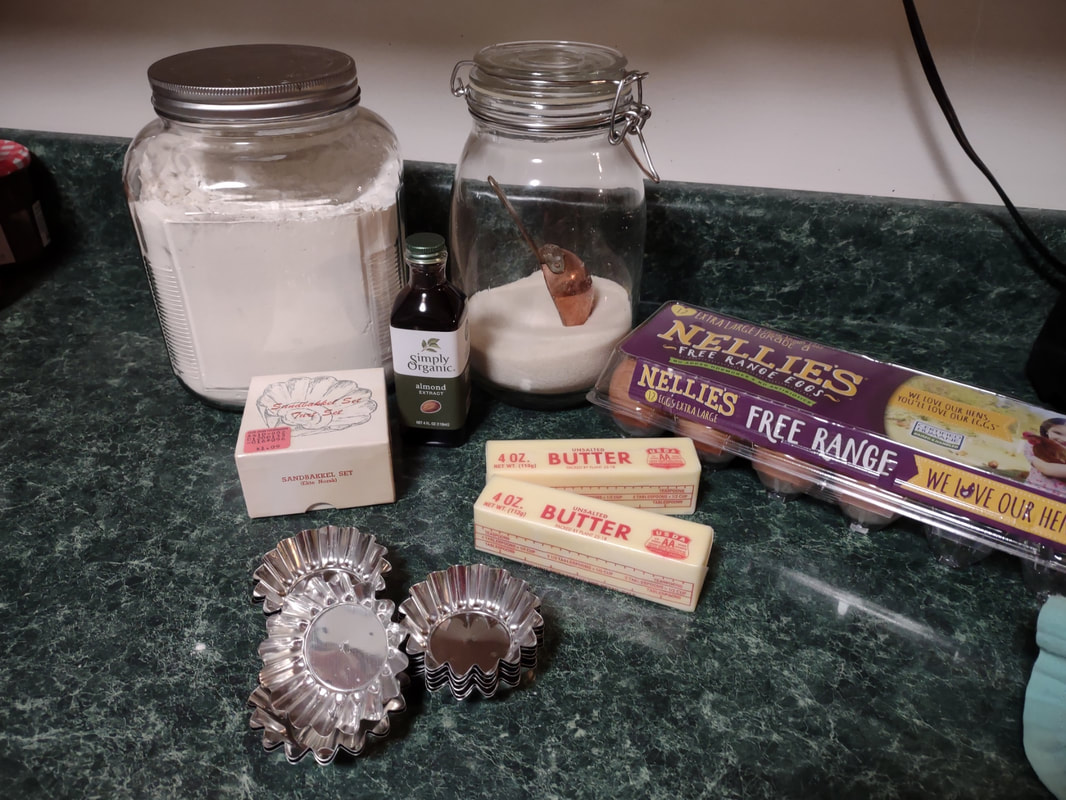 Sandbakkelse ingredients - flour, sugar, butter, eggs, almond extract, and the tins. The recipe is pretty straightforward, and if you don't have sandbakkel tins, never fear! There's a hack suggested in the historic recipes that I'll outline below. 1 cup softened butter (2 sticks) 1 cup granulated sugar 1 egg 1 teaspoon almond extract 2 cups flour (plus more to knead) Preheat the oven to 350 F. In a large bowl, cream the butter and the sugar together, then add the egg and extract and mix until smooth. Add the flour, a little at a time, until the dough starts to come together, then knead with the hands until smooth. Take half dollar sized pieces of dough and press into the tart tin, pressing the dough all the way out to the edge of the tin, but not over the edges. Make sure to press well to ensure good fluting. The dough is buttery enough that you won't need to grease the tins. Place tins on a sheet pan and bake 12-15 minutes or until golden brown. Let cool in the tins. Uhoh - you've still got a ton of dough left, and your sandbakkel tin set only came with 12 tins! What do you do? Well dear reader, you follow the advice of those sage 1920s North Dakota farm wives, who maybe didn't have sandbakkel tins either, and you press the dough into a pie plate, and bake it that way. And instead of filling the adorable individual tarts with jam and whipped cream, you fill a whole pie worth and cut it into slices to serve. Easy peasy! You could probably also use muffin tins, in a pinch. But the fluting is the pretty part, so if you can find sandbakkel tins, use them! I actually took a fair number of photos this time, so enjoy the process via the power of film: 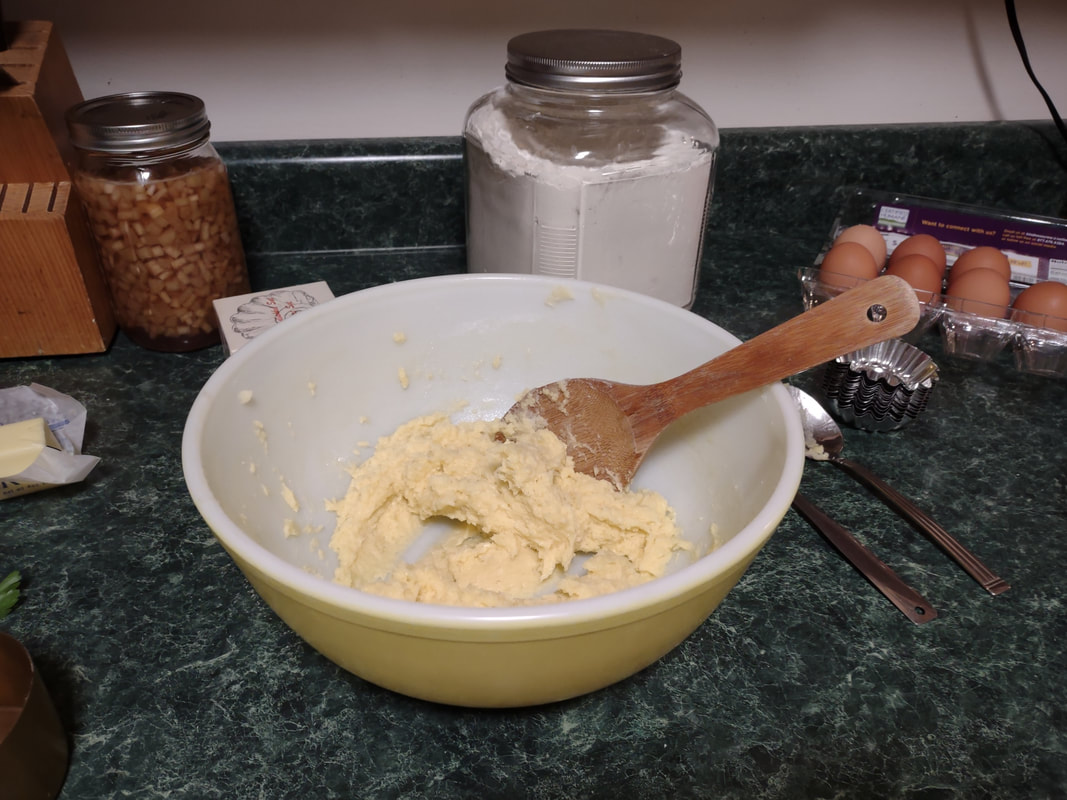 Creaming the butter and sugar by hand, because I don't like to wash my electric mixer beaters. 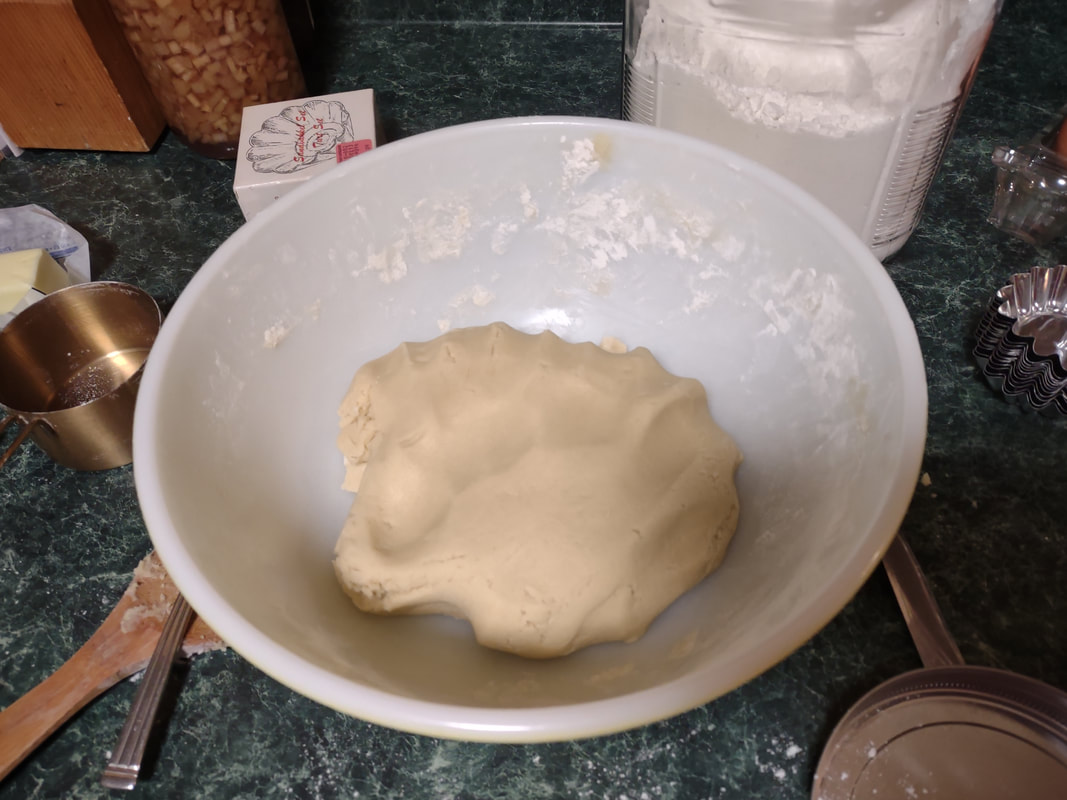 The soft dough that wouldn't hold anymore flour without getting tough. 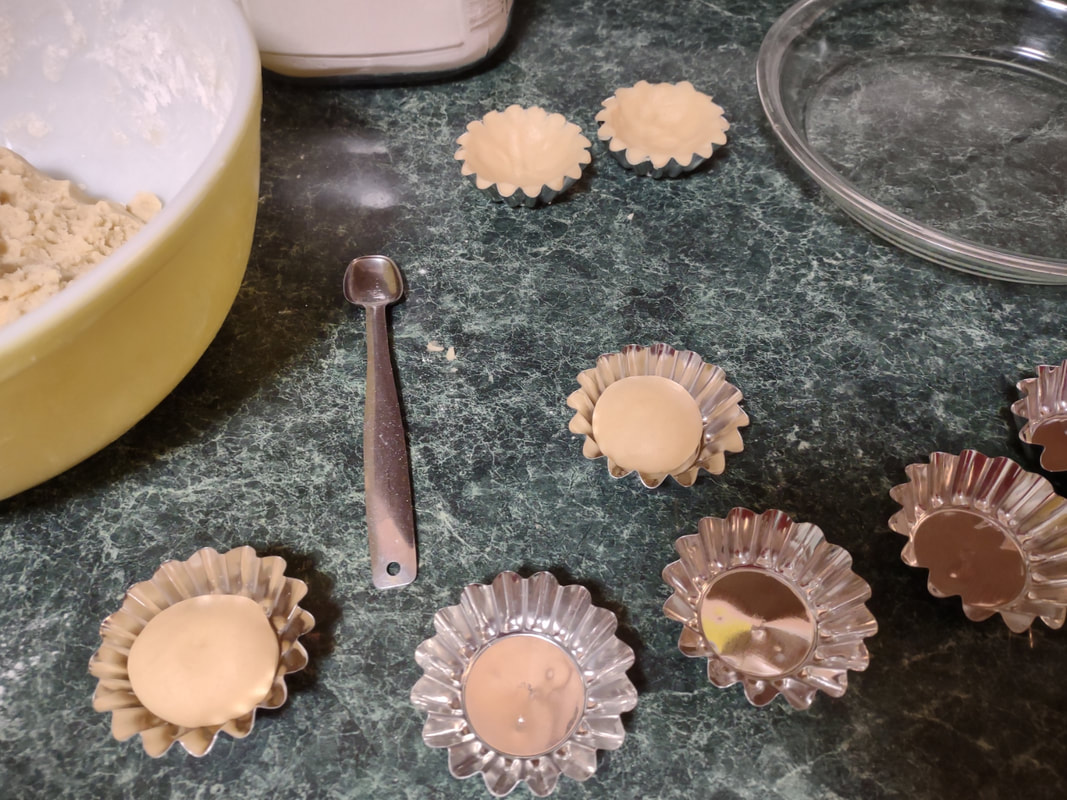 Pressing the dough into the tins (they're so shiny!) with some rounds of dough for amount gauging. 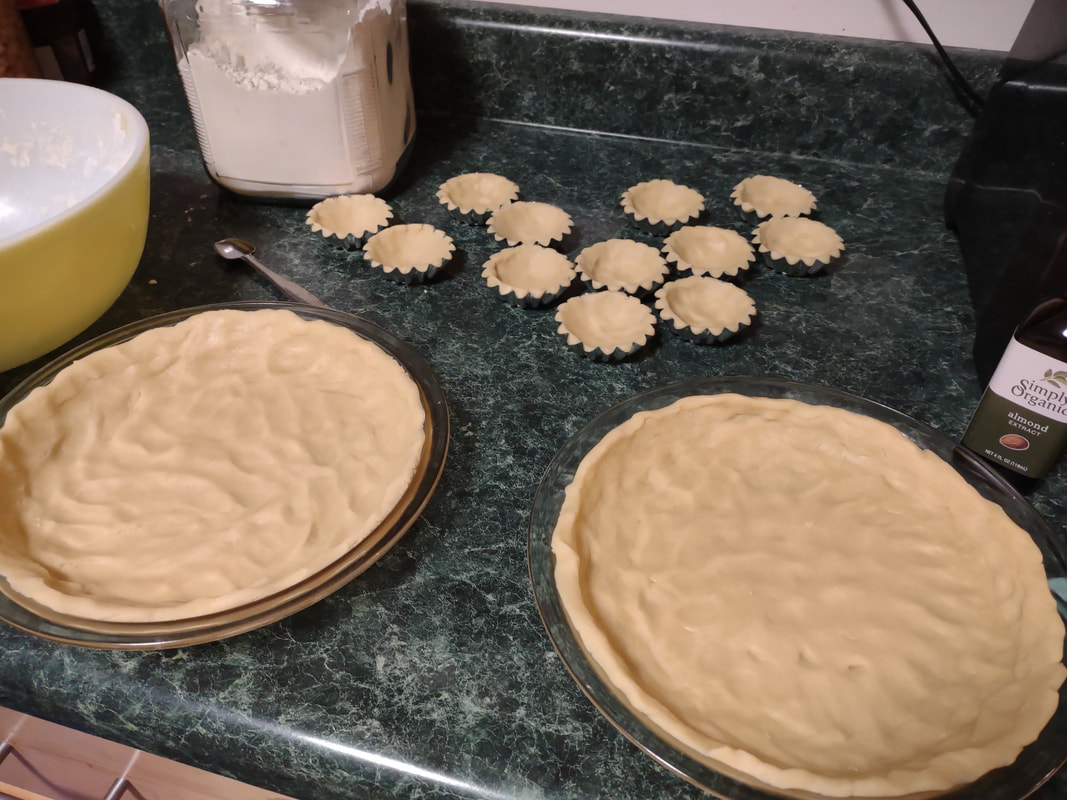 The recipe made enough dough for 12 sandbakkel tins and two pie plates! If I had enough tins, I'd estimate 3 dozen tarts total. 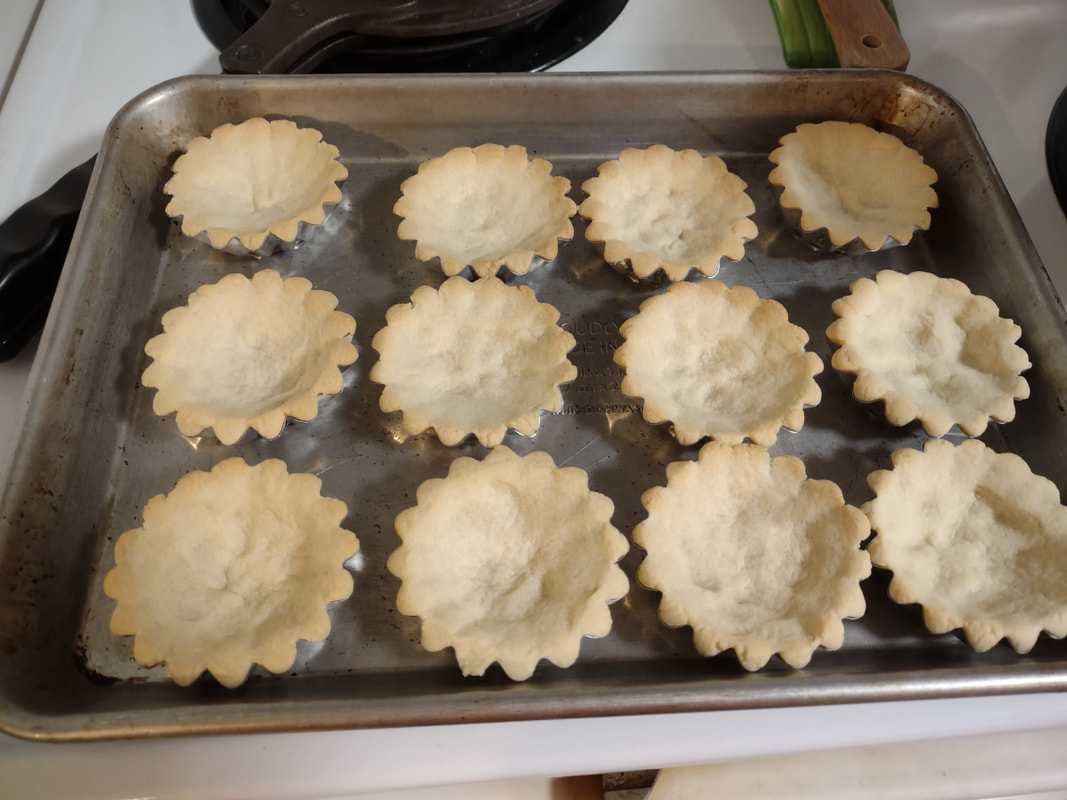 The finished tarts, coming out of the oven on their sheet pan, golden brown. 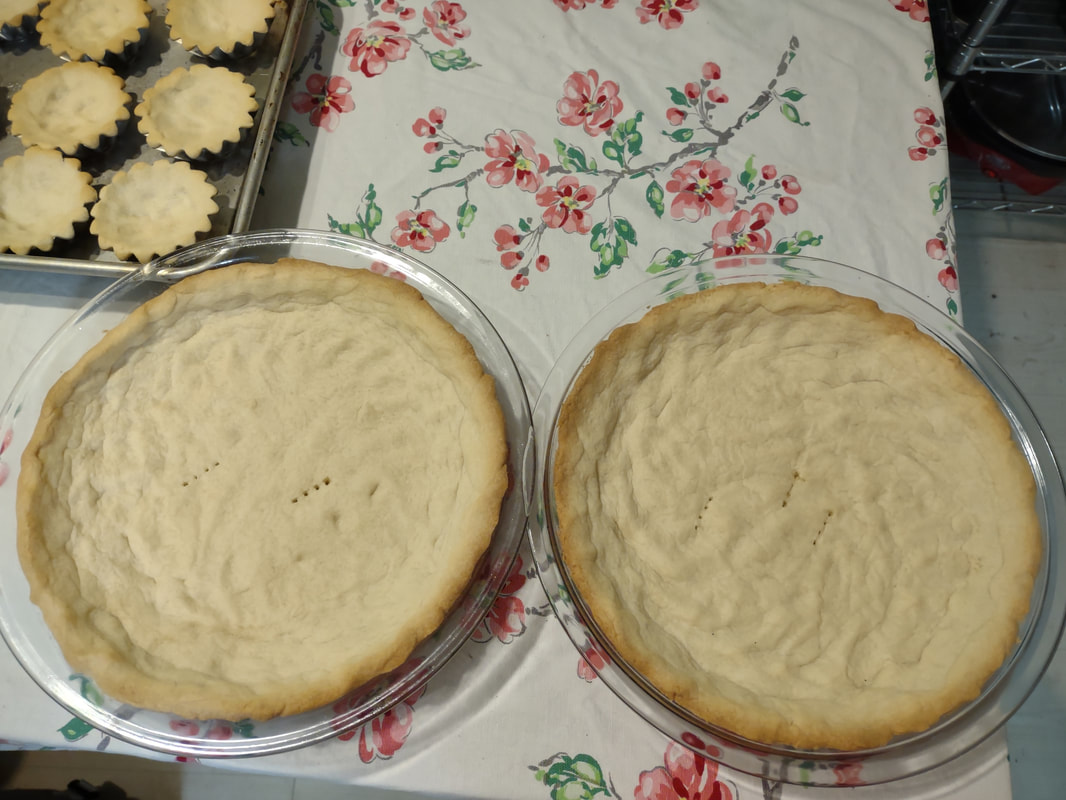 The sandbakkels and pie plate sized ones cooling. The pie versions have fork marks because they were puffing up in the middle during baking. 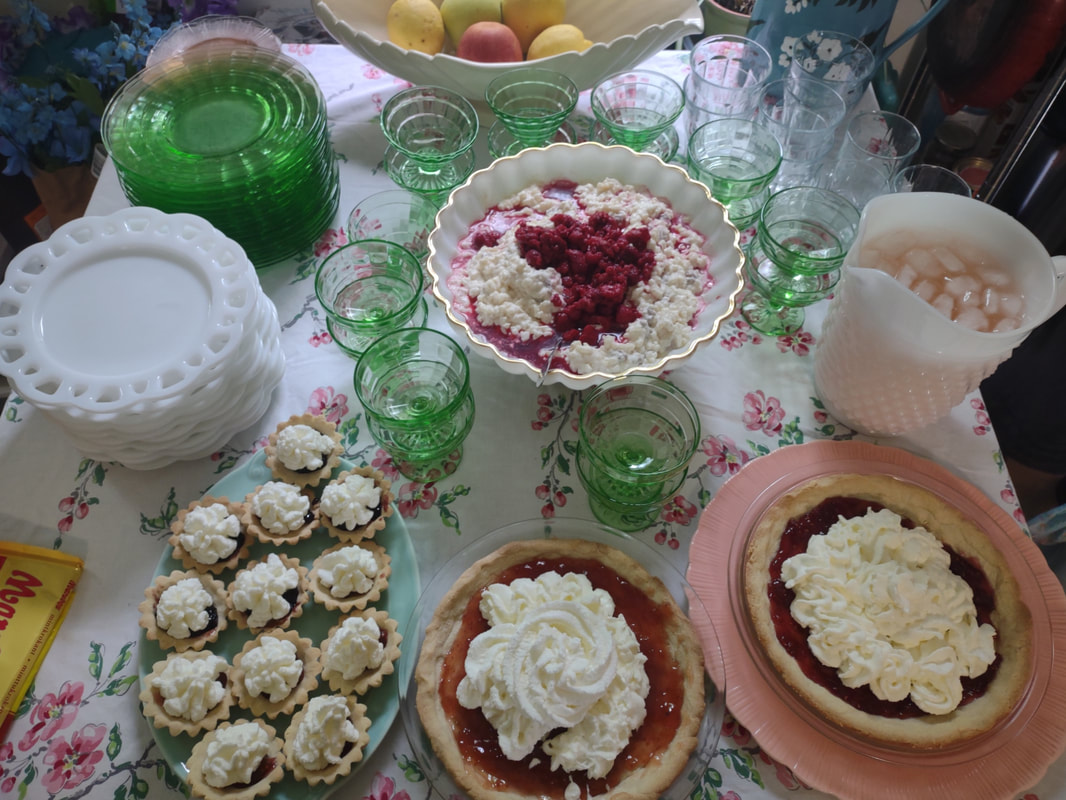 The finished dessert table! Sandbakkelse in the foreground. Tarts were filled with strawberry, blackberry, or a special homemade raspberry-rose wine jam that was to die for, and then topped with homemade whipped cream. In all, the sandbakkelse were among the easiest of the Scandinavian cookies to make. Which is probably why in Norway they are traditionally the first Christmas cookie that kids help make. But they're not just for Christmas! They were delightful as a summer treat. You could also fill them with pastry cream, fresh fruit, chocolate, or whatever you like! But berry jam and whipped cream felt the most appropriate for Midsummer. If you'd like to buy your own sandbakkelse tins, Bethany Housewares makes the round kind, and you can get the fancy shapes from Norpro. And if you are a whipped cream fiend like my husband (and to a lesser extent me), and you admired the pretty piping, I can't recommend enough getting a professional, reusable whipped cream dispenser. We love this one. When you factor in buying the heavy cream and the nitrous oxide cartridges, they're not much cheaper than buying the disposable cans, but the whipped cream is some of the best you'll ever taste and you waste a lot less packaging. Plus the cream, once charged, keeps in the fridge for as long as the heavy cream was good. A little shake and it restores to fluffy deliciousness. Happy baking, happy eating! If you purchase anything from the links, The Food Historian gets a small commission! 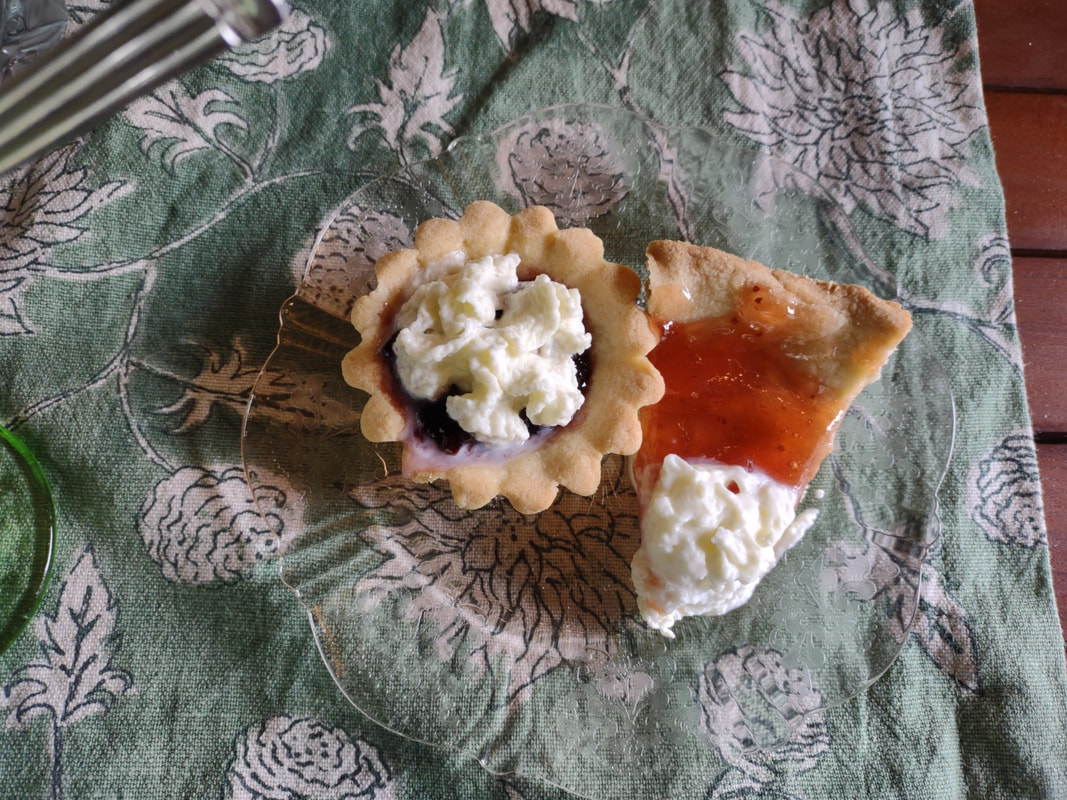 A blackberry sandbakkel and a slice of giant strawberry sandbakkel, on a vintage pink Depression glass plate. You know these were not the first ones I ate. The Food Historian blog is supported by patrons on Patreon! Patrons help keep blog posts like this one free and available to the public. Join us for awesome members-only content like free digitized cookbooks from my personal collection, e-newsletter, and even snail mail from time to time! Don't like Patreon? Leave a tip!  These were, shockingly, the runaway smash hit of my Scandinavian Midsummer Porch Party. And here I thought no one would like them! But they were the first to go of the open-faced sandwiches on offer and the only ones to have every last sandwich devoured. I probably should have made more... You may be asking yourself, what the heck is a "Ski Queen Brunost Open-Faced Sandwich?" Dear reader, Ski Queen is a brand of brunost widely available here in the United States. And what exactly is brunost? And how is it different from gjetost? Did you even know you needed the answers to these questions? Brunost is literally Norwegian for "brown cheese," and it is a very special, very specific style of cheese that is not really a cheese at all. Made from caramelized whey, this super-smooth, sweet and salty cheese can be made from either cow's milk whey (brunost) or goat's milk whey (gjetost). Whey-based cheeses, or mysost, date back over 2,000 years in Scandinavia, with the earliest evidence found on Jutland, Denmark. Going back hundreds of years, Norwegian dairy farmers perfected the use of whey, the milky yellow liquid leftover from processing butter. The original brown cheese, mysost, was literally just whey boiled until all the water evaporated and it caramelized into a sweet, grainy, fudge-like substance. But brunost is cow's milk whey that has cream and milk added in, which makes it creamy, smooth, and addictive. This addition is attributed to dairywoman Anne Hov, who helped revive the failing dairy industry in Gudbrandsdalen, Norway, in the 1860s. Later variations included goat's milk (gjetost) and "ekte gjetost" or "real goat cheese" is a brown whey cheese made from only goat's milk whey and goat's milk - it has a much stronger flavor than brunost and a sweet-salty tang. Brunost was typically served with open-faced sandwiches, on Norwegian heart-shaped waffles, or eaten plain as a snack. Modern cooks have used it in all sorts of ways, but one of my favorites is a creamy gjetost sauce for chicken. Today, most commericial brunost is produced by Tine - a Norwegian dairy cooperative that started in the 1850s and is named after the special bentwood boxes Norwegians used to store butter in the days before refrigeration. Tine also produces Jarlsberg. In the United States, you can get the cow's milk brunost and goat's milk ekte gjetost under the Ski Queen brand, so named because of the association in Norway of brunost with skiing, since brunost holds its shape under a wide range of temperatures, and its sweetness and fat helped replenish energy after a long day of skiing. Brunost Open-Faced Sandwiches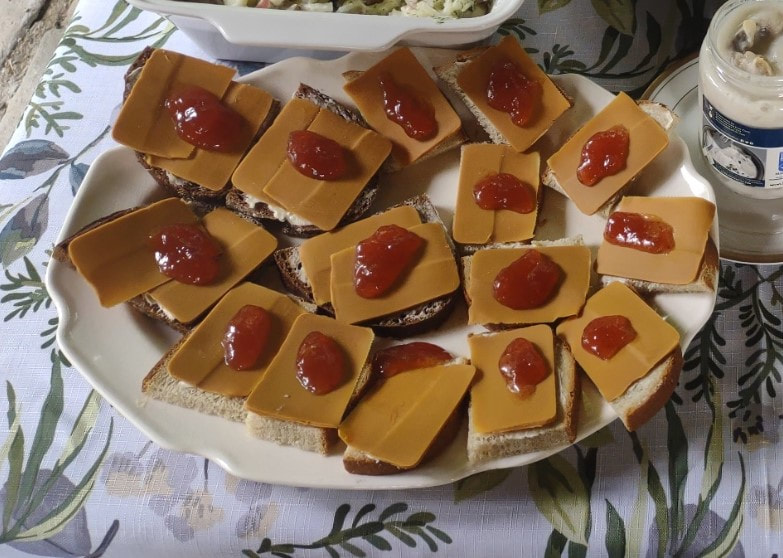 The full platter of brunost sandwiches on a mix of rye and pumpernickel bread. This really will win converts. If you want to be bold, have a tasting of both the milder, sweeter brunost and bolder gjetost. thinly sliced buttered rye sliced brunost a dollop of strawberry jam You'll need your ostehøvel to get appropriately thin slices - a knife will be too thick. Make sure to get high quality strawberry jam - not too sweet, not too thick (my favorite is Welch's natural strawberry). These little sandwiches are basically like grownup candy. You can see why they are so popular in Norway and why almost everyone who tries it loves brunost. Have you ever tried it? 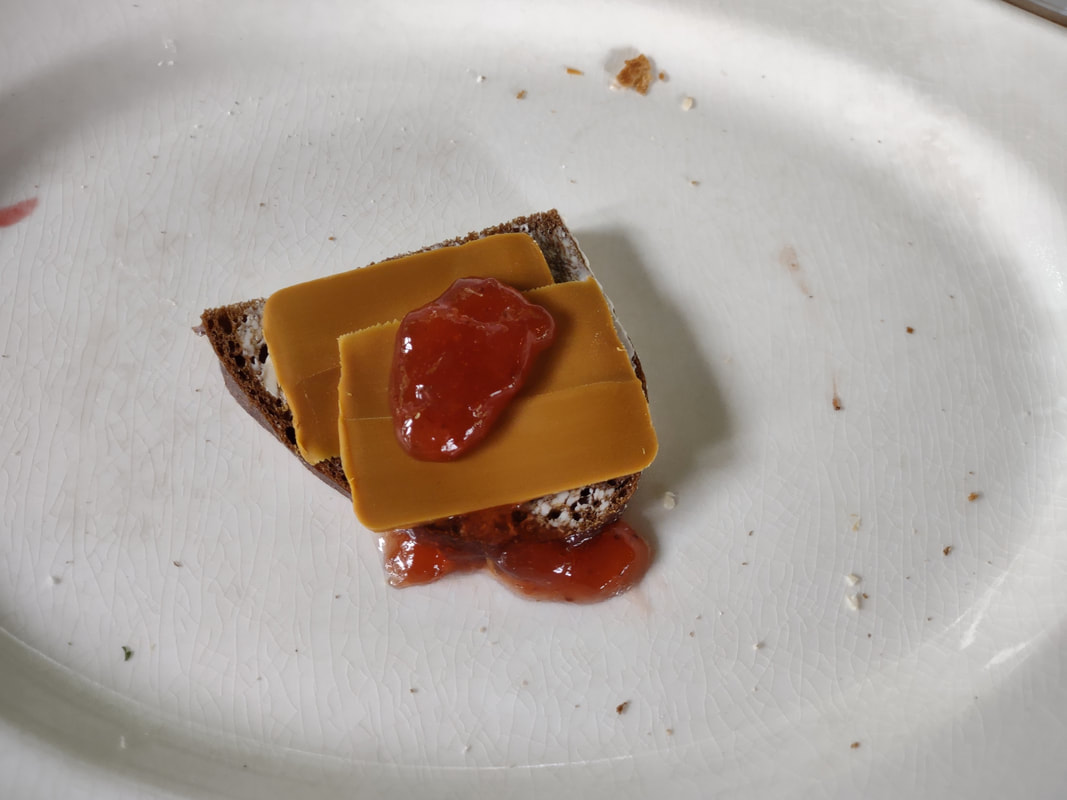 The last lonely sandwich! It didn't last long. The Food Historian blog is supported by patrons on Patreon! Patrons help keep blog posts like this one free and available to the public. Join us for awesome members-only content like free digitized cookbooks from my personal collection, e-newsletter, and even snail mail from time to time! Don't like Patreon? Leave a tip! 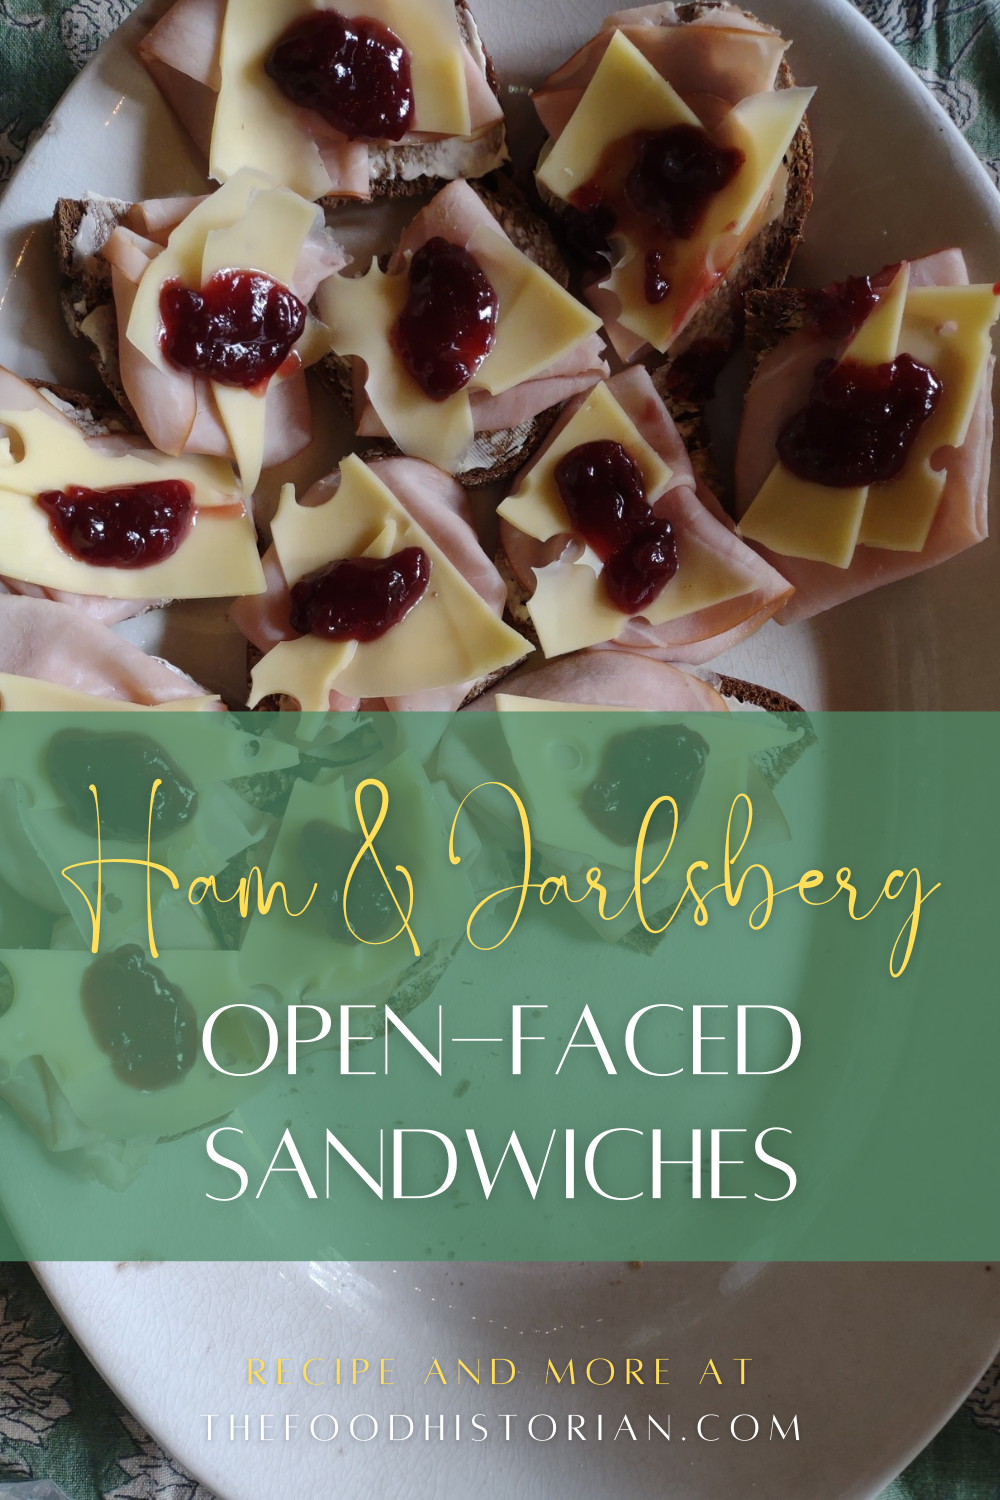 When planning the menu for my Scandinavian Midsummer Porch Party, I wanted to make sure to have some sandwiches hearty enough to stand in for dinner. We can't all subsist on salads and dessert! But while these sandwiches are decidedly NOT friendly to folks who don't eat pork or meat (always make sure all guests can eat!), they are delicious and worth a try for those of you who do eat pork. Although many people don't realize it, ham is quintessentially Scandinavian. It is a popular Christmas and Easter dish, and the Danish pork industry supplies most of Continental Europe. We always had ham for Easter growing up, and sometimes for Christmas, too (along with Swedish meatballs). It's also a popular sandwich meat in the United States, where deli-style hams are very similar to those produced in Denmark. Jarlsberg is also a popular Scandinavian cheese here in the U.S. A Swiss-style cheese introduced to the dairy farms of Jarlsberg, Norway in the 1850s, it had disappeared by the 20th century. In the 1950s, scientists at the Agricultural University of Norway were intrigued by a graduate student's paper on the historic cheeses of Vestfold, Norway (where Jarlsberg is located) and set about to recreate the historic Swiss-style cheese. Rich and very butter, with extra-large holes, Jarlsberg is coated in red wax and the details of its production are a trade secret. Combining the two on pumpernickel rye with a dollop of lingonberry jam seemed like a match made in heaven, and I was right. Lingonberries, also sometimes known as partridgeberries or cow berries, are a relative of the cranberry. Lingonberries are native to the boreal forests of Scandinavia and the rest of Northern Europe, Russia, Alaska, Canada, etc. Tiny and tart, they feature heavily in Scandinavian cuisine, especially with game meats and in desserts and drinks. If you can't find lingonberry jam, you can substitute cranberry sauce, but it won't be the same. Ham and Jarlsberg Open-Faced Sandwiches with Lingonberry Jam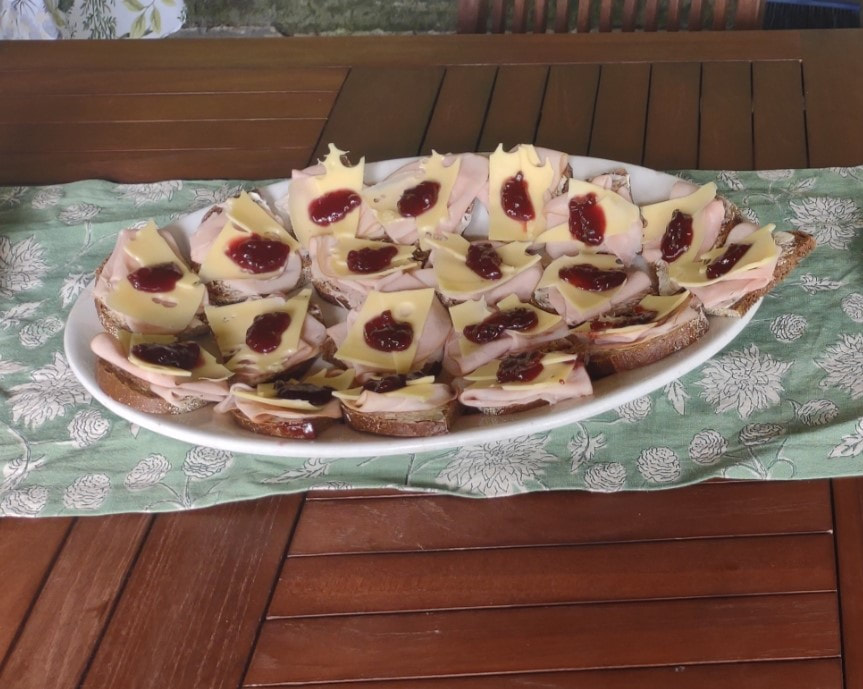 The giant platter of open-faced ham and Jarlsberg sandwiches with their ruby red dollops of lingonberry jam. thinly sliced sturdy pumpernickel bread butter shaved natural ham Jarlsberg cheese lingonberry jam or preserves Butter a slice of pumpernickel or rye bread thinly, edge-to-edge, and top with a slice or two of natural (I prefer bone-in) ham. Add a slice or two of Jarlsberg on top (use a Norwegian osthovel for best results!) and top with a small spoonful of lingonberry jam. The salty, fattiness of the ham, the buttery taste of the Jarlsberg, and the acid sweetness of the lingonberry jam work just wonderfully together. Plus they're pretty, too! You can serve these as part of a smorgasbord, like I did, or alone for a fancy lunch. The bread tends to dry out if left out too long, so if you have any party leftovers, be sure to seal and refrigerate to ensure freshness. I like to make the leftover open-faced sandwiches (if there are any!) closed by simply placing to of them together, open faces in! The Food Historian blog is supported by patrons on Patreon! Patrons help keep blog posts like this one free and available to the public. Join us for awesome members-only content like free digitized cookbooks from my personal collection, e-newsletter, and even snail mail from time to time! Don't like Patreon? Leave a tip! 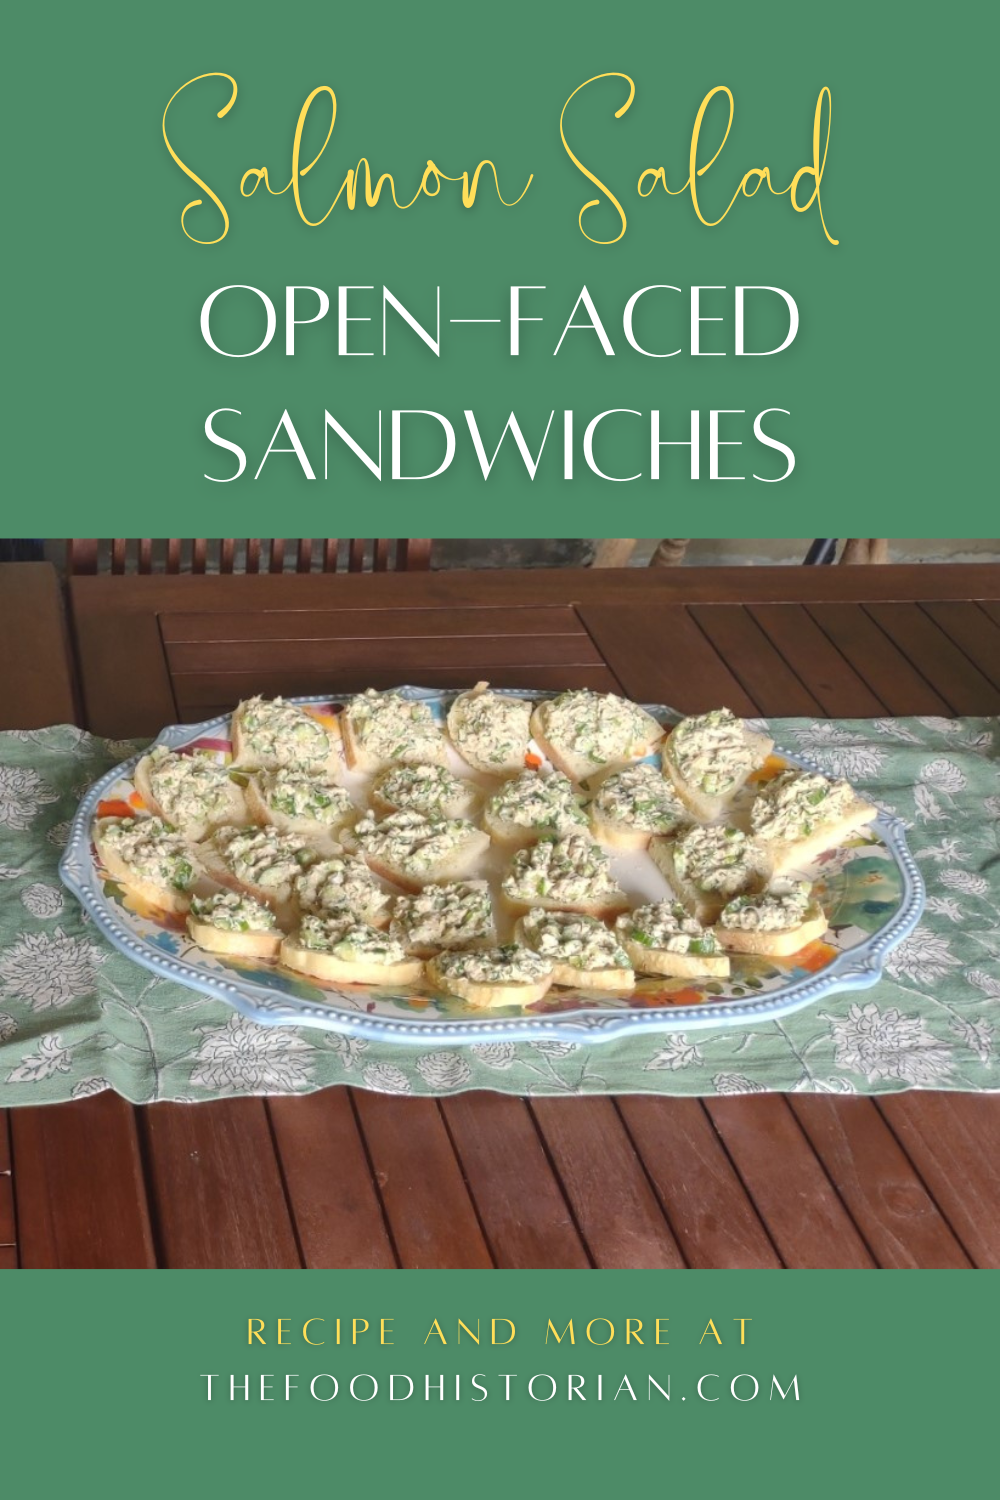 Salmon is a classic Scandinavian dish. Spring salmon runs up the fjords and rivers of Scandinavia from late May/early June through most of the summer. Salmon is eaten fresh, but it is also made into gravlax, a mild cold-cured dish made by burying whole salmon filets in a mixture of salt, sugar, and herbs. Salmon also features in many New England summer traditions, including Fourth of July menus, which consisted largely of salmon, new potatoes, and fresh peas. Historically, as with many springtime fish runs, salmon was inexpensive and easy to obtain, both in the United States and Scandinavia. Not so anymore. I wanted to serve salmon at my Scandinavian Midsummer Porch Party, but I was also short on time and feeding a crowd. I decided against the more intensive prep of a poached or grilled salmon filet and settled on the easier and more wallet-friendly canned salmon instead. I use the smaller tins of sustainably harvested wild-caught salmon that don't contain any skin or bones. The inspiration for this recipe came from a historic one I saw a while ago. Linda Hull Larned's One Hundred Picnic Suggestions cookbook, published in 1915, had a recipe for Salmon Salad which called for the use of rice, but offered an alternative of hard boiled eggs and cucumber. Since I was already making deviled eggs, I decided to go a little lighter and use just cucumber. Salmon Cucumber Salad Open-Faced Sandwiches The very large platter of salmon cucumber salad open-faced sandwiches from the party. This recipe makes a lot of sandwiches (enough for all of the ones pictured above), so feel free to cut the recipe in half if you're serving fewer people. 2 cans (5 oz. each) salmon 1 cup finely chopped English cucumber 2 scallions, sliced fresh dill, minced lemon juice or white wine vinegar salt pepper 1 tablespoon Dijon mustard mayonnaise Drain and flake the salmon, then stir in the cucumber, scallions, and fresh dill. Add salt and pepper and a splash or two of lemon juice or white wine vinegar and toss to coat. Stir in Dijon mustard and mayonnaise to coat. Serve on thin slices of fine-grained but sturdy white bread (I used semolina batard). You should probably butter your bread slices - I didn't, thinking the mayonnaise was moist enough, but they got a little soggy! You could also serve on toast or with water crackers. If you can't find or don't like salmon, you could certainly substitute tuna. But if you don't generally like tuna salad, give salmon salad a try! It is milder-tasting and the cucumbers give a refreshing crunch. If you wanted to be extra-fancy, you could certainly also use leftover grilled, poached, or roasted salmon, flaked, although be aware that most modern salmon filets are going to be fattier than canned salmon, so keep that in mind, flavor-wise. The Food Historian blog is supported by patrons on Patreon! Patrons help keep blog posts like this one free and available to the public. Join us for awesome members-only content like free digitized cookbooks from my personal collection, e-newsletter, and even snail mail from time to time! Don't like Patreon? Leave a tip! 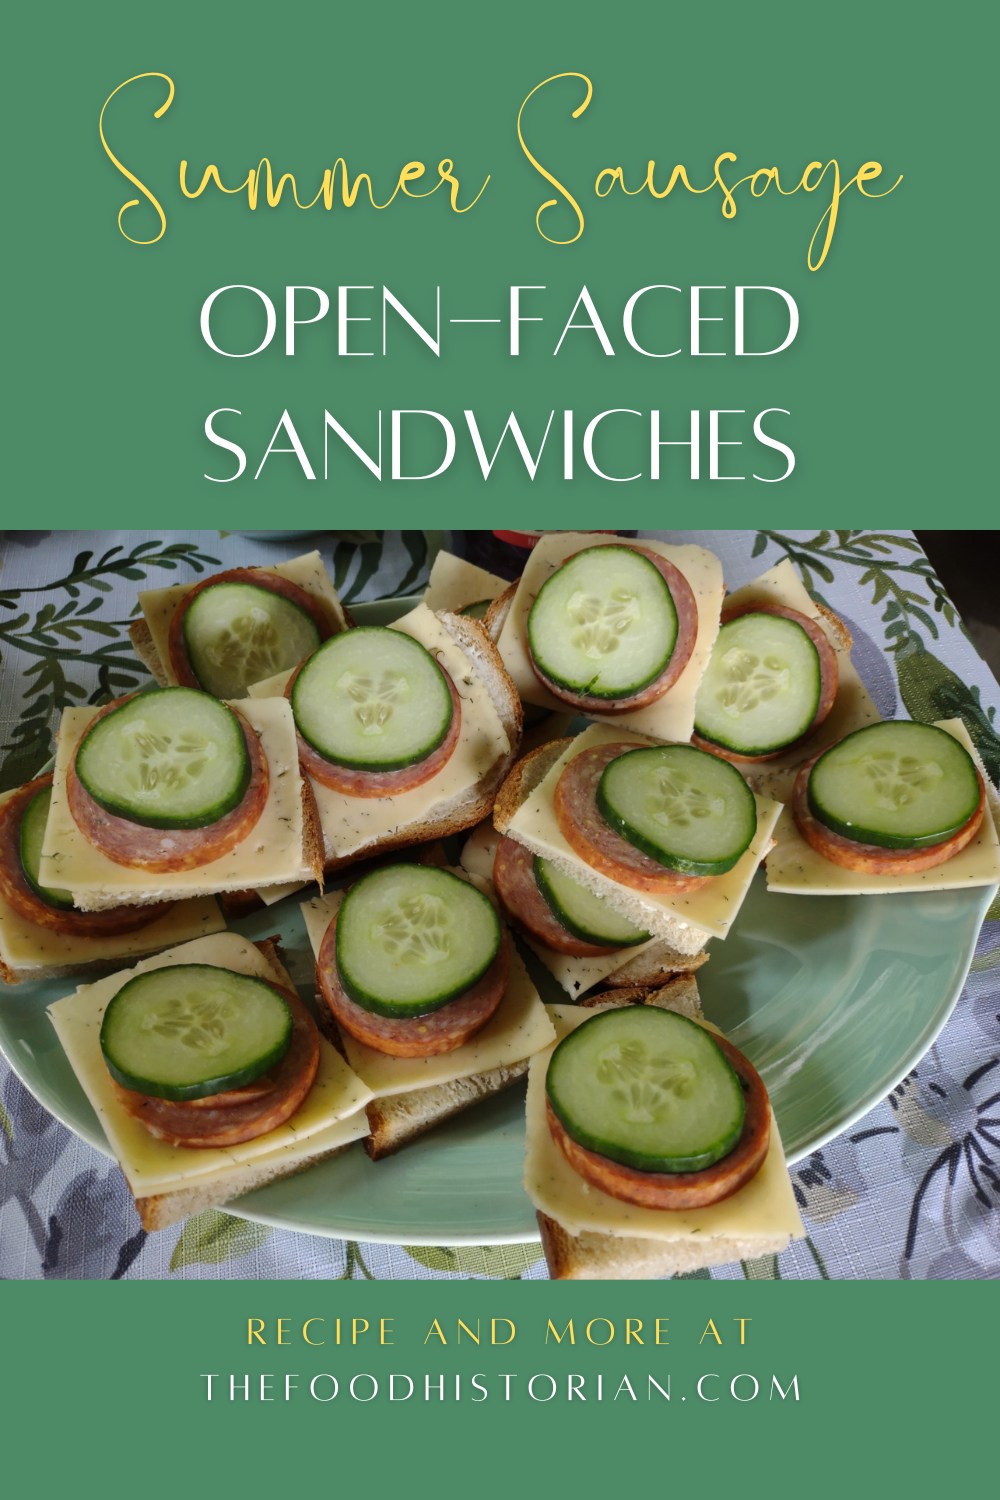 Growing up, I considered Scandinavian-style open-faced sandwiches the epitome of style. Which, in a region where "traditional" Scandinavian food is essentially variations on meat and potatoes, it was! I requested a Scandinavian smorgasbord for my high school graduation party, and that's what I got! Of course, mine were more American than the traditional Danish versions with tiny shrimps or smoked salmon, but still delicious. When planning my Scandinavian Midsummer Porch Party, I knew I wanted open-faced sandwiches for the main dish, because they would be relatively quite and easy to assemble, and they were small enough for people to have lots. Plus! They could be served cold, so no having to manage a hot main course. The official name for open-faced sandwiches is smørrebrød, which is Danish for (literally) "butter-bread," but which is used to refer to a very specific style of open-faced sandwich. Danish smørrebrød etiquette is a bit too formal for me - eating sandwiches with a knife and fork?! No thanks. I'm Scandinavian AMERICAN, after all. And there are some very specific types of sandwiches, and even an order in which to eat them! This is a party, folks. I don't tell people how to eat unless they ask for advice. I also find the formality hilarious given the very plebian origins of open-faced sandwiches. Conventional wisdom draws a direct line from Medieval trenchers (essentially plates made of bread) to open-faced sandwiches. As with most food history, there isn't a ton of concrete evidence, but it's a logical connection. Others draw a line between 19th century field food for farmers, who ate leftovers with buttered bread for lunch. Regardless, there are some commonalities between most open-faced sandwiches. 1. Fine-grained rye bread is the best and sturdiest foundation. 2. Yes, you have to butter the bread - thinly and edge to edge. This keeps the bread structure together and prevents it from getting soggy. Buttering edge-to-edge also helps keep the bread from drying out. 3. No, it cannot have another piece of bread on top. Otherwise it's not open-faced anymore! Other than that, the sky's the limit! I made four different ones for the party, and all were a hit. Here's my personal favorite: Dill Havarti and Summer Sausage with Cucumber on Rye At that graduation party, a variation of this was one of my favorite sandwiches my mom came up with - tiny party rye slices spread with herbed cream cheese and topped with a slice of summer sausage, a slice of cucumber, and a sprig of dill. These aren't quite the same, but equally delicious. Fine-grained rye bread, buttered Thinly sliced dill Havarti cheese 1 slice summer sausage (not salami!) 1 slice English cucumber Summer sausage is a must here. It's almost impossible to find in my neck of the woods, so when I was in Ohio for a wedding back in April, and saw giant sticks of it in the grocery store, I grabbed one to take home. It's all gone now (sadly), and it wasn't QUITE as good as the stuff from back home in North Dakota (which is known for its sausage), but it was better than anything out here in New York. Unlike dried sausages like salami or pepperoni, summer sausage is able to be kept at room temperature because of a bacteria which lowers the PH of the sausage and gives it its signature tangy taste. You have to refrigerate it once it's unsealed, but it's softer and less fatty than salami and the flavor is just as good if not better. I saw dill Havarti in the store, so had to get it for this recipe. I got mine sliced at the deli. Havarti was invented in Denmark and is an incredibly buttery-tasting, softish, lacy-grained cheese that is just lovely on sandwiches. The tender, dense rye bread, butter and buttery tasting Havarti, the tangy, salty summer sausage, and the crisp, cold cucumber are just a delicious taste sensation. I cut the bread in quarters for easier eating and to fit the sausage and cucumber better. The Food Historian blog is supported by patrons on Patreon! Patrons help keep blog posts like this one free and available to the public. Join us for awesome members-only content like free digitized cookbooks from my personal collection, e-newsletter, and even snail mail from time to time! Don't like Patreon? Leave a tip! 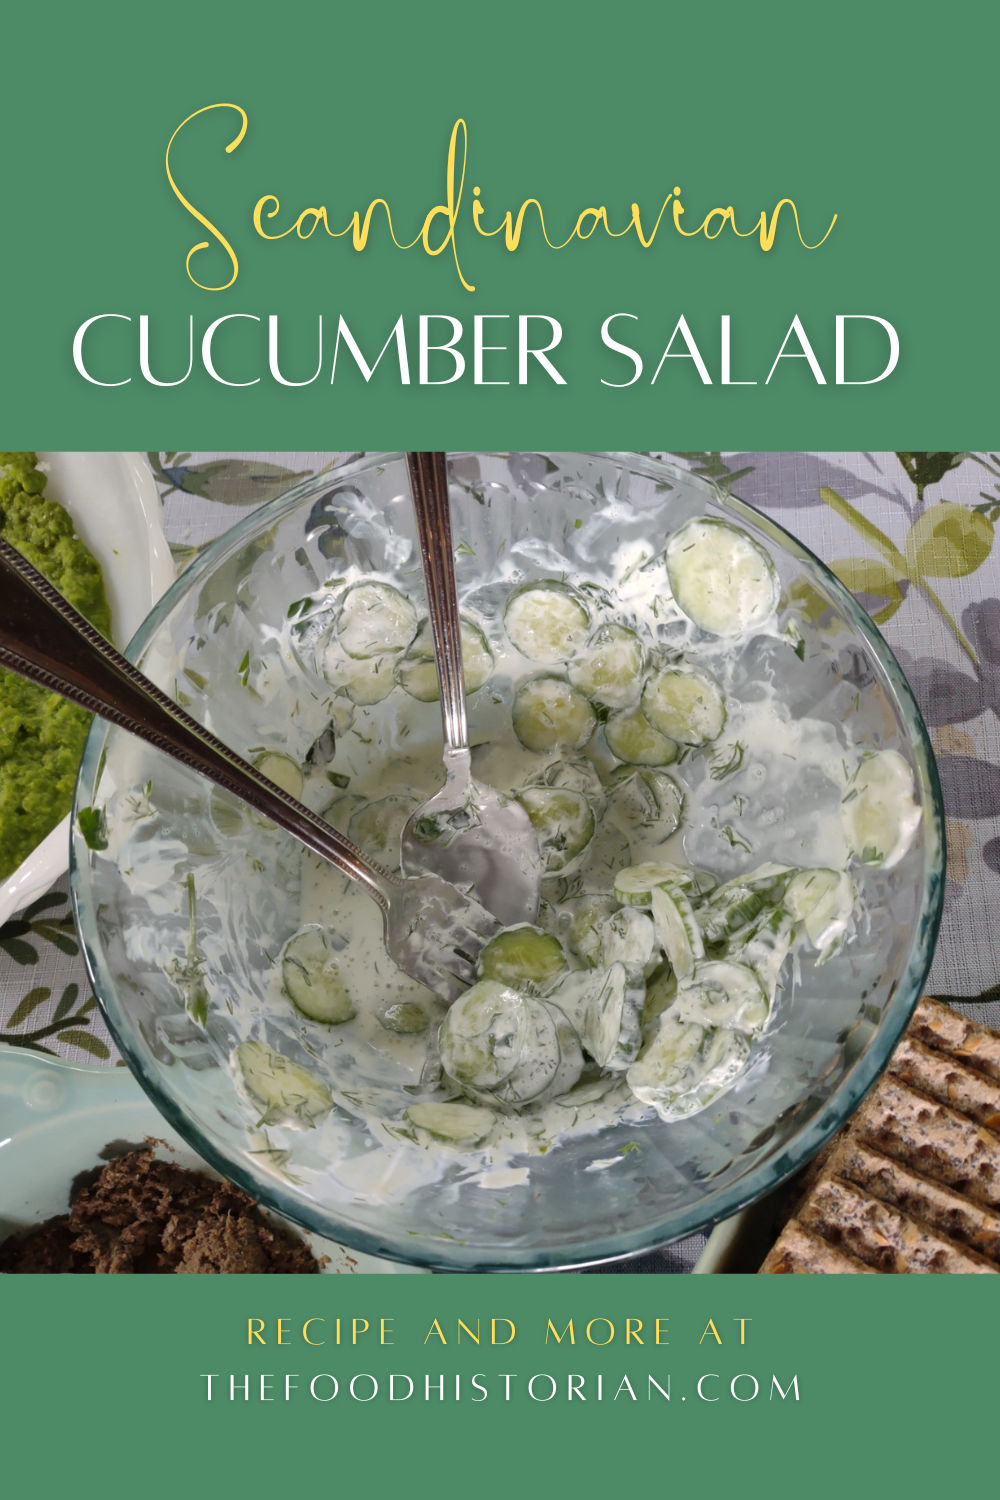 Cucumber salad with dill and sour cream just screams summer and Scandinavia. So when I planned my Scandinavian Midsummer Porch Party, I knew it had to be included. Agurksalat is the Norwegian name of cucumber salad, but funnily enough, most cucumber "salads" in Scandinavia are more like quick cucumber pickles - thinly sliced cucumbers are covered with a brine of vinegar, salt, and sugar, with fresh dill. This salad is often used to accompany fish, or as a topping for rye bread and liver pate. But where I was growing up in the Red River Valley of North Dakota, cucumber salad was made with sour cream. I wonder if these salads weren't invented to use up the bumper crops of cucumbers that often result. Certainly in Scandinavia they were historically celebrated as a herald of spring, and were eaten only for the short months they were available in outdoor gardens, mostly June and July. In the US, especially the Upper Midwest, the cucumbers are often peeled, but I'm a big fan of English/burpless/seedless/Persian cucumbers, which are thinner skinned, less bitter, and more crisp than their larger counterparts. These cucumbers are perfect for salads as they're crisp enough to hold up under dressings but tender enough to taste more like garden-grown. I am not particularly a fan of the sweet-sour brine (which seems to also be used to pickle herring!), and dislike bread and butter pickles for this reason, so my cucumber salad recipe doesn't include any sugar. This last-minute addition ended up being one of the surprise smash hits of the afternoon, and I sent the little bit that was left home with a friend and her kids, who kept going back for seconds. Scandinavian Cucumber SaladIf you want a more traditional salad, google "agurksalat," but if you want something traditionally Midwestern Scandinavian-American, and surprisingly refreshing on a hot day, stay with me. 6 mini Persian cucumbers, or 1 large English cucumber 1 teaspoon salt 2 scallions white wine vinegar full fat sour cream Wash and thinly slice the cucumber - not paper-thin, but thinner than a quarter inch. Add salt to the bowl and toss the cucumber slices to coat. Let rest for 15 minutes, then drain off the juice. If you're avoiding salt, feel free to give them a little rinse and drain again. Slice the scallions paper-thin, and add to the cucumbers with a splash of vinegar and a dollop of sour cream. Toss everything together until the cucumbers are coated with the vinegar-sour cream mixture. Serve cold or cool. The cucumbers will be salty and crisp and the creamy-sour dressing will be very addictive. Great as an accompaniment to sandwiches, grilled fish or meats, or as one of a variety of cold salads served for a light supper. 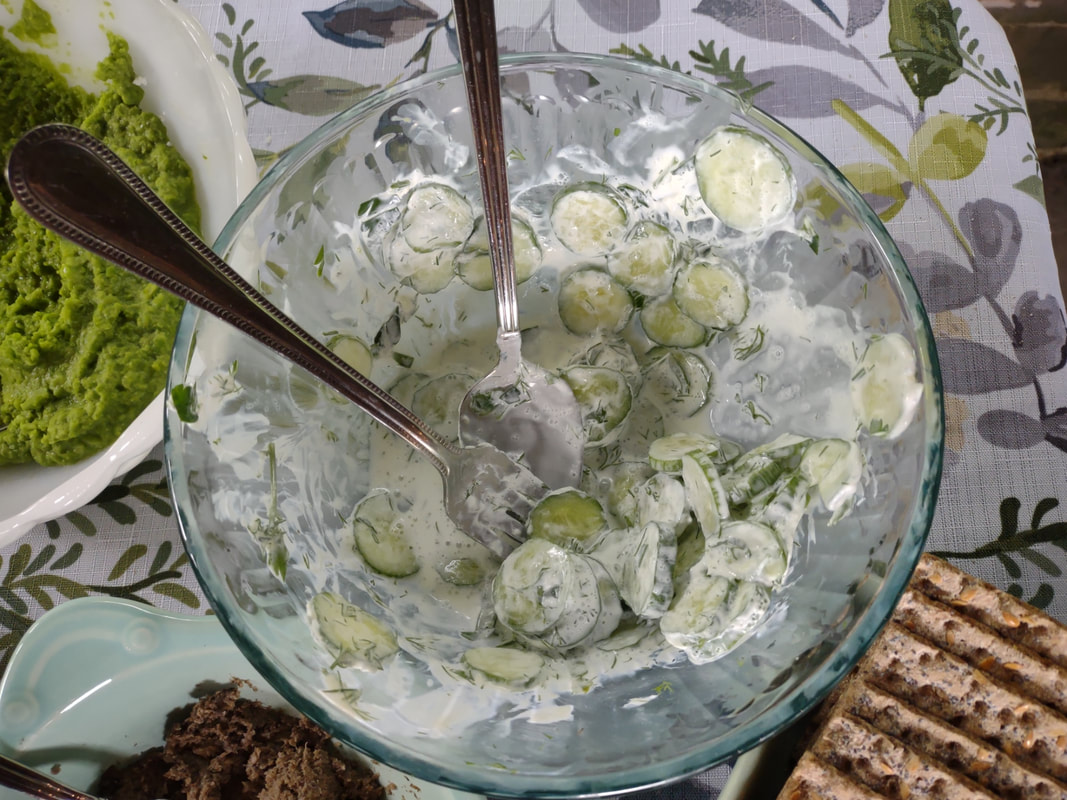 I really should have made more for the crowd! Only about a half cup was left by the end of the party. The Food Historian blog is supported by patrons on Patreon! Patrons help keep blog posts like this one free and available to the public. Join us for awesome members-only content like free digitized cookbooks from my personal collection, e-newsletter, and even snail mail from time to time! Don't like Patreon? Leave a tip! 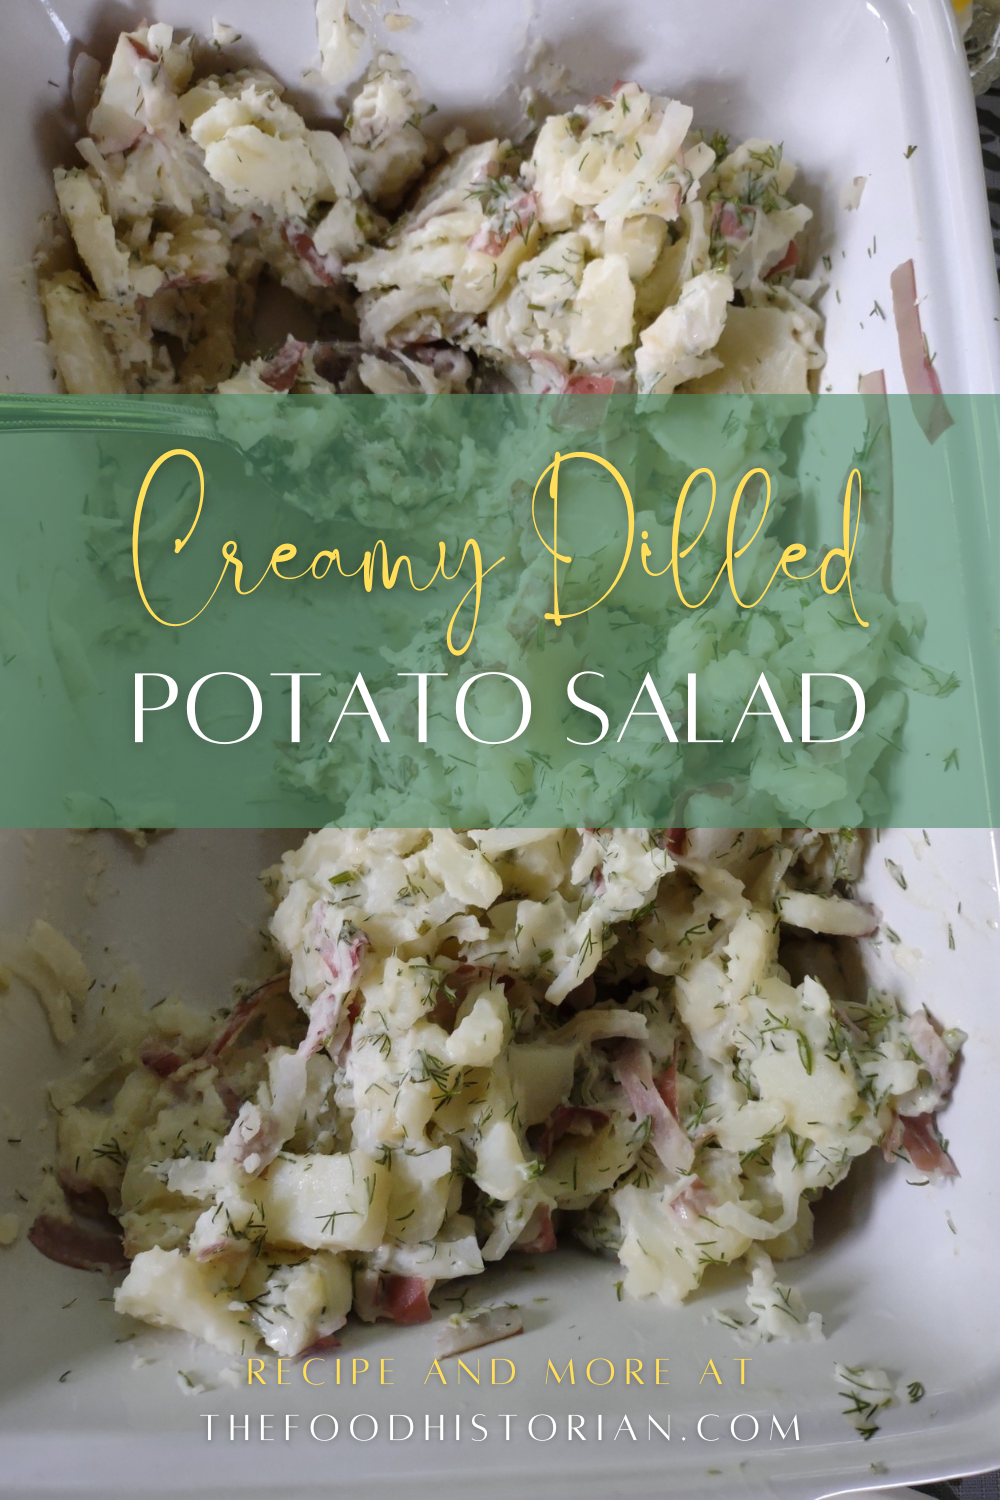 Nothing says summer like potato salad, but while many people have strong opinions about what constitutes potato salad and what doesn't, in my opinion, if it contains cold (or even warm!) potatoes and some kind of dressing, it's potato salad. Scandinavians have embraced the potato since it was introduced in the mid-1700s, and it now plays a foundational role in some of their most famous foods, including lefse, Jansson's temptation, and the beloved boiled red potatoes that accompany nearly every celebratory meal, including Midsummer. For my Scandinavian Midsummer Porch Party, I thought I'd riff off of a recipe my mother-in-law introduced to me, and make it slightly more Scandinavian. Hers calls for boiled potatoes, sweet onion, white vinegar, and mayo with dried dill. I made mine with boiled red potatoes (also a North Dakota favorite) and fresh dill. Native to the Mediterranean and Eurasia, dill is probably the most important culinary herb in Scandinavia. Only caraway gives it a run for its money. Although most Americans are probably only familiar with it thanks to dill pickles, it is one of my favorite herbs - fresh and green tasting, but not as one-dimensional as parsley or overpowering as fennel or rosemary. It is the perfect complement to fish, cucumbers (as you'll see in the next post), and yes, potatoes. Scandinavians also use it to flavor lamb stew, instead of the more Western mint. Fresh dill can be a bit of a pain to keep fresh, but trim the stems when you get home and place them in a wide-mouth pint mason jar with an inch or so of cold water. It will keep fresh at room temp for a day or so (change the water daily), but put it in the fridge with a plastic bag tent if you want it to keep for longer. The key to this tangy salad is the vinegar, and tossing the onions and potatoes while the potatoes are still hot. Creamy Dilled Potato SaladIf you don't have fresh dill, you can certainly use 2 tablespoons dried dill, but the flavor, while good, won't be quite the same. 2-3 lbs red potatoes 1 sweet onion, like Vidalia or Walla-Walla 2+ tablespoons white or white wine vinegar 1+ cup mayonnaise 1/4 cup chopped fresh dill Wash the potatoes and slice them about a quarter inch thick (I cut my very large potatoes in quarters first). Place in a large pot and add cold water to cover generously. Bring to a rolling boil, reduce the heat slightly (so they don't boil over), and cook until fork-tender, but not quite falling apart. Meanwhile, cut the root end off the onion, then cut in half lengthwise, peel, and cut in quarters or sixths. Slice crosswise paper thin. Add to a large serving bowl or casserole and toss the onions with the vinegar. When the potatoes are done, drain and let them steam for a second, then add while hot to the onions and vinegar. Toss well to combine. Then add mayonnaise to coat and the fresh dill. Taste and add more vinegar as necessary. The vinegar flavor will tame down a bit as the potatoes absorb it, so if making ahead taste the next day and add more vinegar as necessary. You can also add some sour cream if you want this potato salad to be even creamier. Serve as a side dish to grilled meats, sandwiches, or your favorite bean salad. 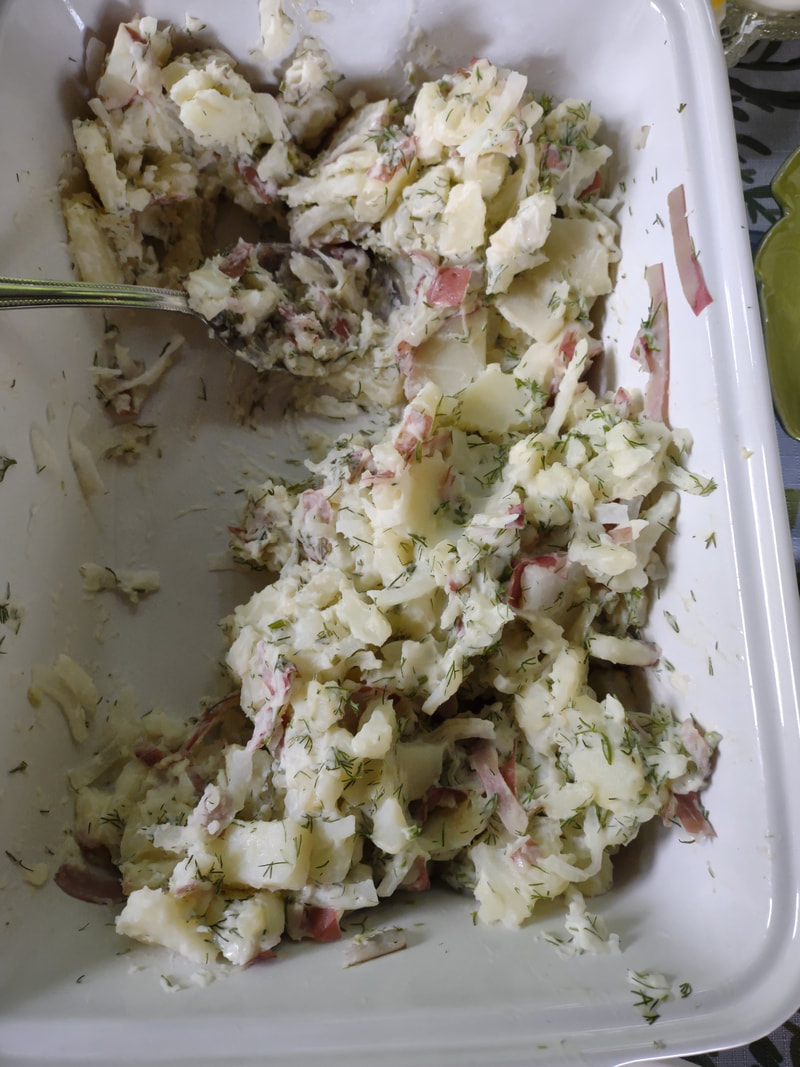 I only managed to snap one photo! And this after it was mostly eaten. Lol. Eating the delicious leftovers with lunch this week. The Food Historian blog is supported by patrons on Patreon! Patrons help keep blog posts like this one free and available to the public. Join us for awesome members-only content like free digitized cookbooks from my personal collection, e-newsletter, and even snail mail from time to time! Don't like Patreon? Leave a tip! 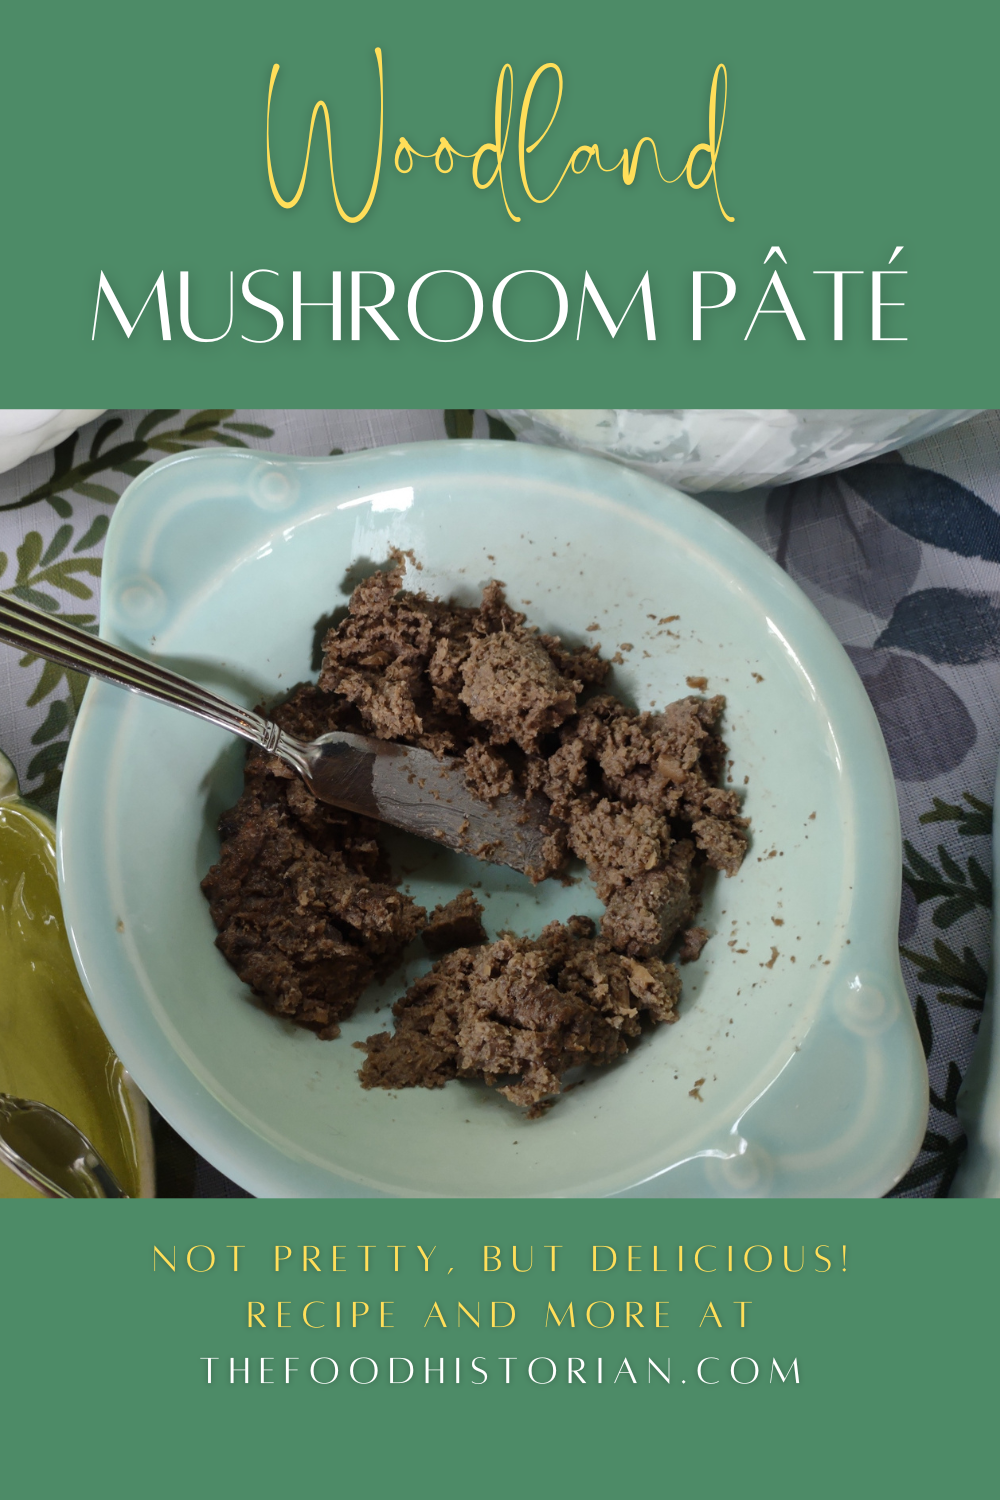 In our continuing Scandinavian Midsummer Porch Party menu exploration, this mushroom pâté is relatively simple to make and a favorite of vegetarian guests. Although they're not often the first thing people consider when thinking of Scandinavian food, wild mushrooms are extremely popular in all the Nordic countries. Foraging is something of a national pastime, and while berries are easier to identify, mushrooms rank high on the list as well. Although in Scandinavia they are normally served in gratins, soups, and as an accompaniment to game meats, mushrooms in summer called for something a little different. Traditionally pâté is made of finely ground meat and fat - goose liver (a.k.a. fois gras) is the most famous of the pâtés, which of course originate in France (hence the French word), but are common throughout northern Europe. Substituting mushrooms for meat is a common swap, but the same smooth texture is replicated, albeit in a lighter format. There are lots of mushroom pâté recipes out there, but this is one of the simpler ones. It's based on a skillet dish I invented for a vegetarian friend. The lemon flavor doesn't fade as it often does in dishes, but adds an indefineable tang to the creamy richness. I recommend a food processor or chopper for this to work well, but with some time and knife skills, you can make due without one. Mushroom Pâté RecipeFor a more complex flavor, feel free to substitute your favorite wild mushrooms, or a combination of mushrooms. This recipe would also scale up easily if you're feeding a crowd. 1 pint white button mushrooms 1 tablespoon butter 1-2 tablespoons lemon juice 1/4 teaspoon wild garlic salt (or regular sea salt) 1/4 cup heavy cream Clean and coarsely chop the mushrooms, then add to a food processor or chopper. Pulse until the raw mushrooms start to form a paste. Be sure to ensure any large chunks are also finely chopped. If using a knife, just keep chopping until you can get them as fine as possible. In a saucepan over medium heat, melt the butter and add the mushroom paste all at once. Stir well to combine and let cook until the liquid of the mushrooms cooks out and evaporates. Add the lemon juice and salt and cook until the juice is absorbed by the mushroom paste. Add the heavy cream and cook until absorbed. Serve warm, room temperature, or cold with rye crisps, crackers, or toast. 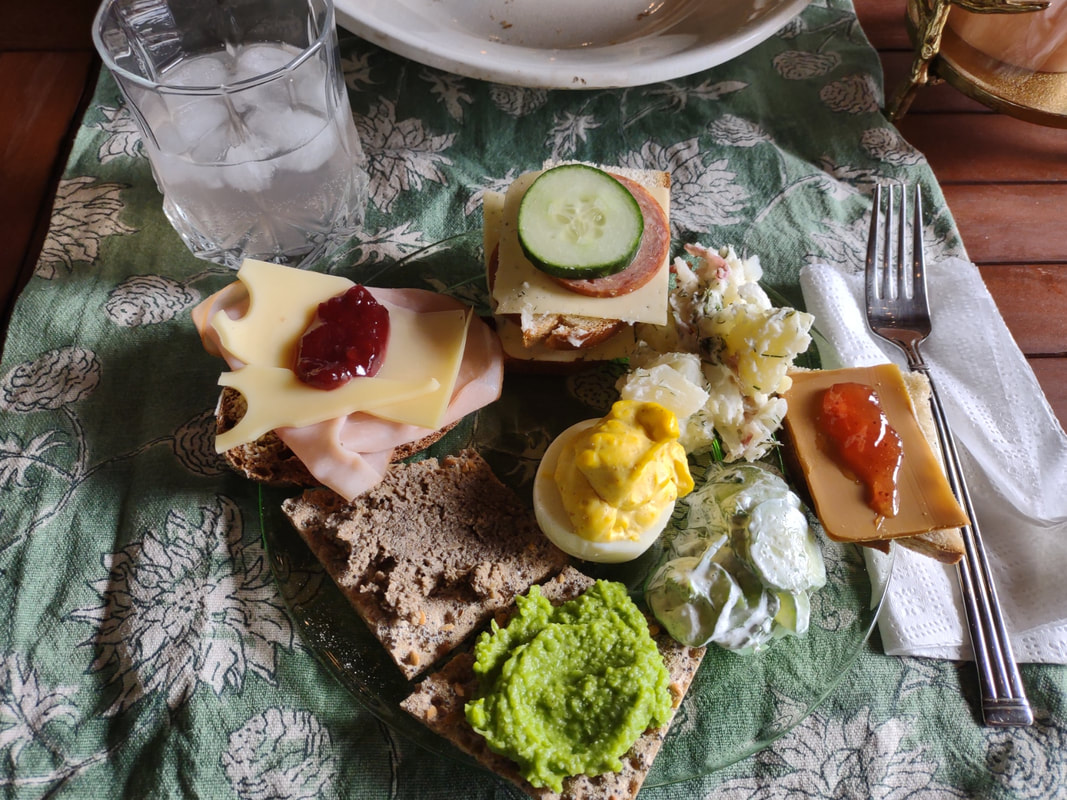 Mushroom pate on a rye crisp on the front left of my loaded midsummer party plate. :D Not pretty, but delicious! The Food Historian blog is supported by patrons on Patreon! Patrons help keep blog posts like this one free and available to the public. Join us for awesome members-only content like free digitized cookbooks from my personal collection, e-newsletter, and even snail mail from time to time! Don't like Patreon? Leave a tip! |

AuthorSarah Wassberg Johnson has an MA in Public History from the University at Albany and studies early 20th century food history. Archives
September 2023
Categories
All
|
 RSS Feed