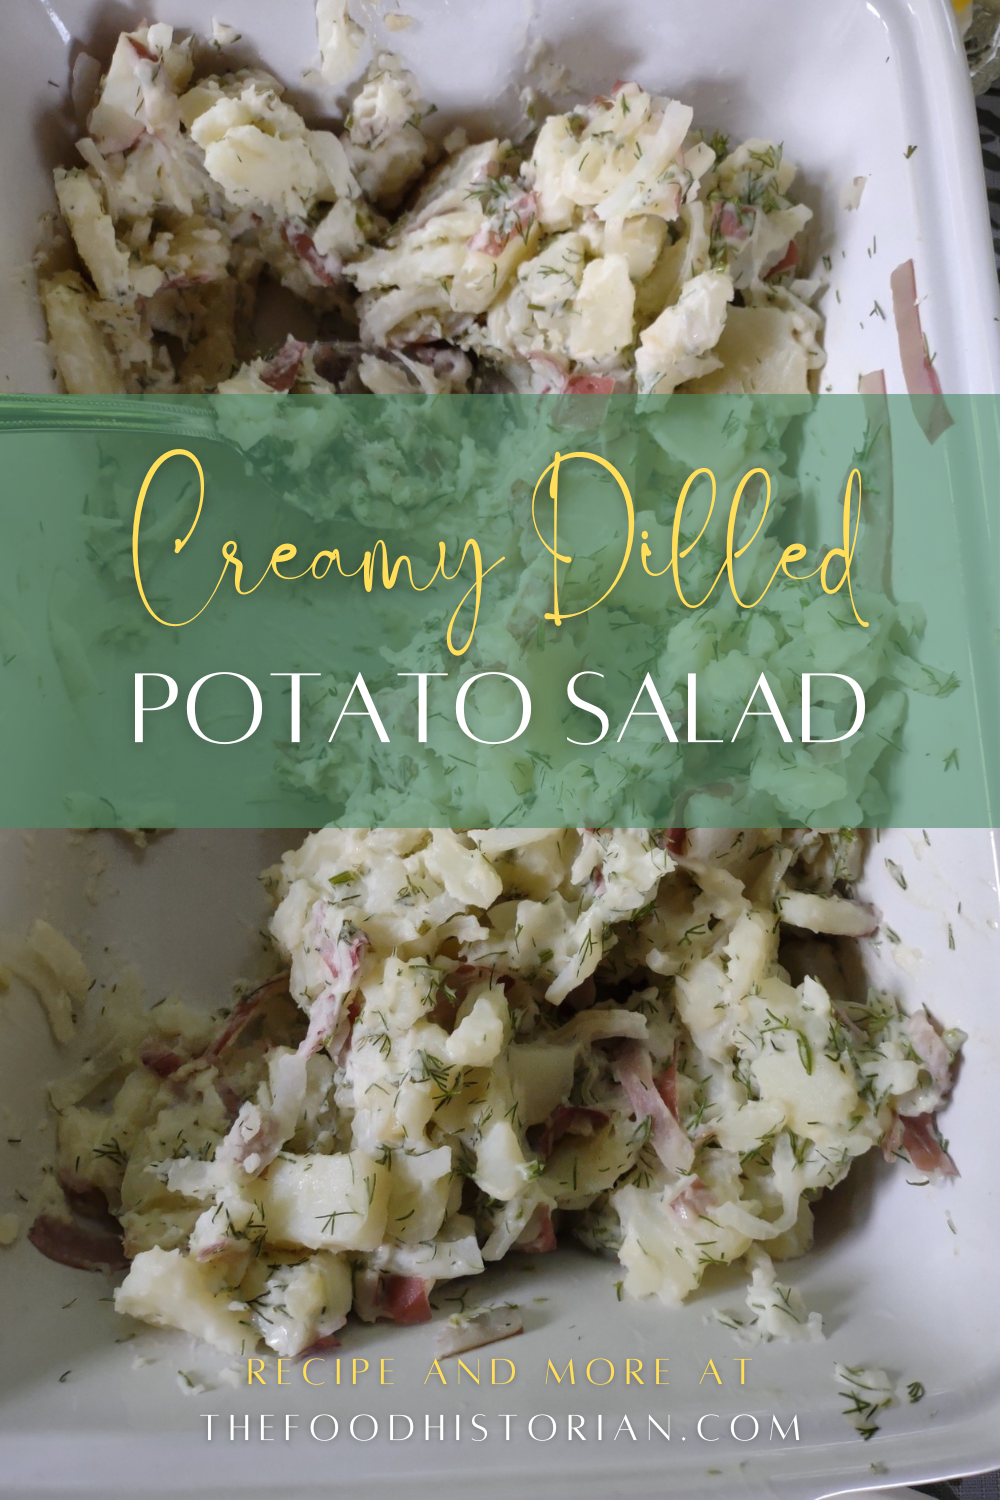
 Nothing says summer like potato salad, but while many people have strong opinions about what constitutes potato salad and what doesn't, in my opinion, if it contains cold (or even warm!) potatoes and some kind of dressing, it's potato salad. Scandinavians have embraced the potato since it was introduced in the mid-1700s, and it now plays a foundational role in some of their most famous foods, including lefse, Jansson's temptation, and the beloved boiled red potatoes that accompany nearly every celebratory meal, including Midsummer. For my Scandinavian Midsummer Porch Party, I thought I'd riff off of a recipe my mother-in-law introduced to me, and make it slightly more Scandinavian. Hers calls for boiled potatoes, sweet onion, white vinegar, and mayo with dried dill. I made mine with boiled red potatoes (also a North Dakota favorite) and fresh dill. Native to the Mediterranean and Eurasia, dill is probably the most important culinary herb in Scandinavia. Only caraway gives it a run for its money. Although most Americans are probably only familiar with it thanks to dill pickles, it is one of my favorite herbs - fresh and green tasting, but not as one-dimensional as parsley or overpowering as fennel or rosemary. It is the perfect complement to fish, cucumbers (as you'll see in the next post), and yes, potatoes. Scandinavians also use it to flavor lamb stew, instead of the more Western mint. Fresh dill can be a bit of a pain to keep fresh, but trim the stems when you get home and place them in a wide-mouth pint mason jar with an inch or so of cold water. It will keep fresh at room temp for a day or so (change the water daily), but put it in the fridge with a plastic bag tent if you want it to keep for longer. The key to this tangy salad is the vinegar, and tossing the onions and potatoes while the potatoes are still hot. Creamy Dilled Potato SaladIf you don't have fresh dill, you can certainly use 2 tablespoons dried dill, but the flavor, while good, won't be quite the same. 2-3 lbs red potatoes 1 sweet onion, like Vidalia or Walla-Walla 2+ tablespoons white or white wine vinegar 1+ cup mayonnaise 1/4 cup chopped fresh dill Wash the potatoes and slice them about a quarter inch thick (I cut my very large potatoes in quarters first). Place in a large pot and add cold water to cover generously. Bring to a rolling boil, reduce the heat slightly (so they don't boil over), and cook until fork-tender, but not quite falling apart. Meanwhile, cut the root end off the onion, then cut in half lengthwise, peel, and cut in quarters or sixths. Slice crosswise paper thin. Add to a large serving bowl or casserole and toss the onions with the vinegar. When the potatoes are done, drain and let them steam for a second, then add while hot to the onions and vinegar. Toss well to combine. Then add mayonnaise to coat and the fresh dill. Taste and add more vinegar as necessary. The vinegar flavor will tame down a bit as the potatoes absorb it, so if making ahead taste the next day and add more vinegar as necessary. You can also add some sour cream if you want this potato salad to be even creamier. Serve as a side dish to grilled meats, sandwiches, or your favorite bean salad. 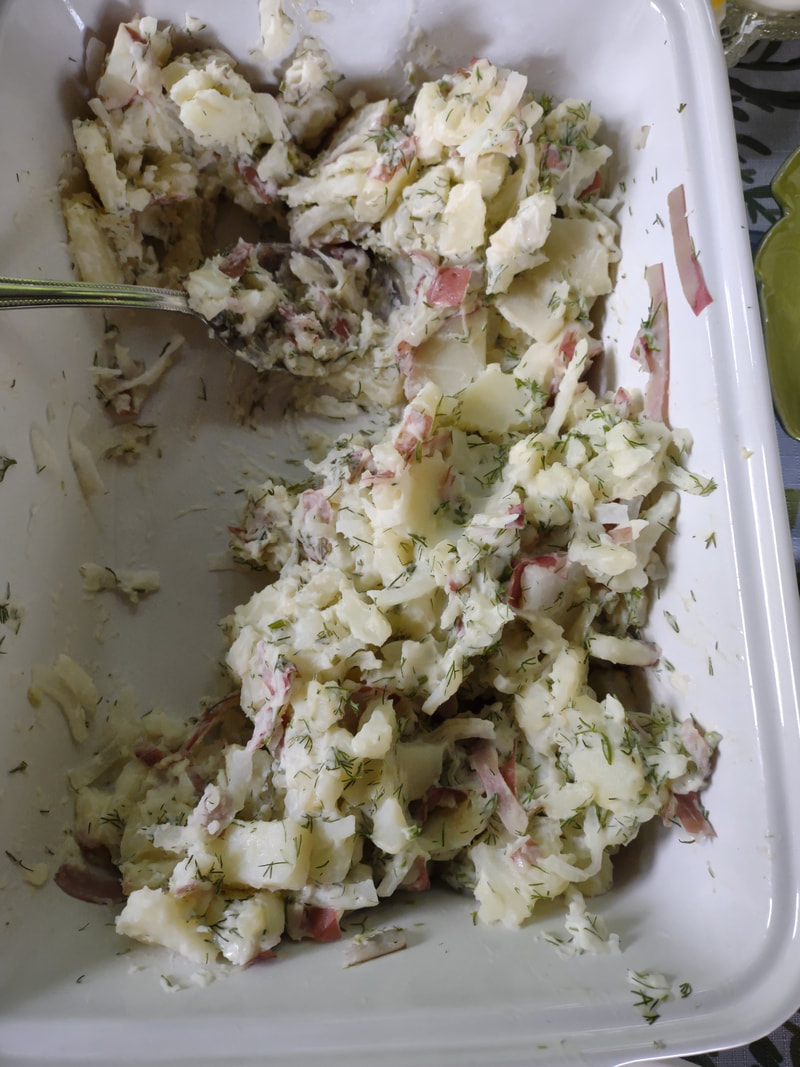 I only managed to snap one photo! And this after it was mostly eaten. Lol. Eating the delicious leftovers with lunch this week. The Food Historian blog is supported by patrons on Patreon! Patrons help keep blog posts like this one free and available to the public. Join us for awesome members-only content like free digitized cookbooks from my personal collection, e-newsletter, and even snail mail from time to time! Don't like Patreon? Leave a tip!
0 Comments
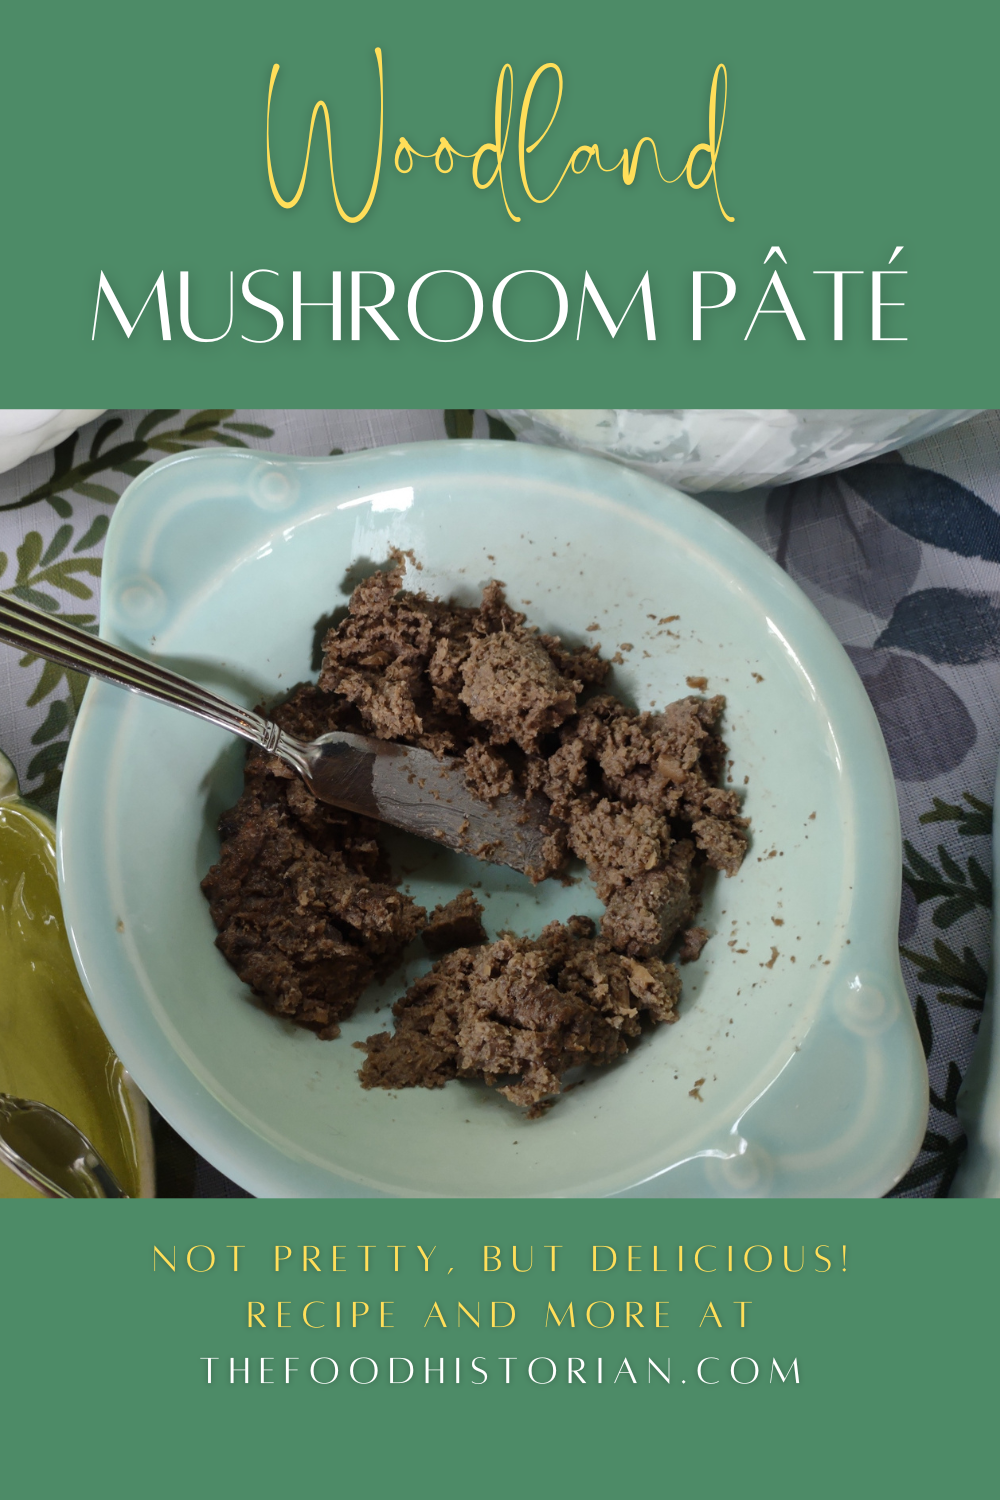 In our continuing Scandinavian Midsummer Porch Party menu exploration, this mushroom pâté is relatively simple to make and a favorite of vegetarian guests. Although they're not often the first thing people consider when thinking of Scandinavian food, wild mushrooms are extremely popular in all the Nordic countries. Foraging is something of a national pastime, and while berries are easier to identify, mushrooms rank high on the list as well. Although in Scandinavia they are normally served in gratins, soups, and as an accompaniment to game meats, mushrooms in summer called for something a little different. Traditionally pâté is made of finely ground meat and fat - goose liver (a.k.a. fois gras) is the most famous of the pâtés, which of course originate in France (hence the French word), but are common throughout northern Europe. Substituting mushrooms for meat is a common swap, but the same smooth texture is replicated, albeit in a lighter format. There are lots of mushroom pâté recipes out there, but this is one of the simpler ones. It's based on a skillet dish I invented for a vegetarian friend. The lemon flavor doesn't fade as it often does in dishes, but adds an indefineable tang to the creamy richness. I recommend a food processor or chopper for this to work well, but with some time and knife skills, you can make due without one. Mushroom Pâté RecipeFor a more complex flavor, feel free to substitute your favorite wild mushrooms, or a combination of mushrooms. This recipe would also scale up easily if you're feeding a crowd. 1 pint white button mushrooms 1 tablespoon butter 1-2 tablespoons lemon juice 1/4 teaspoon wild garlic salt (or regular sea salt) 1/4 cup heavy cream Clean and coarsely chop the mushrooms, then add to a food processor or chopper. Pulse until the raw mushrooms start to form a paste. Be sure to ensure any large chunks are also finely chopped. If using a knife, just keep chopping until you can get them as fine as possible. In a saucepan over medium heat, melt the butter and add the mushroom paste all at once. Stir well to combine and let cook until the liquid of the mushrooms cooks out and evaporates. Add the lemon juice and salt and cook until the juice is absorbed by the mushroom paste. Add the heavy cream and cook until absorbed. Serve warm, room temperature, or cold with rye crisps, crackers, or toast. 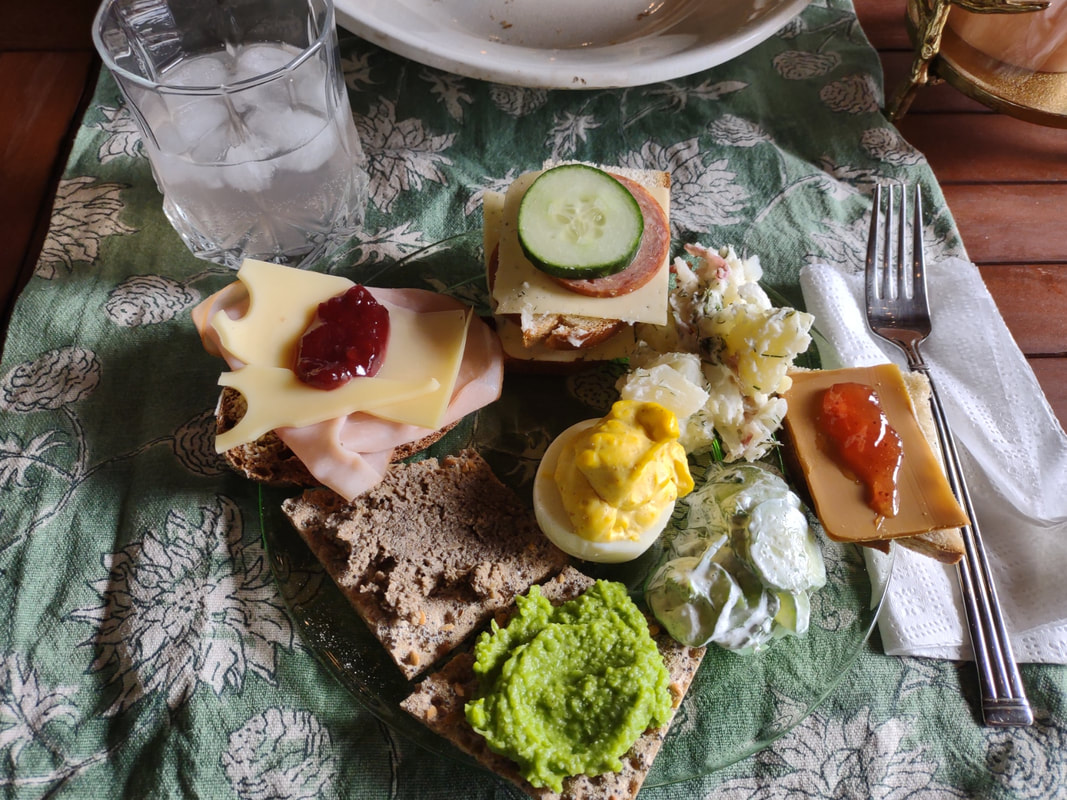 Mushroom pate on a rye crisp on the front left of my loaded midsummer party plate. :D Not pretty, but delicious! The Food Historian blog is supported by patrons on Patreon! Patrons help keep blog posts like this one free and available to the public. Join us for awesome members-only content like free digitized cookbooks from my personal collection, e-newsletter, and even snail mail from time to time! Don't like Patreon? Leave a tip! 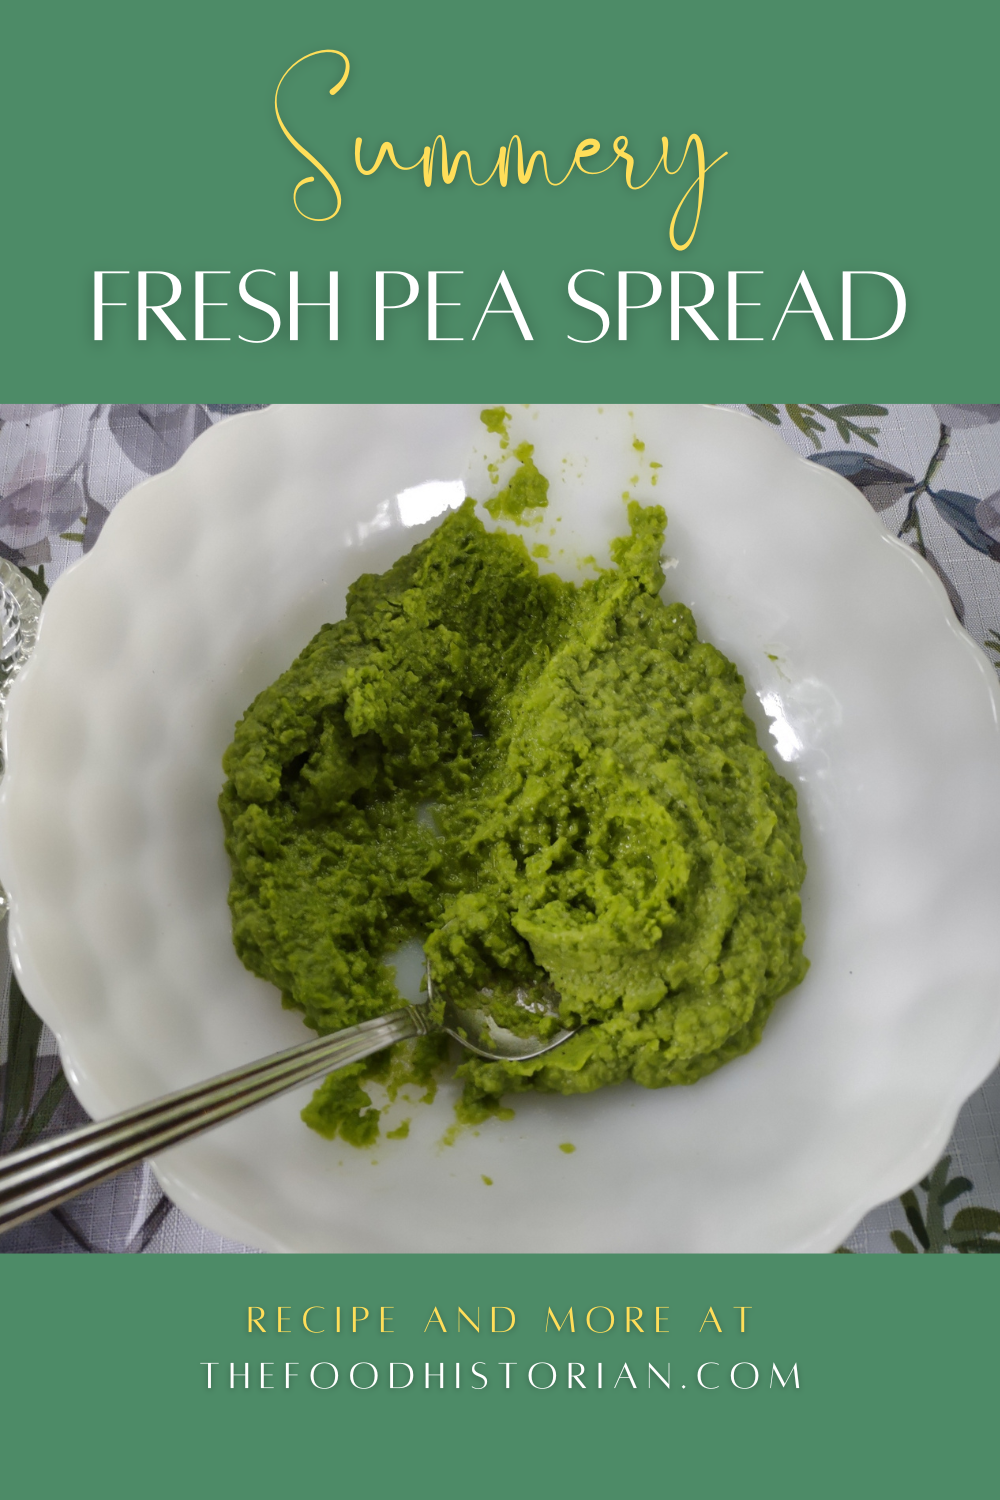 When it comes to freshness, there's nothing like a freshly picked garden pea. But most of us aren't growing them ourselves, and "fresh" peas in grocery stores are generally old enough that the sugars that make peas so delicious are converted to tasteless starch. Canned peas are generally overcooked and mushy. Fine for eating alongside mashed potatoes and meatloaf, but not so fresh-tasting. What's the solution? Frozen peas. Ironic, I know, but frozen peas are often so much better than "fresh" unless you've picked them yourself or get them the same day. To me, peas signal not only spring but also early summer - when mornings and evenings are still cool, even when midday is hot. In the Northeastern U.S., peas were historically on the menu as late as July 4th! They're popular in Scandinavia, too. I wanted some nice, bright color for my Scandinavian Midsummer Porch Party, and this fresh pea spread hit the spot. I've made Spring Pea Hummus before - and that's equally delicious. But I wanted something vegan this time. Fresh Pea Spread RecipeThis recipe definitely needs a food chopper or processor! You could use a food mill in a pinch, but you'll need to finely mince the onion, first. 1 bag frozen organic peas 1/4 sweet onion (I used Vidalia) 1 tablespoon lemon juice 1 tablespoon olive oil salt pepper Cook the peas in a little water on the stove or in the microwave until no longer frozen and just barely cooked. They'll be soft after thawing anyway. Add the peas and onions to the food chopper and pulse until well-mixed. Add a tablespoon of lemon juice and a tablespoon or two of olive oil and pulse again until as smooth as possible. If you're using a food mill, mince the onion as fine as you can before sending through the food mill with the peas, then mix in the lemon juice and olive oil by hand. Sample and add salt and pepper to taste. Serve on rye crisps or other crackers, or use as a sandwich spread. Fresh pea spread on a rye crisp on the bottom center of my Midsummer plate! The Food Historian blog is supported by patrons on Patreon! Patrons help keep blog posts like this one free and available to the public. Join us for awesome members-only content like free digitized cookbooks from my personal collection, e-newsletter, and even snail mail from time to time! Don't like Patreon? Leave a tip!  I'm not sure why deviled eggs are so popular. At least, mine are! They're always the first thing to go at every party, and no matter how many I make, even leftovers get devoured quickly. Historically, deviled eggs were "deviled" by mixing the yolks with soft butter and mustard. Later, the deviling became associated with cayenne pepper or paprika. The popularity of prepared mayonnaise meant that condiment soon supplanted butter as the primary ingredient. Deviled eggs are perfect for just about any party, but they seem especially lovely tea party, picnic, and summertime fare, so I just had to make them for my Scandinavian Midsummer Porch Party. As you can see in the photo, they were half-gone almost instantly, and totally gone by the end of the night. Despite their relative simplicity, they always seem so festive! They're not difficult or expensive to make, but a few tips will make things a bit easier than you might expect. Deviled Eggs RecipeI like to use free range local eggs for my deviled eggs, which makes for super delicious and bright yellow yolks. Slightly older eggs are better for peeling as the albumen of the egg starts to pull away from the shell. So if you've got a dozen eggs that need eating, there's no better way to use them up than deviled eggs. Deviled eggs are best when you boil the eggs the same day you devil them. 1 dozen eggs mayonnaise Dijon or spicy brown mustard sour cream (optional) In a stock pot large enough to accommodate all the eggs in a single layer without touching, cover the eggs with cold water. Cover the pot and place over high heat, bringing it to a full rolling boil. Turn off the heat and leave the eggs, covered, for 15 minutes. Then fish them out (a slotted spoon works nicely) and deposit them in a large bowl of ice water to stop the cooking process and cool them down. Let them rest at least 10 minutes. Now for the hard part - peeling them. I find the water method easiest. One at a time, place each egg in a glass, fill a third of the way with water, cover the top with your hand, and shake vigorously. Alternatively, crack the egg all over, peel up a small part, and then place under running water. In both instances, the water gets between the shell and the cooked egg, making peeling easier. Although a perfectly peeled egg is a joy, no one ever complains about a slightly battered one - they all taste the same! Slice the peeled eggs in half lengthwise and pop the yolks out into a small bowl. Mash the yolks thoroughly with a fork, until no large chunks remain. Then add about a half cup of mayonnaise and 1-2 tablespoons of prepared mustard. Add some sour cream if you like. The yolk mixture should be extra-creamy, but bright yellow from the yolks. Taste and add more mustard or salt as you like. Remember, the whites are bland. Using a spoon, plop the yolk mixture evenly into the egg halves (use a plastic bag with the tip cut off if you want cleaner piping - also good for transporting the eggs and filling on site for picnics and such), making sure to cover most of the white, not just the hollow left by the yolk. A good deviled egg should be just a bit messy to eat. Deviled eggs contain egg and mayonnaise, so they should not be left at room temperature for too long. Luckily they're not likely to last long, anyway! 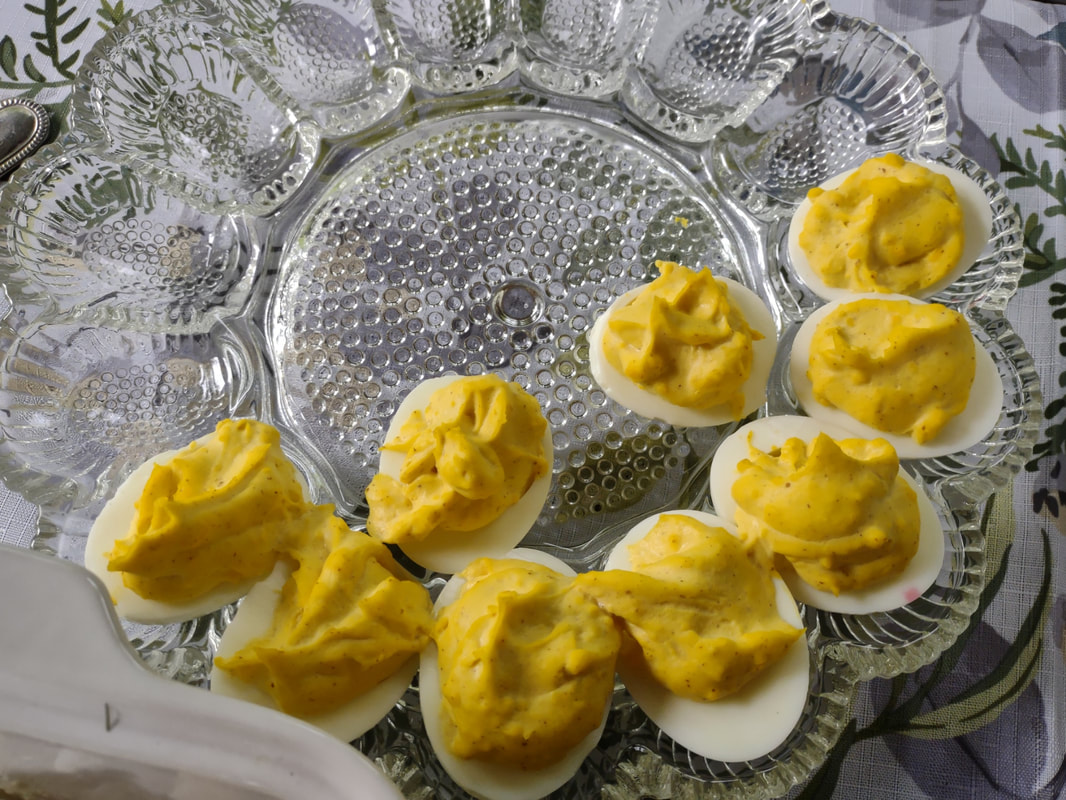 Half the deviled eggs were gone before I could take a photo! Lol. The Food Historian blog is supported by patrons on Patreon! Patrons help keep blog posts like this one free and available to the public. Join us for awesome members-only content like free digitized cookbooks from my personal collection, e-newsletter, and even snail mail from time to time! Don't like Patreon? Leave a tip!  A few weeks ago, COVID finally got me, and making myself a simple chicken noodle soup made me feel so nourished, even as I felt terrible. So when a friend told me she had also gotten COVID, feeling fatigued with a cough, I knew I had to make something and bring it over. But my friend is vegetarian, so chicken soup was out. What to make? Inspiration struck in the form of chickPEA noodle soup. I didn't have any intention of posting this recipe, but my friend thought it was so good she demanded I share, especially since vegetarian and vegan-friendly alternatives to chicken soup are often so few and far between. It is incredibly easy and quick to make, so even if you don't have anyone to cook for you, you can tackle this recipe. If you are feeling under the weather, this will perk you right up. To be honest, in many ways, I thought it was better than traditional chicken noodle soup, and it will probably go in regular rotation, especially when I'm not feeling well. Vegan Chickpea Noodle SoupThis soup relies heavily on the quality of your vegetable stock. I used Better Than Bouillon refrigerated organic vegetable bouillon doctored with some herbs and turmeric for color and flavor and it turned out lovely. It also scales up nicely and frankly, the bouillon is the most expensive ingredient! Everything else is eminently affordable. If you're feeding a crowd or want to double the recipe for a week of lunches or to freeze, you can. It's also extremely quick. The whole thing, including chopping vegetables, probably took about 30 minutes, start to finish. Which is nice when you're feeling under the weather or you need some comfort food in a hurry. 2 tablespoons fat (I used 1 each olive oil and salted butter) 1/2 cup sliced carrots 1/2 cup minced celery 1 small onion, minced (about 1/2 a cup) 1 clove garlic, finely minced 1 can chickpeas 4-5 cups water 4-5 teaspoons bouillon (less if you like a thinner, less salty broth, substitute 1 bouillon cube per teaspoon) a few generous shakes of ground turmeric a shake or two of dried thyme a pinch of dried marjoram a pinch of ground pepper 1 bay leaf a small handful (about the size of a nickel) of short spaghetti In a large stockpot over medium heat, sauté the carrots, celery, and onion in the fat until the onion is translucent. Add the garlic and stir well. Let it keep cooking while you drain, but do not rinse, a can of chickpeas. Add the chickpeas and water to the pot, then add the bouillon and herbs and spices. Bring to a boil, reduce heat to medium-high, and let cook until the vegetables and chickpeas are tender, 5-10 minutes. Then add the spaghetti and simmer/boil until the spaghetti is tender. Serve hot with plenty of fresh bread and butter, or biscuits (my friend felt well enough to make some garlic cheddar biscuits. I was jealous), or Saltines, or any other comforting carb you prefer. The vegetable bouillon I used does have tomato in it, so discerning palates will be able to detect a hint of tomato in the broth, but it's not particularly noticeable. If you are using boxed vegetable broth, add a tablespoon of soy sauce (an ingredient in the bouillon) or miso paste for some extra umami flavor and richness. The tender chickpeas really do mimic the flavor and texture of chicken, and the broth is almost identical. Don't skimp on the fat - you want some of that golden goodness floating on top. But my husband commented that it tasted less greasy than chicken noodle soup, and that he preferred this lighter version. From a distance, it even looks like chicken noodle soup. 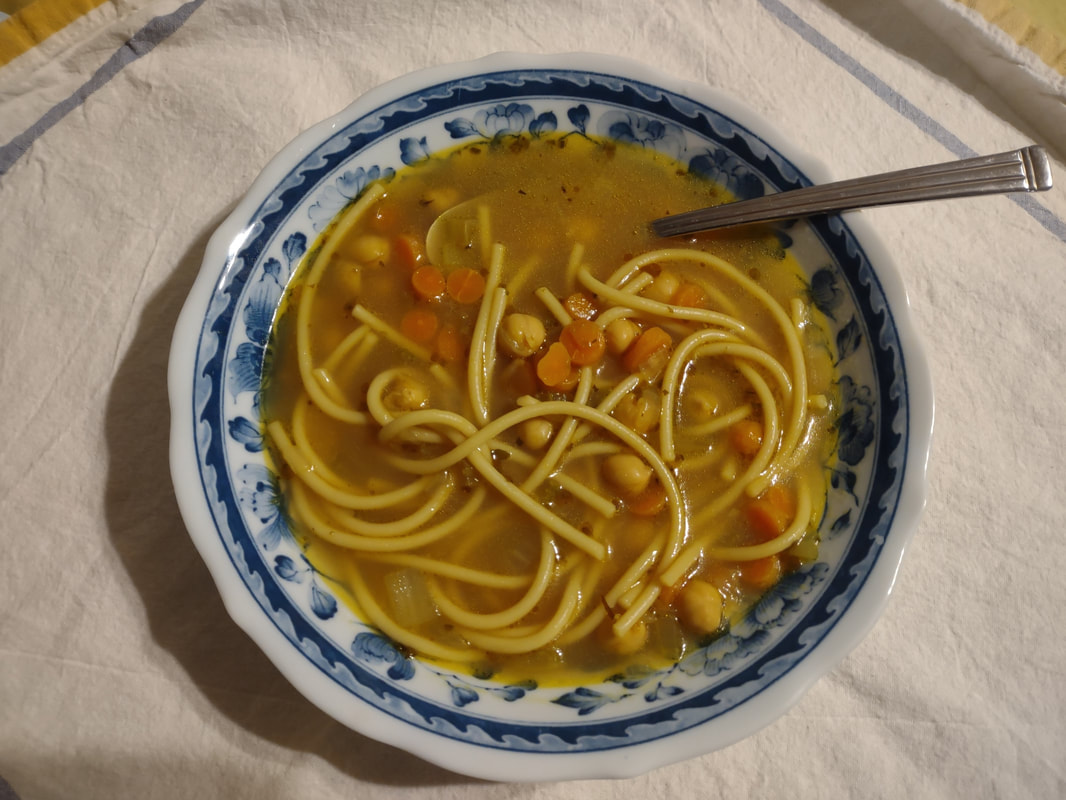 The beautifully golden chickpea noodle soup in a lovely new blue transferware bowl my grandma gave me. Keep this recipe in your back pocket when you are in need of some comforting. It's easy, inexpensive, and healthy. Just the ticket to get you feeling better. You could also easily riff this soup to substitute potatoes or rice for a gluten-free alternative to the pasta, add other vegetables like frozen peas and/or corn, and add cream or milk for a creamier broth. If you like your soup brothier, add more water and more bouillon. If you don't have chickpeas and want to substitute another type of legume like cannellini beans, I recommend adding them after the pasta is done cooking, otherwise you'll end up with beautiful, golden, bean mush. Chickpeas are a little sturdier and I find they often need extra cooking to soften them up a bit, but cannellini beans will start to disintegrate after a few minutes of boiling. I hope you haven't been sick recently, but this new extra-contagious variant is going around, and most of us have spent the last two years avoiding getting regular colds and the flu, so our immune systems aren't quite as up to the challenge as they might usually be. The season of spring also means pollen, leading to irritated throats and sinuses for some of you. This soup will make you feel better, whatever ails you. Stay healthy, dear reader. The Food Historian blog is supported by patrons on Patreon! Patrons help keep blog posts like this one free and available to the public. Join us for awesome members-only content like free digitized cookbooks from my personal collection, e-newsletter, and even snail mail from time to time! Don't like Patreon? Leave a tip! 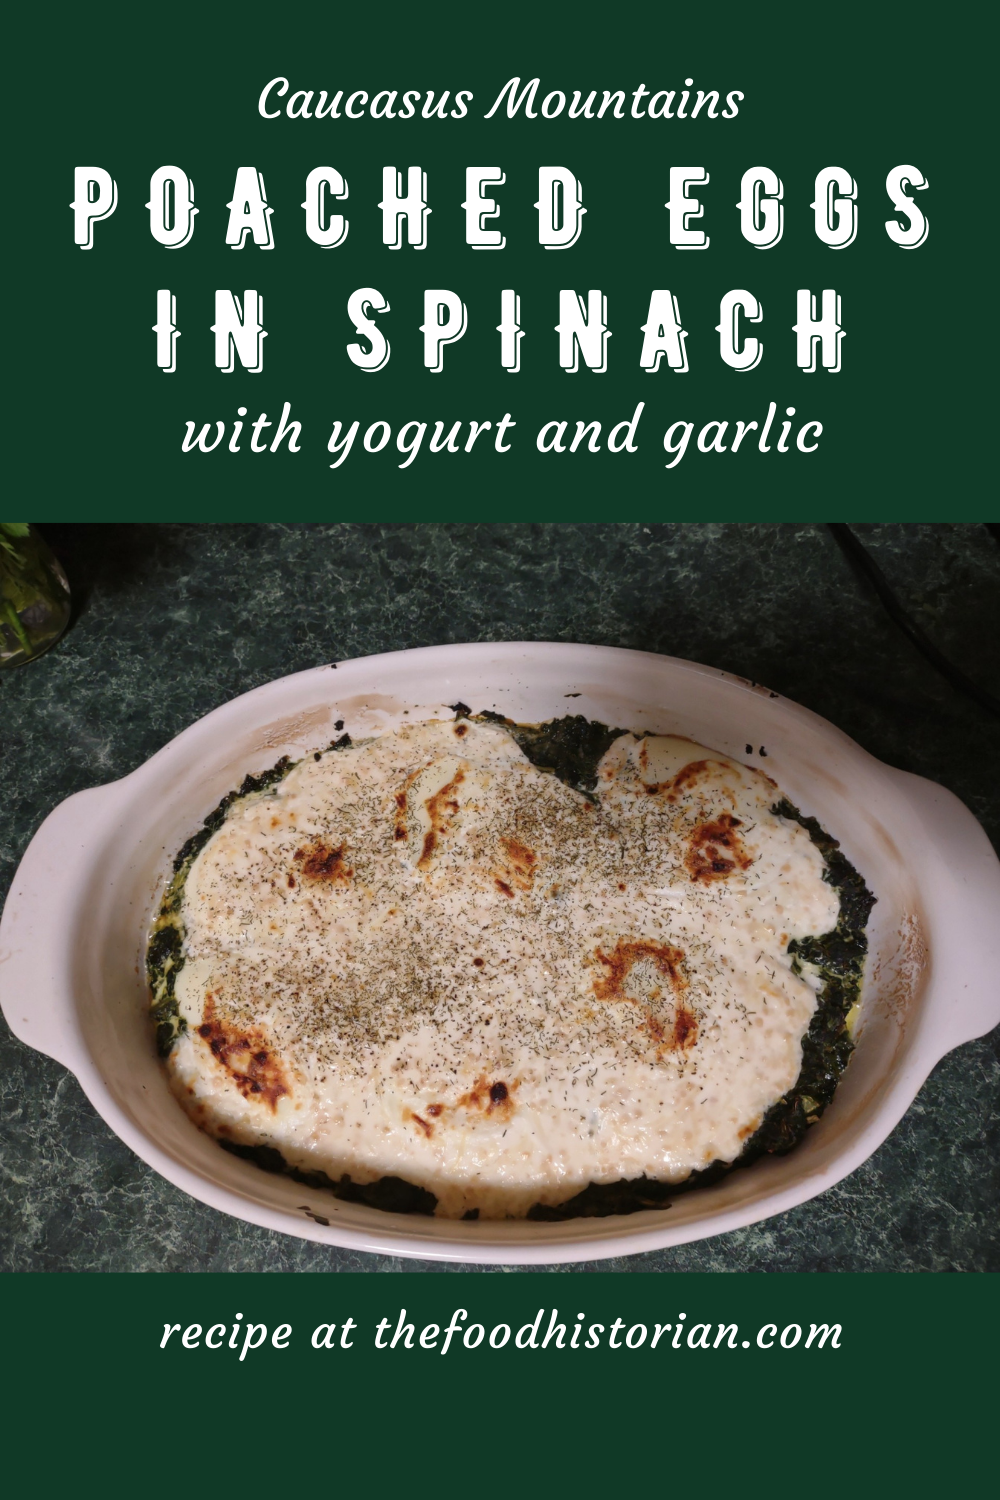 Note: This article contains Amazon Affiliate links. As I'm sure many of you have, I've been thinking a lot about Ukraine and Eastern Europe these days. Last week I launched a Substack specifically so I could give food history commentary on current events, and my first post was all about Ukraine. I've long had an interest in the cuisines of Eastern Europe and the states of the former Russian/Soviet empires. Their creative use of ordinary ingredients and emphasis on fresh fruits and vegetables is extremely appealing to a Midwesterner raised on meat and potatoes. The connection to the land, gardens, and older folks also reminds me a lot of visiting my great-grandmothers in rural North Dakota, who kept huge gardens, and dirt cellars full of preserved foods. I'm always on the lookout for new cookbooks in this vein, so when I saw the following, I snatched it up. The week before the Russian invasion of Ukraine - Cuisines of the Caucasus Mountains: Recipes, Drinks, and Lore from Armenia, Azerbaijan, Georgia, and Russia by Kay Shaw Nelson arrived at my door. First published in 2002, it's written by Nelson, an American who studied Russian language and literature and later became enamored of the food of Georgia (which I am also very interested in). She covers the whole of the Caucasus Mountains, and writes eloquently on each country and their regional differences in agriculture, wild foods, terrain, and foodways. 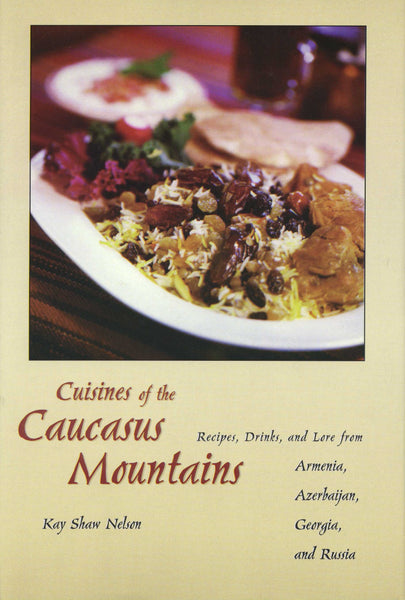 Cover of "Cuisines of the Caucasus Mountains" by Kay Shaw Nelson (2002). I'm always interested in vegetarian dishes, and this cookbook has quite a few, in addition to some delicious-sounding meat dishes. The book is divided by a combination of meal and ingredient, including appetizers, soups, dairy dishes (where eggs are confusingly included), fish, meat/poultry/game, vegetables & salads, grains & legumes, breads/pastas/savory pastries, desserts & sweets, and beverages/drinks/wine. I have earmarked a number of dishes, including salads and egg-based dishes. After the success of Eggs en Cocotte last week, I thought we'd take a stab at another egg dish for a simple supper. Nelson doesn't assign this dish to a country or region, like she does the others, so I've ascribed it to the entire Caucasus Mountains region. 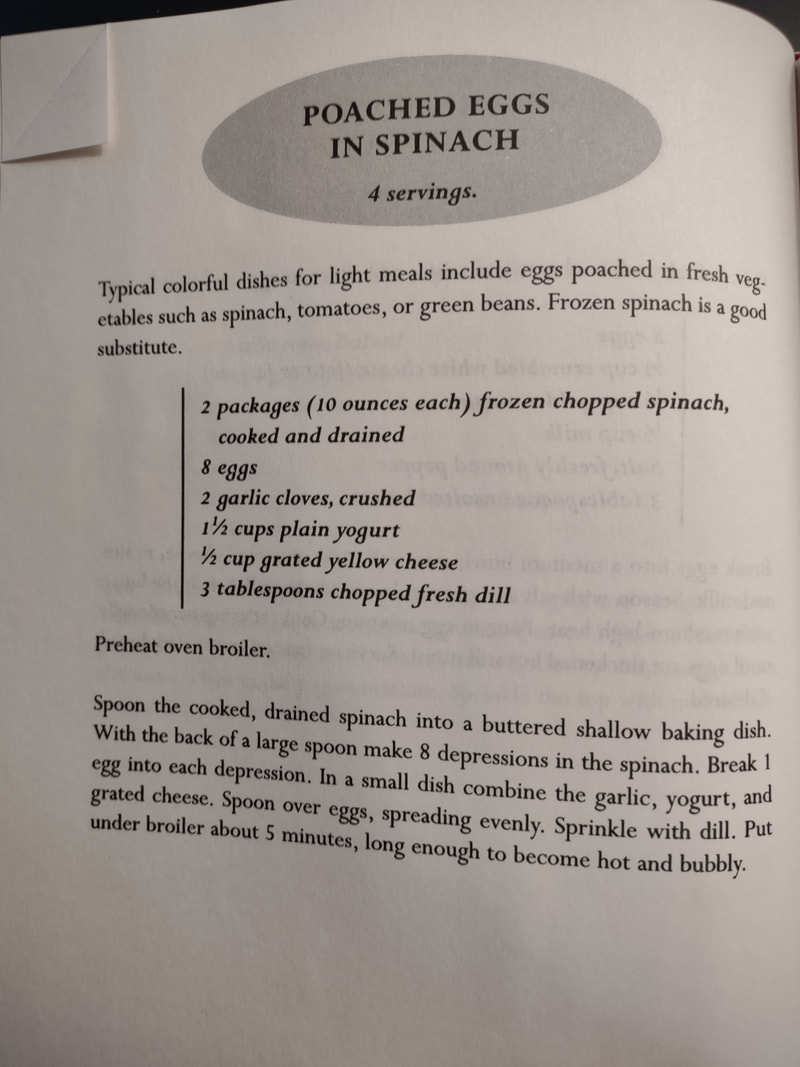 The recipe for "Poached Eggs in Spinach" as it appears in "Cuisines of the Causasus Mountains" by Kay Shaw Nelson (2002). Poached Eggs in Spinach with Garlic and YogurtNelson's original "Poached Eggs in Spinach" recipe is pretty straightforward, and as she remarks in the headnotes, tomatoes and green beans are an alternative vehicle for the poached eggs (similar to Middle Eastern shakshuka). However, her recipe leaves a bit to be desired. Because spinach is the main vehicle of this dish, if you don't season the cooked greens and the eggs well, it will be a flop. Here's my adaptation of her original recipe. 2 packages frozen spinach (10 ounces each), cooked and drained salt, pepper, and whatever other spices you like lemon juice 6 eggs 1 1/2 cups plain yogurt 2 garlic cloves, finely chopped 1/2 cup shredded mozzarella salt pepper dried dill butter for the baking dish Preheat your broiler. Season the spinach with salt, pepper, and lemon juice. Place in a well-buttered baking dish (not glass, which is not broiler safe) and make six indentations for the eggs. Mix the yogurt, garlic, and mozzarella. Crack the eggs into the indentations, then spread the yogurt evenly over the top (I skimped mine a little because I was using fewer eggs, and shouldn't have). Top the yogurt with more salt and pepper and dried dill. Broil for 10-15 minutes or until the yogurt is bubbly and browned and the egg whites are set. 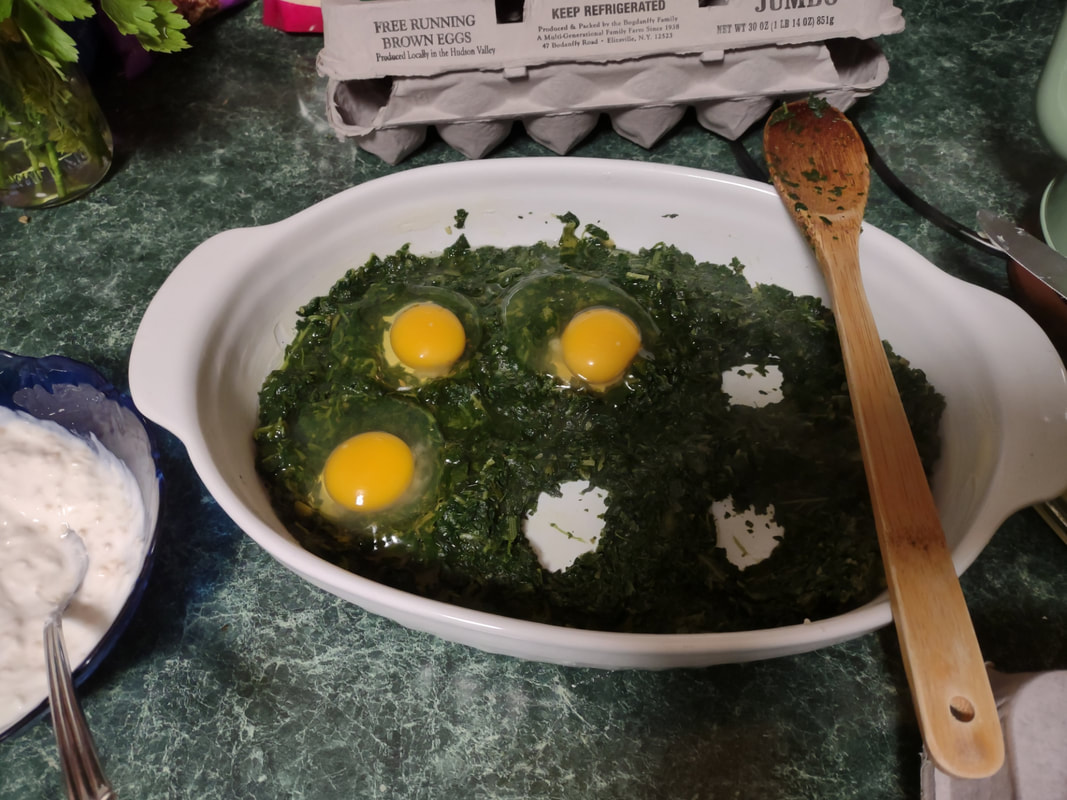 Cracking eggs into the indentations, yogurt sauce at left. 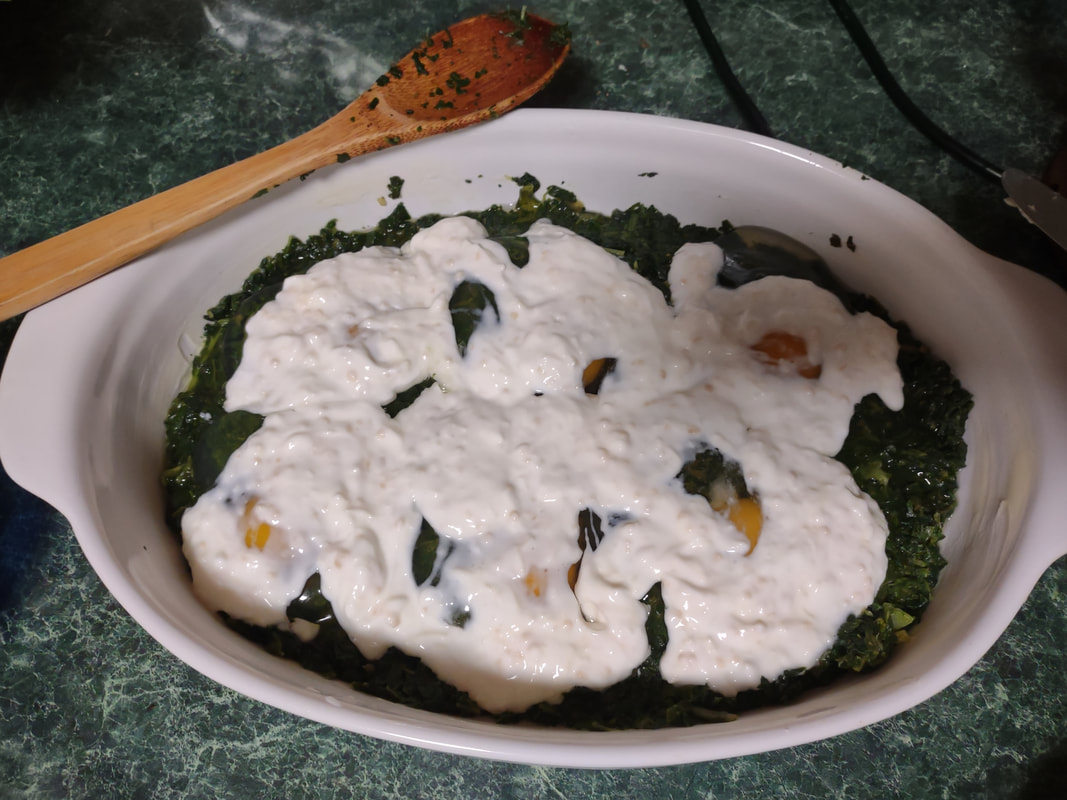 Covering the eggs with inadequate yogurt sauce. 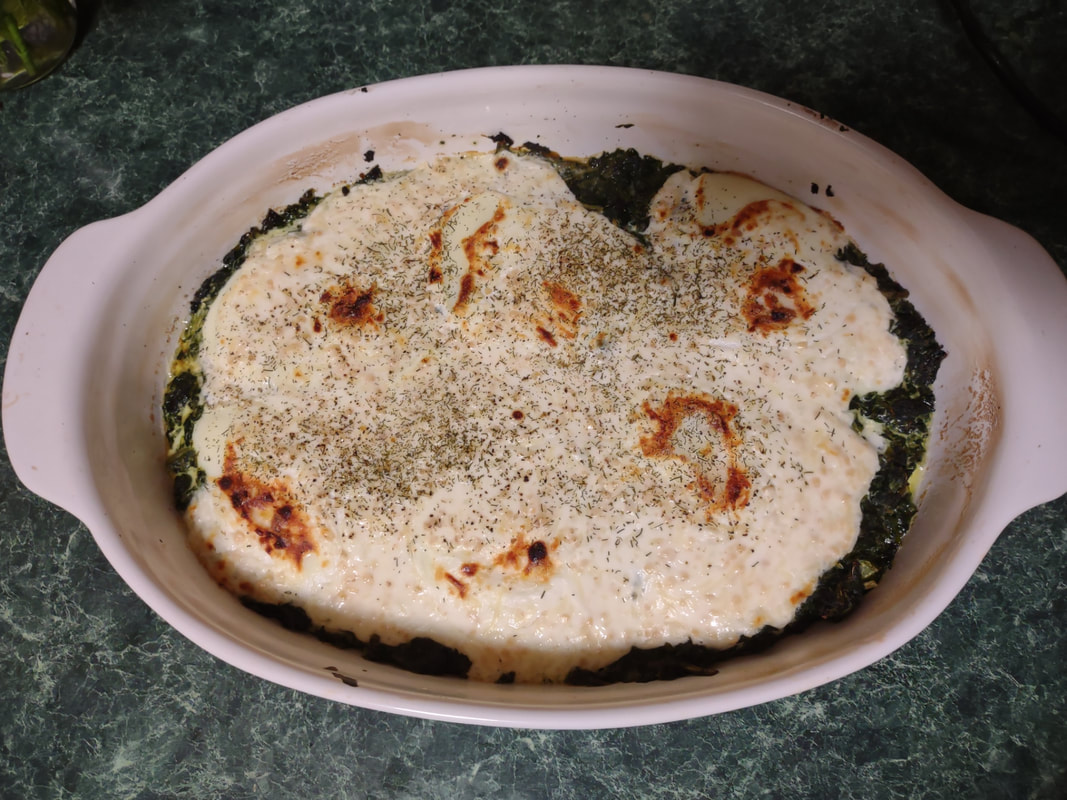 Bubbly and browned. Two eggs per person was plenty, and the leftovers weren't bad, although the egg will obviously cook more once you reheat it. I ate mine all mixed up with some buttered cracked wheat toast (Heidelberg Bread Company in New York makes the BEST toast). 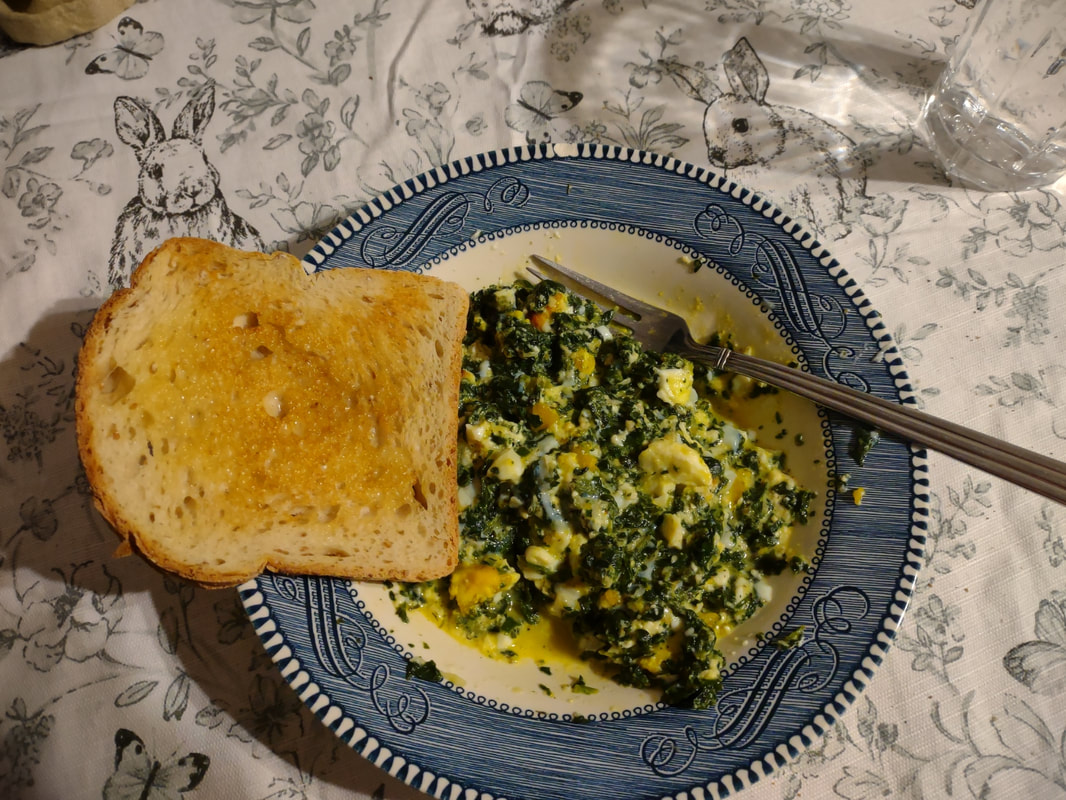 The poached eggs stirred into the spinach, with a slice of buttered wheat toast on the side. This turned out pretty well, all things considered. Without the seasoning it would have been especially bland, so make sure you season your greens! A few things I would change - press more of the water out of the spinach and add more lemon juice, add chopped fresh dill and parsley to the spinach mix, or lemony fresh sorrel if I could find it. I think I would also add onion or more garlic to the spinach itself, instead of just the topping. I would also follow the instructions and use more yogurt for the topping - the places where the egg white wasn't covered it got a little tough in the oven. I think I would still stick with just six eggs, instead of eight, because it was a nice ratio of egg-to-spinach, so the spinach felt like a substantial part of the meal, instead of a garnish for the eggs. I might also try this again in a stovetop-safe vessel like a cast iron skillet, or pre-heat the spinach in the oven before adding the eggs. The bottoms of the eggs were still a little undercooked and the tops were a bit tough. That being said, this was a surprisingly satisfying dish, and anything that gets more dark leafy greens into the diet is always a good thing. I would definitely try this again, but with some changes to make it more flavorful. What do you think - would you try it? The Food Historian blog is supported by patrons on Patreon! Patrons help keep blog posts like this one free and available to the public. Join us for awesome members-only content like free digitized cookbooks from my personal collection, e-newsletter, and even snail mail from time to time! Don't like Patreon? Leave a tip! Tip Jar
$1.00 - $20.00
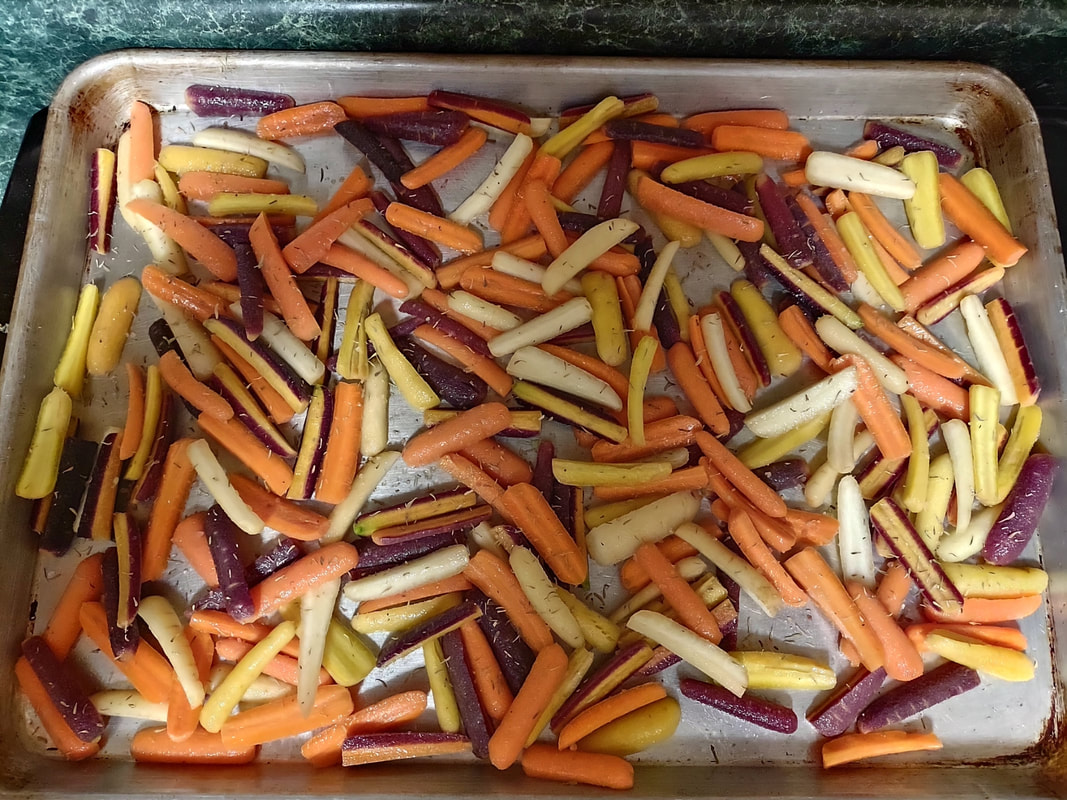
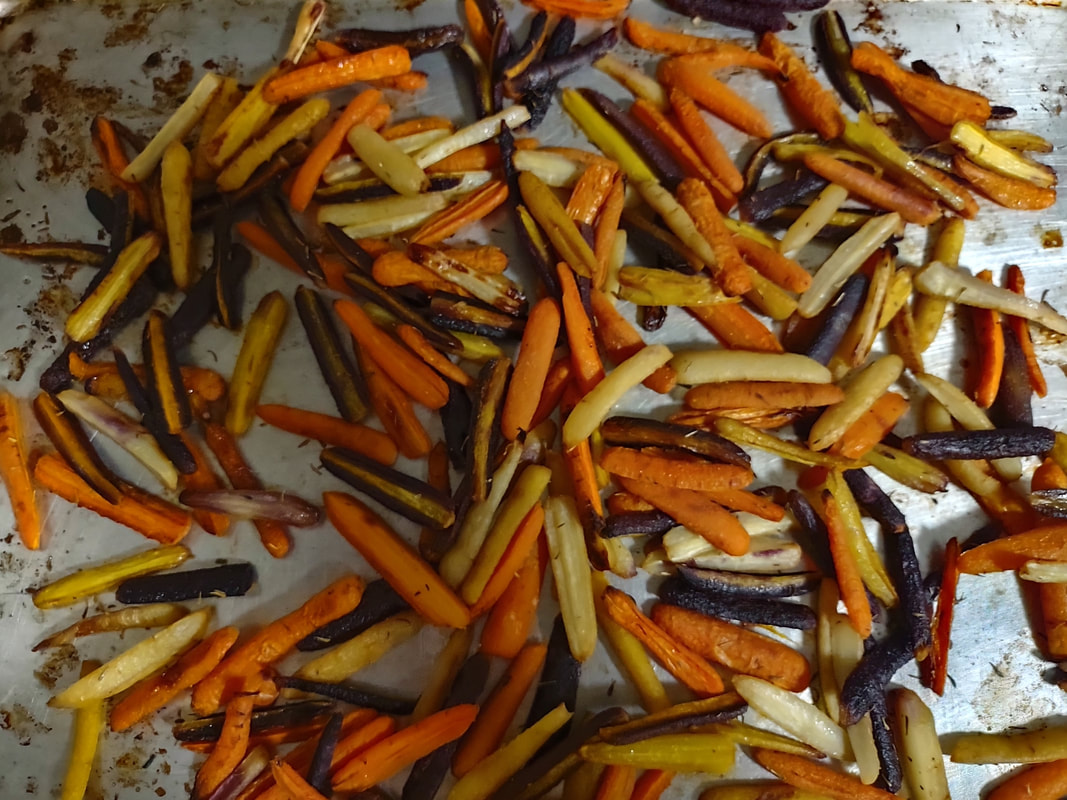
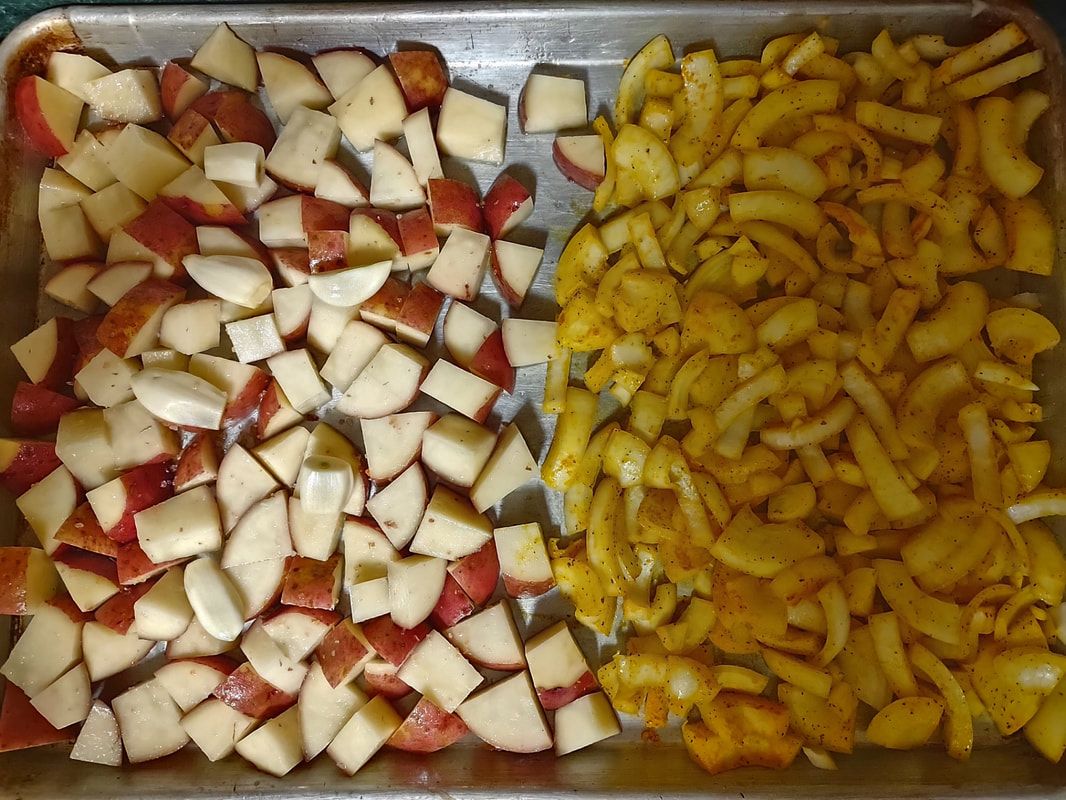
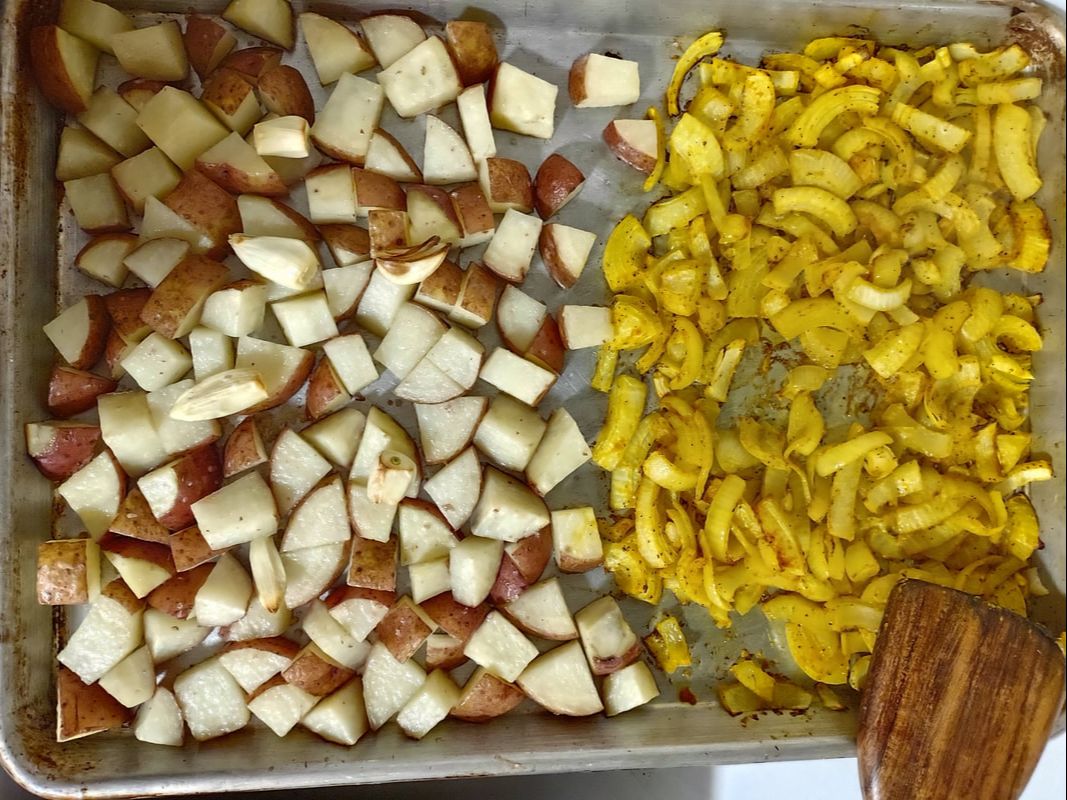
Like what you read, watch, or hear? Wanna help support The Food Historian, but don't want to commit to a monthly thing, or sign up for Patreon? Then you're in luck! You can leave a tip! This one-time (non-tax-deductible) donation helps keep The Food Historian going and pays for things like webhosting, Zoom, additions to the cookbook library, and helps compensate Sarah for her time and energy in helping everyone learn more about the history of food, agriculture, cooking, and more. Thank you!  I love brunch. Not the kind you wait in line for, crowded and busy and loud. I love brunch made at home. It's as quiet or loud as you want it to be, the service is usually pretty good, and while there's the effort of making food, if you play your cards right, it's always hot when it gets to the table, and hopefully someone else will do the washing up. Eggs have long been a breakfast staple. If you've a hot skillet, they cook up in a flash. And if you keep chickens, you have a fresh supply every day, at least during the warmer months. But getting a bunch of eggs hot and cooked to order to the table can be a precarious thing when you're hosting. So I took to my historic cookbooks and found a viable solution - eggs en cocotte. Technically, it's oeufs en cocotte, which is French for eggs baked in a type of dish called a cocotte, which may or may not have been round, or with a round bottom and/or with legs. Sometimes also called shirred eggs, which are usually just baked with cream until just set, these days en cocotte generally means the dish spends some time in a bain marie - a water bath. The cookbook recipe I used was from Practical Cooking & Serving by prolific cookbook author Janet McKenzie Hill. Originally published in 1902, my edition is from 1912. You can find the 1919 edition online for free here.  The cover of "Practical Cooking and Serving" by Janet McKenzie Hill, 1912 edition, author's library. A weighty tome of a book, Practical Cooking and Serving is nothing if not practical, and McKenzie Hill is uncommonly good at explaining things. Her section on eggs explains: "Eggs poached in a dish are said to be shirred; when the eggs are basted with melted butter during the cooking, to give them a glossy, shiny appearance, the dish is called au mirroir. Often the eggs are served in the dish in which they are cooked; at other times, especially where several are cooked in the same dish, they are cut with a round paste-cutter and served on croutons, or on a garnish. Eggs are shirred in flat dishes, in cases of china, or paper, or in cocottes. A cocotte is a small earthen saucepan with a handle, standing on three feet." Since my baking dishes were neither the flat oval shirring dishes, nor the handled kind, I guess perhaps they are neither shirred nor en cocotte, according to Hill, but we can afford to be less picky about our dishware. Hill offered two recipes: one more classic version with breadcrumbs (optional addition of chopped chicken or ham) mixed with cream "to make a batter." The buttered cocotte was lined with the creamy breadcrumbs, the egg cracked on top, with the option to cover with more breadcrumb batter. The whole thing was then baked in a hot water bath "until the egg is set." My brunch guest adores mushrooms, and I wanted something a little fancier and more substantial, so I went with Hill's version No. II. Eggs en Cocotte with Sauteed Mushrooms (1912)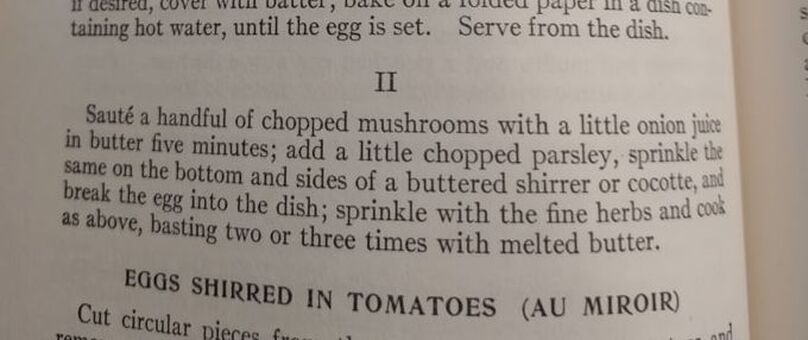 Egg in Cocottes, No. II, from "Practical Cooking and Serving," by Janet McKenzie Hill, 1912. Author's library. Hill's original recipe reads: Sauté a handful of chopped mushrooms with a little onion juice in butter five minutes; add a little chopped parsley, sprinkle the same on the bottom and sides of a buttered shirrer or cocotte, and break the egg into the dish. Sprinkle with the fine herbs and cook as above, basting two or three times with melted butter. I will admit I didn't follow the directions as closely as I should have - I didn't use hot water in my bain marie (oops), and I didn't baste with butter. So the eggs were cooked a little more solid than I would have like, but still turned out deliciously. Here's my adapted recipe: 1 pint white button mushrooms, minced 2 tablespoons butter 1 clove minced garlic salt and pepper 2 tablespoons heavy cream 2 tablespoons fresh flat leaf parsley, chopped 4 eggs Preheat the oven to 350 F. Butter three or four small glass baking dishes. Sauté the mushrooms and garlic in butter, adding salt and pepper to taste. When most of the mushroom liquid has cooked off, add the heavy cream and parsley and stir well. Divide evenly among the baking dishes, make a little well, and then crack eggs into dishes. One or two per dish. Salt and pepper the egg, then place in a 9x13" baking pan with two inches of water (use hot or boiling water). Bake 5-10 minutes, or until the egg white is set and the yolk still runny. For firmer eggs, bake 10-15 mins. I did not use boiling water, so the whole thing took more like 20-30 mins for the water to heat up properly, and the yolks got firmer than I would have liked. Tasted delicious, though! This is a very rich dish, so best served with something green and piquant - I chose baby arugula with a sharp homemade vinaigrette (2 tablespoons olive oil, 2 tablespoons lemon juice, 1 tablespoon dijon mustard was enough for 3 or 4 servings of salad), which was just about perfect. 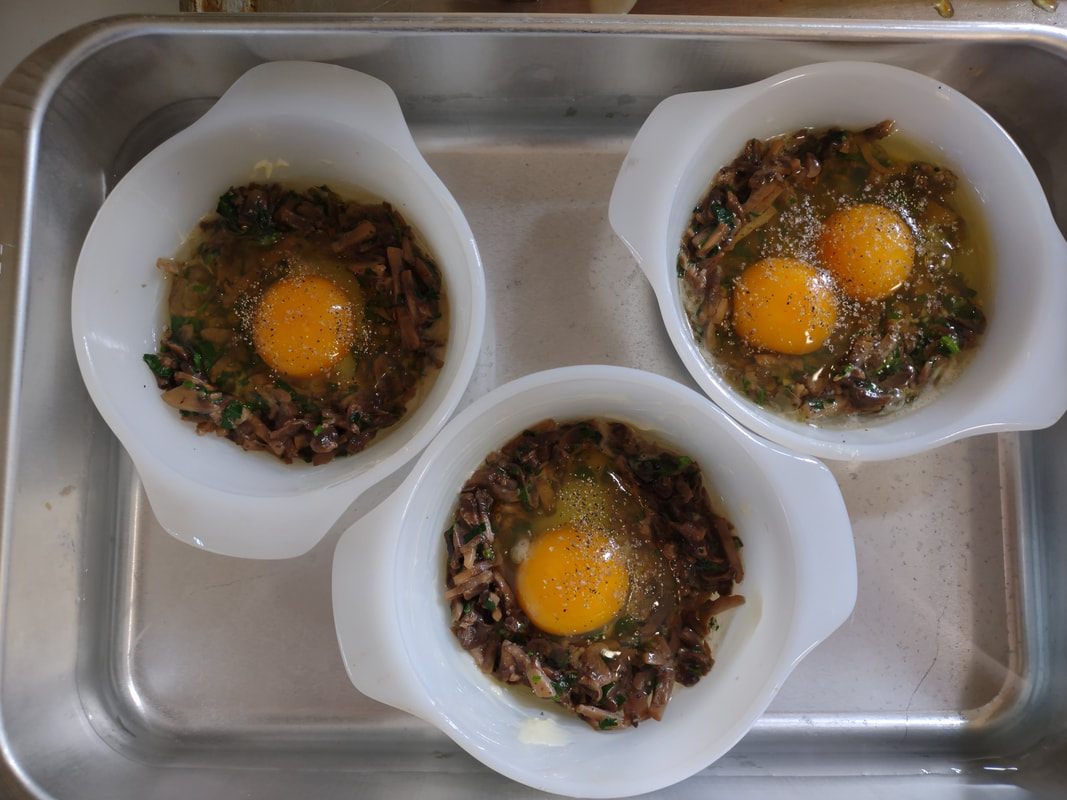 The raw eggs in their cocottes, sitting in their water bath and waiting to go into the oven. You don't have to be a fan of mushrooms to like this dish - white button mushrooms aren't particularly strong-flavored - they just tasted rich and meaty. And despite the fact that eggs en cocotte look and taste incredibly fancy, they were very easy and relatively fast to make. If you were cooking brunch for a crowd, you could certainly prep the mushroom mixture in advance, have the bain marie water on the boil, and make the eggs your last task for a beautiful brunch. With the simple arugula vinaigrette on the side, something sweet and bready (that recipe is coming soon, too) and some fresh fruit and mimosas, you've got yourself a winner. Do you have a favorite egg recipe? 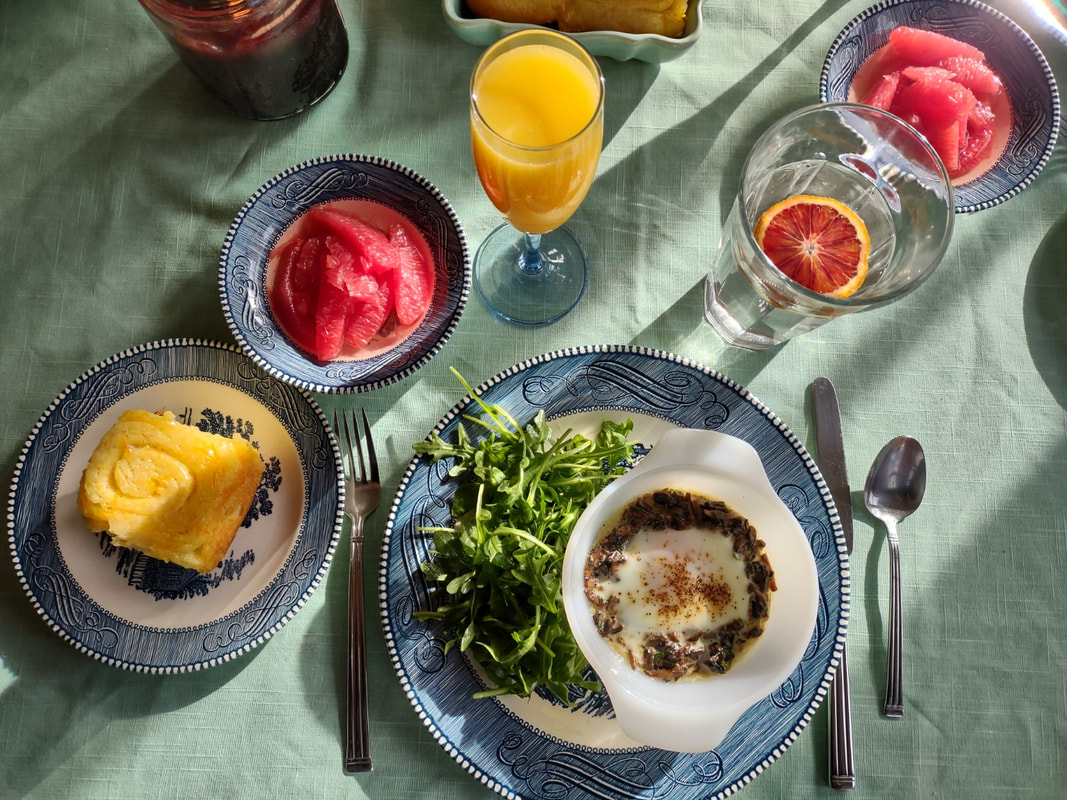 The whole beautiful brunch spread. The Food Historian blog is supported by patrons on Patreon! Patrons help keep blog posts like this one free and available to the public. Join us for awesome members-only content like free digitized cookbooks from my personal collection, e-newsletter, and even snail mail from time to time! Don't like Patreon? You can leave a tip! Meatless Monday: Brunch with Rosemary & Sage Roasted Potatoes and Gorgonzola Garlic Cream Sauce2/7/2022  It's been so bitterly cold lately, I thought I would finally share this stunner of a vegetarian brunch with everyone. A few weeks ago we had a friend over for brunch. It had been a long couple of post-holiday weeks, and everyone was playing catchup at work. So I thought having something delicious and comforting for brunch would help take the edge off. A favorite local Italian restaurant of ours has an appetizer I adore - waffle fries fried with sage and rosemary with a side of gorgonzola cream sauce for dipping. It's divine. I wanted to replicate something similar at home, but brunchified, and with a little lighter hand. So I decided to roast some red potatoes with sage and rosemary and olive oil. I had intended to pick out the herbs as I'm generally not a fan of whole rosemary leaves, but everything fried up in the olive oil so beautifully that we devoured the herbs alongside the potatoes. I topped the potatoes with a fried egg, to make things feel more breakfast-y, with a side of broiled grapefruit for a vintage feel and to cut the fat a little. Sadly I used brown sugar, so instead of caramelizing it just melted everywhere. Still tasted yummy though. We had faux mimosas (the friend doesn't drink alcohol) which were also delicious. The star of the show, though, was the potatoes and cream sauce. Divine. 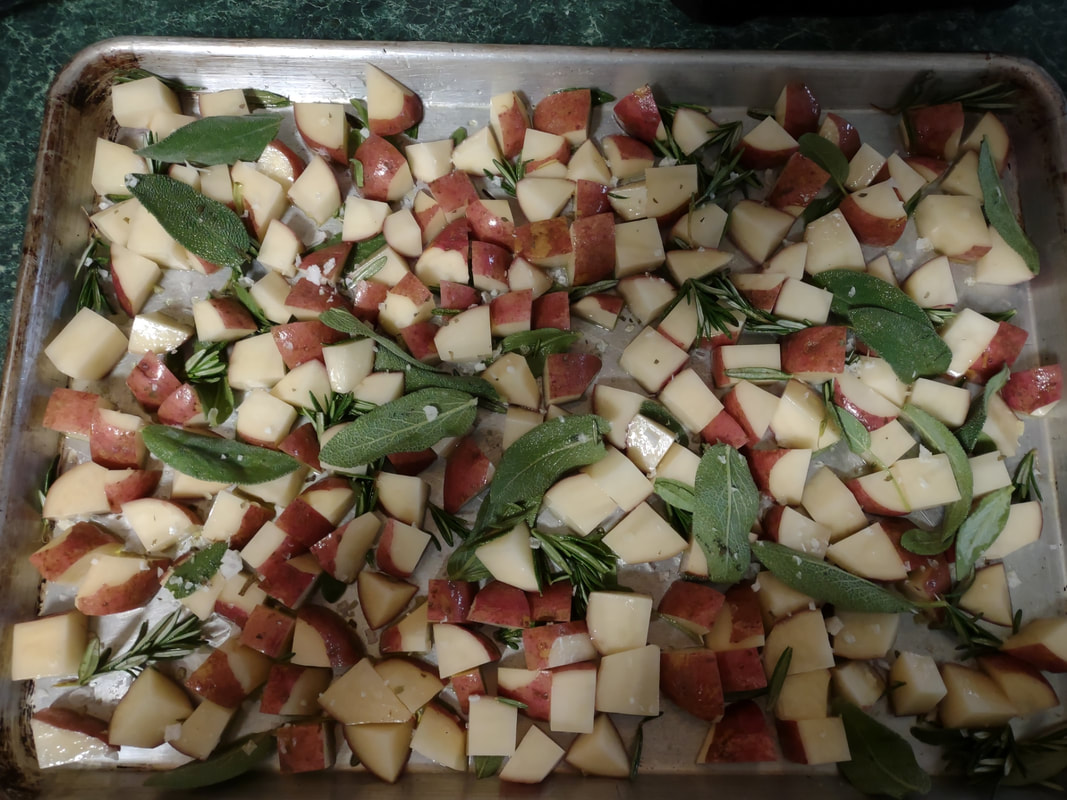 The beautiful potatoes and herbs, pre-roasting, in my very poorly lit kitchen. Rosemary & Sage Roasted PotatoesI used a fancy flake salt flavored with wild garlic, so if you're using regular sea salt, maybe add just a dash of garlic powder or some minced garlic. 6-8 medium red potatoes 1 container/bunch fresh sage 1 container/bunch fresh rosemary olive oil coarse sea salt Preheat oven to 450 F. Scrub the potatoes, cut off any eyes or bad parts, and cut into similarly-sized cubes. Wash the herbs and strip the leaves off of the rosemary stems. Pop the sage leaves off of their longer stems. On a large half sheet pan, spread the potatoes, and drizzle with olive oil. Add the herbs and using your hands, gently toss everything to combine (you can do this in a bowl if it's easier) and spread out in one layer, making sure the potatoes all have a cut end facing down. Sprinkle with salt and put in the oven. Roast for 20-30 minutes, or until potatoes are perfectly tender, with crisp brown bottoms. When ready to serve, use a very flat spatula to scrape up the crispy bits and put the whole shebang, potatoes, herbs, and all, into a serving dish. Garlicky Gorgonzola Cream SauceOne of the miracles of heavy cream is that if you reduce it, it turns into this silky sauce with no need for a roux in sight. 1 pint heavy cream (use more if you like!) 2 cloves garlic 1+ cup crumbled gorgonzola salt & pepper to taste With the flat side of a knife slightly crush your peeled garlic cloves, and add them to the heavy cream in a heavy-bottomed saucepan and cook over medium heat. Let the cream simmer, but do not boil, until reduced slightly (it should coat a spoon) and fragrant with garlic. Fish out the garlic cloves and discard. Add the gorgonzola and stir to melt. Give it a taste and add salt and pepper as needed. Keep hot until ready to use. To make brunch, pile some potatoes on a plate, add a ladle of gorgonzola sauce, and top with a fried egg. If you're like me (over medium, please!), you like to break the runny yolk. 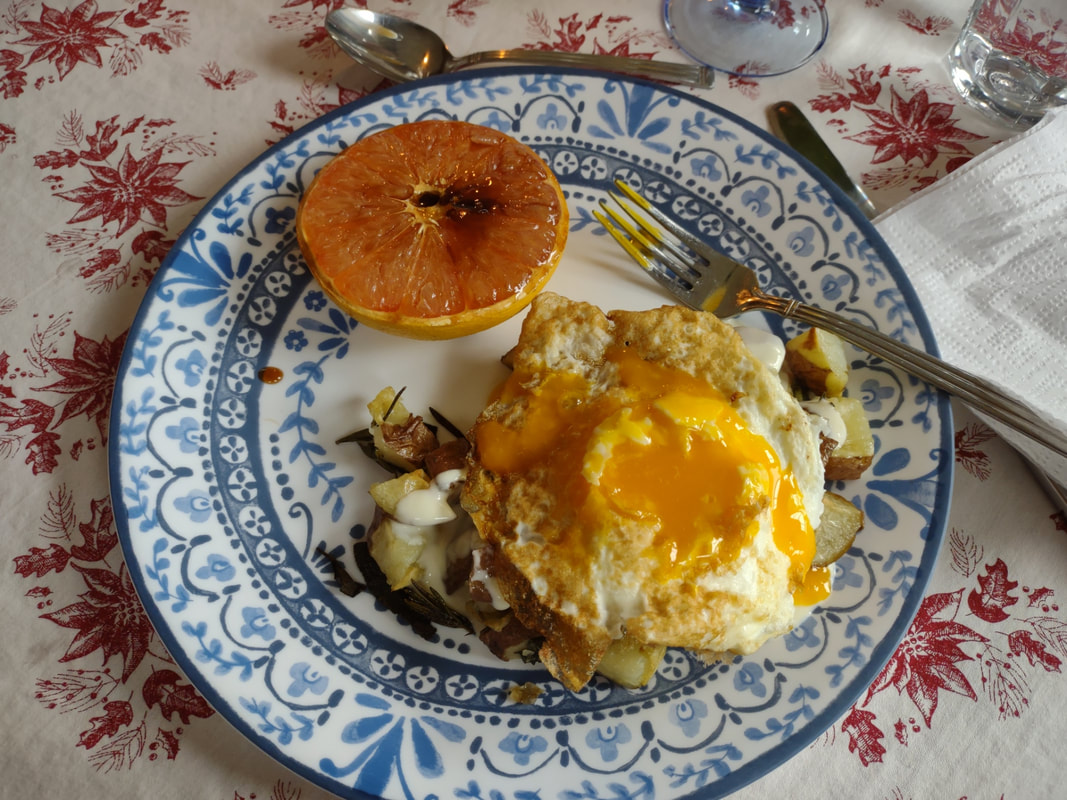 Runny fried egg with the yolk broken on top of the rosemary & sage roasted potatoes and gorgonzola cream sauce. Don't mind the Christmas tablecloth. Virgin MimosasIf you're entertaining folks for brunch who don't want or can't have alcohol, virgin mimosas are delightful. We had sparkling cider from New Year's Eve that had gone un-opened, but you could just as easily use ginger ale or 7-up instead. 1 part sparkling cider 1 part high-quality orange juice champagne flutes Are they really mimosas without the champagne flutes? Pour half and half into each flute, and don't worry about drinking too many. Broiled GrapefruitDo as I say, not as I did. Brown sugar does not work. Lesson learned! 1/2 fresh grapefruit per person 1 tablespoon granulated white sugar per half grapefruit Set the broiler to high. Cut grapefruit in half and place on a metal sheet pan or other broiler-safe dish (do not use glass baking dishes under the broiler!). Gently smooth the tablespoon of sugar over the top. Place under the broiler and cook 1-2 minutes (watch them!) until the sugar is caramelized. Serve with grapefruit spoons, if you have them. Otherwise a dessert spoon or butter knife works, too. 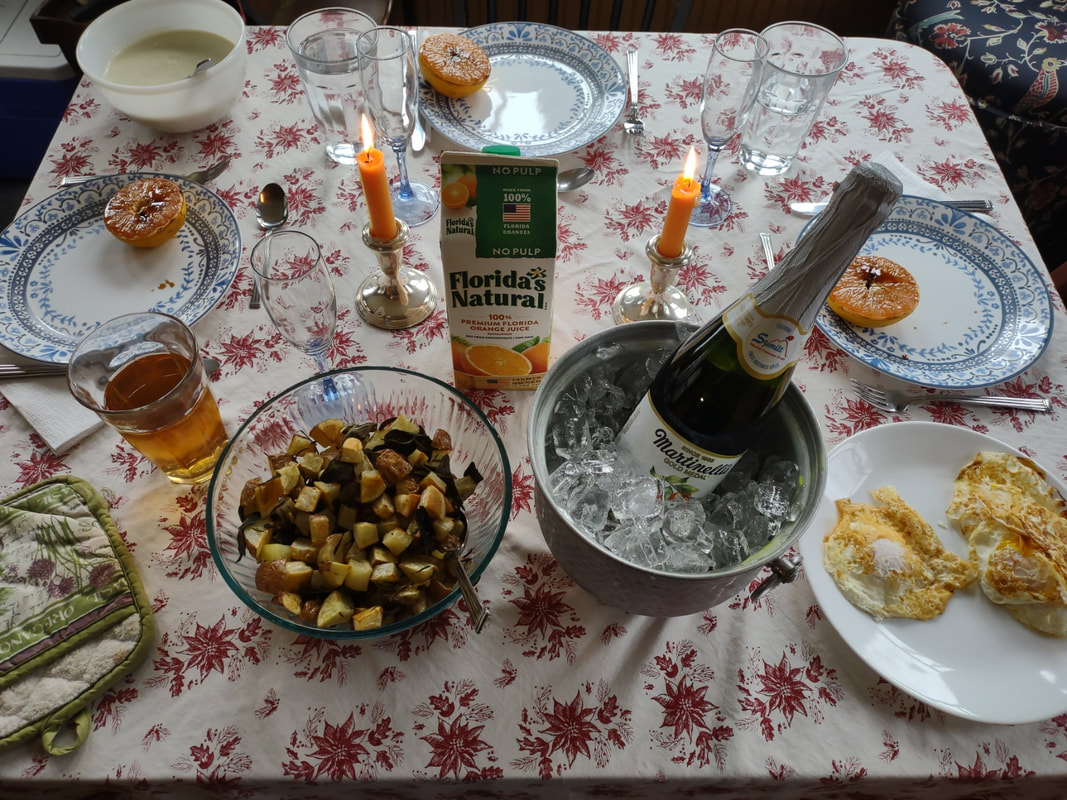 The accidentally Christmassy brunch setup - complete with ice bucket for the sparkling cider and champagne flutes. In the bleak midwinter, a sunny brunch can really lift the spirits. But don't skimp on the trappings. Light some taper candles. Pull out the champagne flutes and an ice bucket. Dig out the grapefruit spoons (I don't have any yet!). It can really make the difference. Don't have any of that? Make a list and keep your eyes peeled once you feel it's safe to go antiquing again. Fancy glassware can usually be had for a song at thrift shops, and since glass is inert, a quick wash in hot soapy water and it will be fit for use, no matter what shape it was in when you got it (so long as it's not broken or cracked!). Have you been doing anything special lately to make winter seem less dreary? The Food Historian blog is supported by patrons on Patreon! Patrons help keep blog posts like this one free and available to the public. Join us for awesome members-only content like free digitized cookbooks from my personal collection, e-newsletter, and even snail mail from time to time! Don't like Patreon? Just leave a tip! 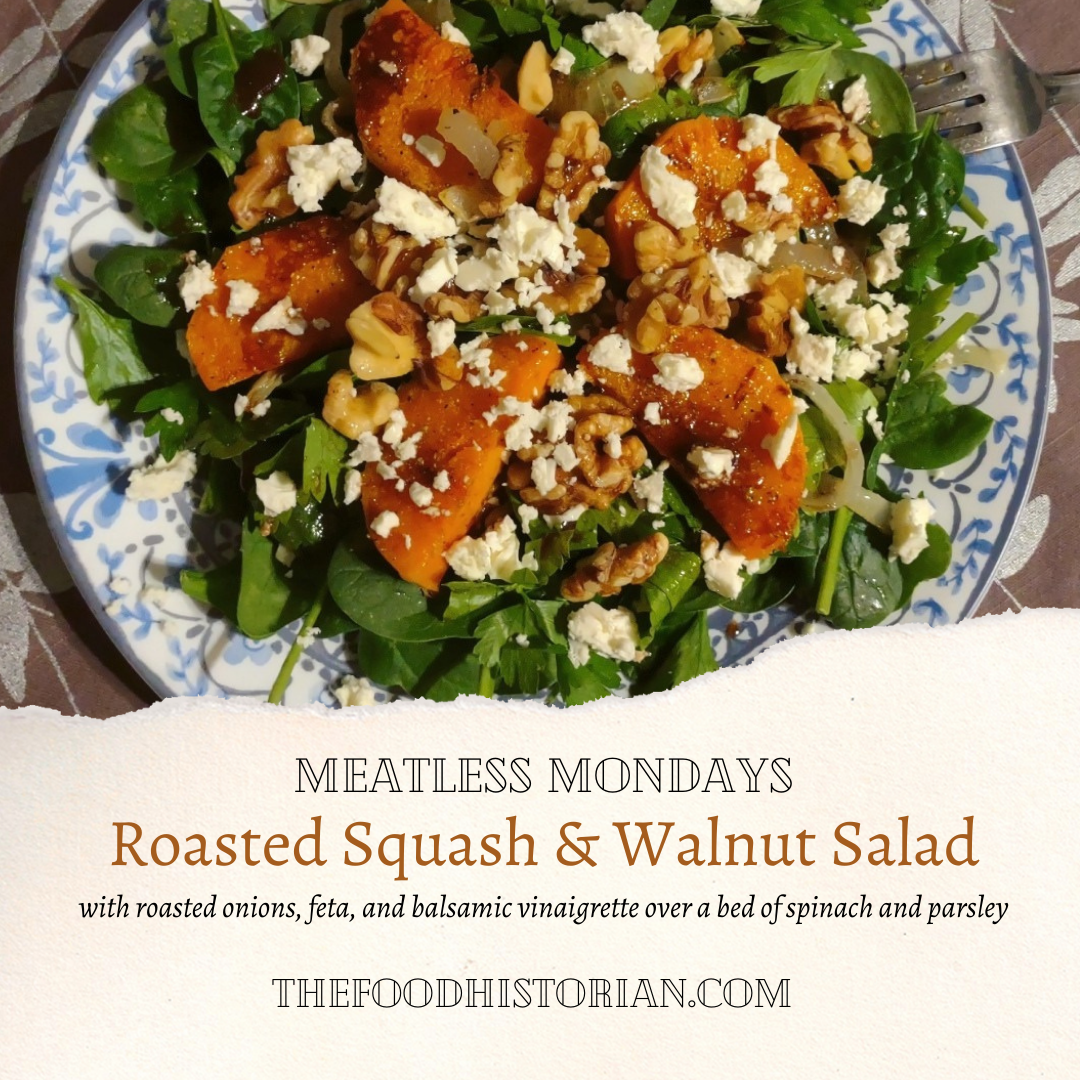 It's the depths of January. And after months of holiday eating, life can feel depressingly uninspiring when it comes to food. But while the imported tropical fruits beckon, it is possible to make a perfectly delightful dinner out of foods that are (mostly) in season here in the northeast. Enter the butternut squash. I'm typically not a huge fan. Butternut squash soup is usually much too sweet. Mashed squash is insipid and mealy. But when a Patreon patron posted about making Emily Nunn's delicata squash salad with parsley and walnut vinaigrette and raved about it, I was intrigued. I didn't have delicata squash, just one lonely little butternut left over from my impulse buy Thanksgiving CSA haul. I did have a big bunch of parsley, but I think it got a little frosty in the frigid temperatures we've been having lately, so bits were crispy and wilted. It would take some sorting. I also had a bottle of walnut oil I'd bought last year, and mostly hadn't used, which was set to expire in February. In the fridge, half a block of the most deliciously creamy, salty, made-in-New-York cow's milk feta (the sheep's kind and I don't get along) was languishing. Inspiration was striking. I'm an inveterate tinkerer when it comes to cooking. Even the respected science of baking usually has me asking, can I put fruit in this? Can I substitute some whole grain flour? Do I really have to beat the eggs for three whole minutes? Even as I don't mess with the ratios otherwise. So it's no surprise that I would be clinically unable to replicate Emily's recipe as she wrote it. The bones were good, though, so I stuck to those. Here's what I came up with: Roasted Squash & Walnut SaladThis recipe seems complicated, but once the vegetables are cut and in the oven, it's a fair amount of waiting. You can do a pan of dishes or start a load of laundry or watch most of an episode of your favorite television show while you wait. 1 smallish butternut squash 2 smallish yellow storage onions walnut oil pink salt garlic powder black pepper dried sage walnuts feta (the good-quality, locally made wet kind) fresh flat leaf parsley fresh baby spinach balsamic vinegar Dijon mustard maple syrup Preheat the oven to 400 F. Generously coat a half sheet pan with walnut oil (you can use olive or canola, if you prefer). Wash butternut squash and cut neck into one inch rounds. Cut in half and with a sharp knife remove the peel. I left the bulb end, cut it in half, scooped out the seeds, and roasted the halves whole with the rounds. Flip the half moons of squash in the oil so they're well-coated. Peel and halve the onions, cut into rounds, and add to the oiled pan. Combine about 2 tablespoons of pink salt, at least a teaspoon of black pepper, a few shakes of garlic powder and dried sage, and sprinkle the mixture all over the squash and onions. Roast for 30 minutes, flip, season again if you like, and roast for another 10 minutes or so, until the squash is crispy on one side and very tender, and the onions are tender. Scatter a generous handful of walnuts across the pan and roast another 3-5 minutes, until the walnuts are fragrant. 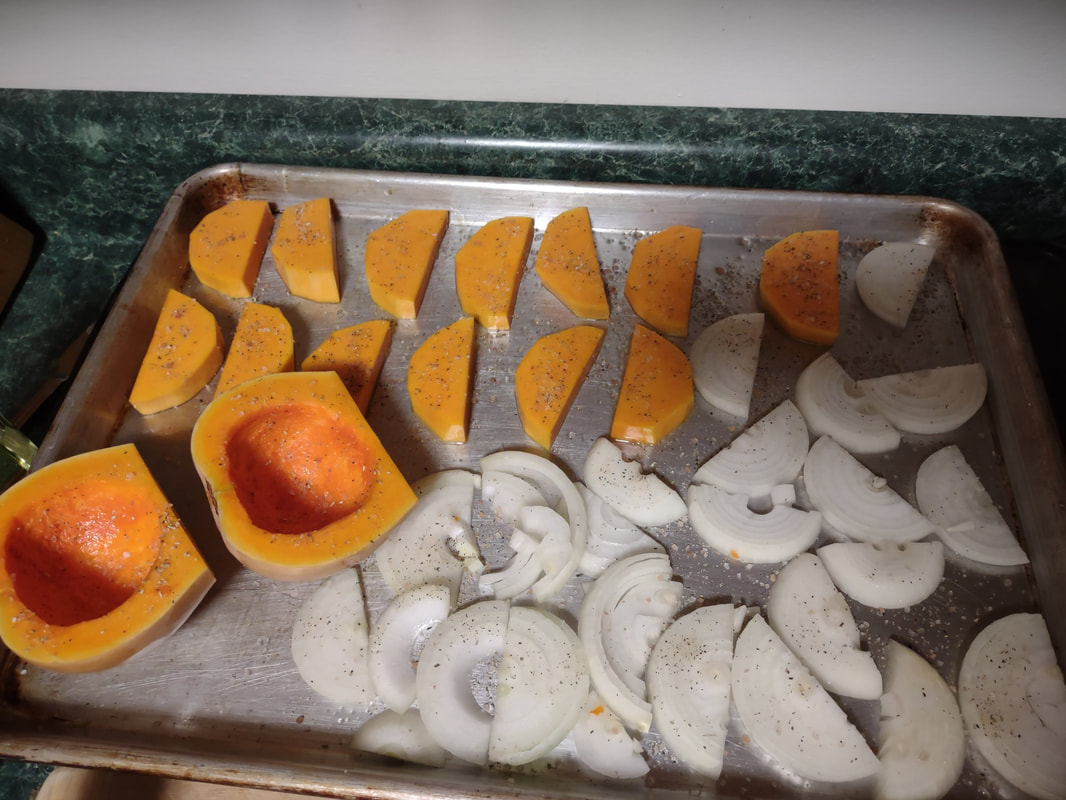 The poorly lit roasting tray, with squash and onions nicely seasoned and ready to go in the oven. Meanwhile, assemble your plate with the baby spinach topped with just the whole leaves of washed and dried parsley. Make a vinaigrette of about 3 tablespoons walnut oil, 2-3 tablespoons balsamic vinegar, and 1 tablespoon each Dijon mustard and maple syrup (add more syrup or a tablespoon of water if it seems too sharp). Top the greens with slices of squash, onions, and walnuts, drizzle over the vinaigrette, crumble feta on top, and serve while the vegetables are still warm. 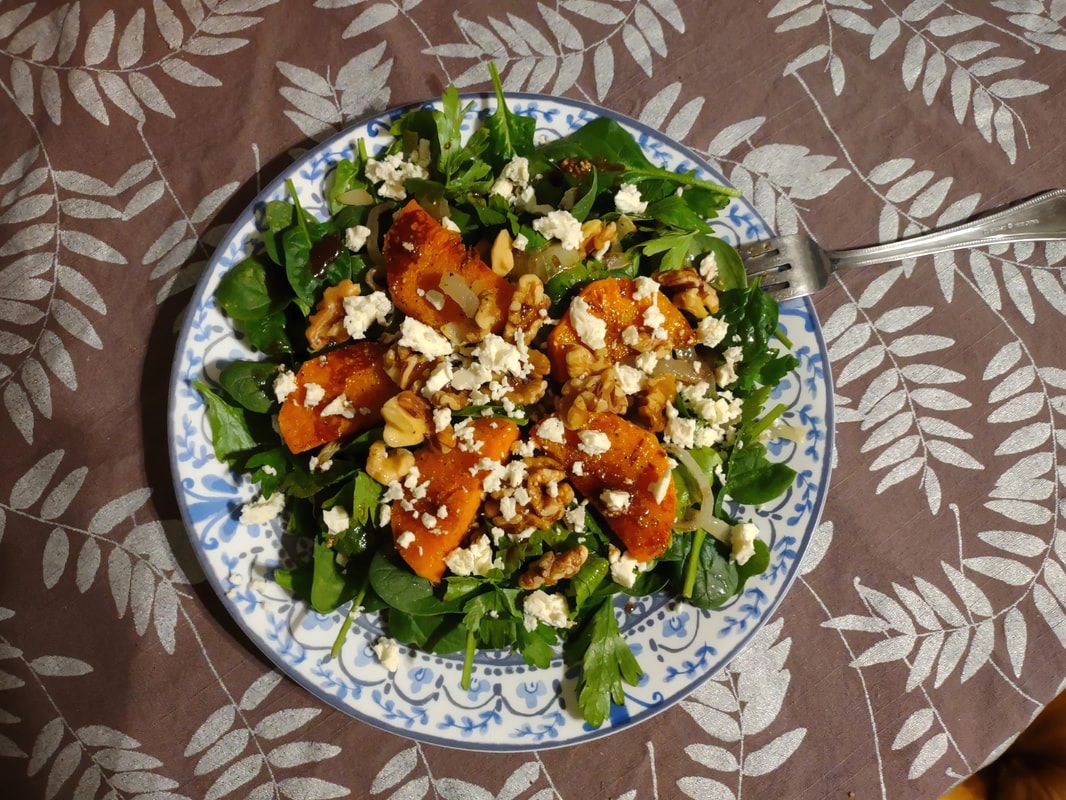 This salad lends itself well to beautiful arrangement, but I cut up the squash into bite-sized pieces while eating to make sure I got a piece of squash in every bite! This salad is divine. The butternut squash came out silky and rich, the onions soft and not-too-sweet, the walnuts pleasantly crunchy, the parsley added some fresh, grassy tones to the milder spinach, and the sweet-sharp balsamic vinaigrette tied everything together. There was one slice of butternut squash left on the pan, so I tried it with some of the leftover onions and walnuts (which I stuffed in the cavities of the squash halves with the rest of the vinaigrette, for lunch tomorrow). To be honest, the squash was so good I could have eaten it just like that. But it really added so much satisfying heft to the salad. I don't think I'll ever make butternut squash any other way again. It was too delicious this way, and I could see it being the star of any number of other salads as well. It's hard to find satisfying, fresh recipes for winter eating that don't involve ingredients flown in from thousands of miles away. And while I love the wintertime treat of beautiful citrus, it's nice to be able to make something so delicious out of locally grown storage foods, too. I hope you enjoy this recipe as much as I did! The Food Historian blog is supported by patrons on Patreon! Patrons help keep blog posts like this one free and available to the public. Join us for awesome members-only content like free digitized cookbooks from my personal collection, e-newsletter, and even snail mail from time to time! Don't like Patreon? Leave a tip! 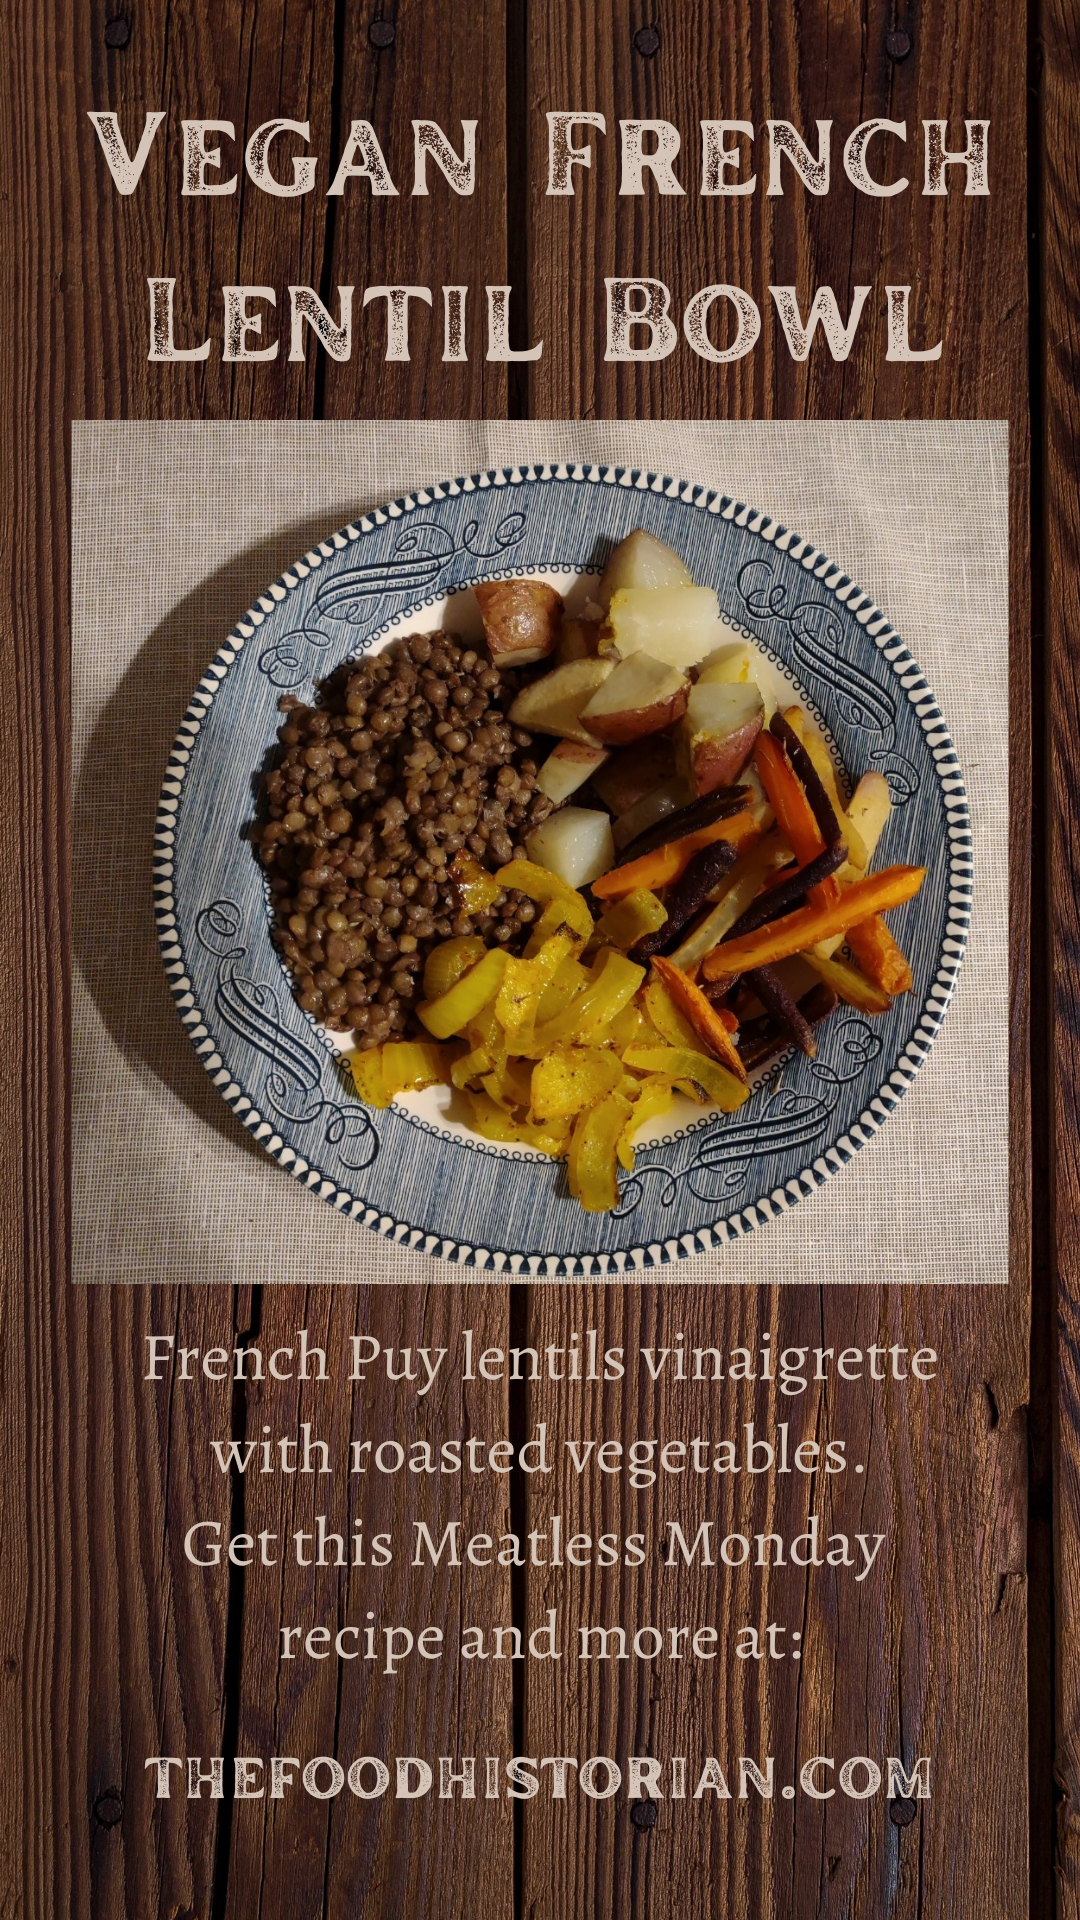 Last Monday I gave a talk on the history of vegetarian food, and the subject of my vegan dinner came up! So I thought I would take the opportunity to share the recipe with you, since so many have asked for it. This is one of my favorite recipes for an easy, delicious supper - perfect for cold weather - and is often in rotation during the fall and winter months. I call it French Lentil Bowl because I used French green Puy lentils, and Dijon mustard vinaigrette, but also because lentils vinaigrette is an old-school French dish. I use lentils vinaigrette in a variety of salads and other dishes (notably one delicious, but very rich, recipe for creamed Dijon lentils with ham I found in the French Vegetable Cookbook by Patricia Bourne), so it's safe to say I'm a lentil fan (don't believe me? Try the lentilwurst). They're quicker and easier to cook from dried than beans and the green Puy lentils (black Beluga lentils also work well) have a hearty texture and peppery flavor that I just love. If you've only ever had lentils in the murky brown soup, give this recipe a try. Vegan French Lentil Bowl RecipeThis recipe makes a lot, but also makes wonderful leftovers and reheats nicely. If the carrots and onions seem excessive, let me note that they are so delicious you will almost always regret not making more. 2 cups green/French lentils 3 cups water 2 bay leaves 1-2 cloves garlic (optional) 2 pounds carrots (baby carrots are fine) 3-4 red potatoes 3-4 yellow storage onions extra virgin olive oil sea salt dried thyme ground turmeric ground black pepper white wine vinegar Dijon mustard Preheat the oven to 450 F. Add the lentils, water, bay leaf, and garlic to a 2 quart pot, cover, and cook over medium-high heat. Once boiling, reduce to medium-low heat and continue cooking until the lentils are tender and all the water is absorbed (approximately 20 minutes). While the lentils are cooking, wash and cut the carrots. If using full-size carrots, wash, peel, and cut into thick julienne. Pieces should be no larger than your pinky finger. If using baby carrots (I like the rainbow heirloom ones for color), wash and cut fat ones in quarters, medium ones in half, and leave the skinny ones. Toss in olive oil and arrange in a thin layer on a half sheet pan. Sprinkle with thyme and sea salt. Then scrub and cut red potatoes into chunks about 1-2 inches square. I usually cut the potato in half lengthwise, then in half lengthwise again, then cross-cut into chunks. Toss with olive oil and arrange on a half sheet pan - it should take up about 2/3 of the space. Sprinkle with sea salt and add a few cloves of garlic to scent them, if you like. Then cut the root part off the onions, cut in half, remove the papery skin, and cut into finger-width slices. Toss with olive oil, a generous sprinkling of turmeric (1/2-1 tablespoon), sprinkling of black pepper, and arrange the onions on the remaining 1/3 of the baking sheet (you can do the tossing and stirring right on the baking sheet).
Pop both sheets into the oven for about 20 minutes. Meanwhile the lentils are probably done. In a largish bowl, add at least 3 tablespoons of olive oil, at least 3 tablespoons of white wine vinegar, and 1-2 tablespoons of Dijon mustard. Whisk with a fork until well-blended, then add your hot lentils (fish out the bay leaves and garlic and discard) and stir well to combine. Let rest until the vegetables are done - they'll keep their heat. When the potatoes are tender, the onions melting, and the carrots browned and tender, pile about a half cup of each of the vegetables into a shallow bowl and serve hot. If you like, you can add a dollop of cold cottage cheese or some crumbles of goat cheese or feta on top, or garnish with toasted walnuts, but it's really delicious as-is. 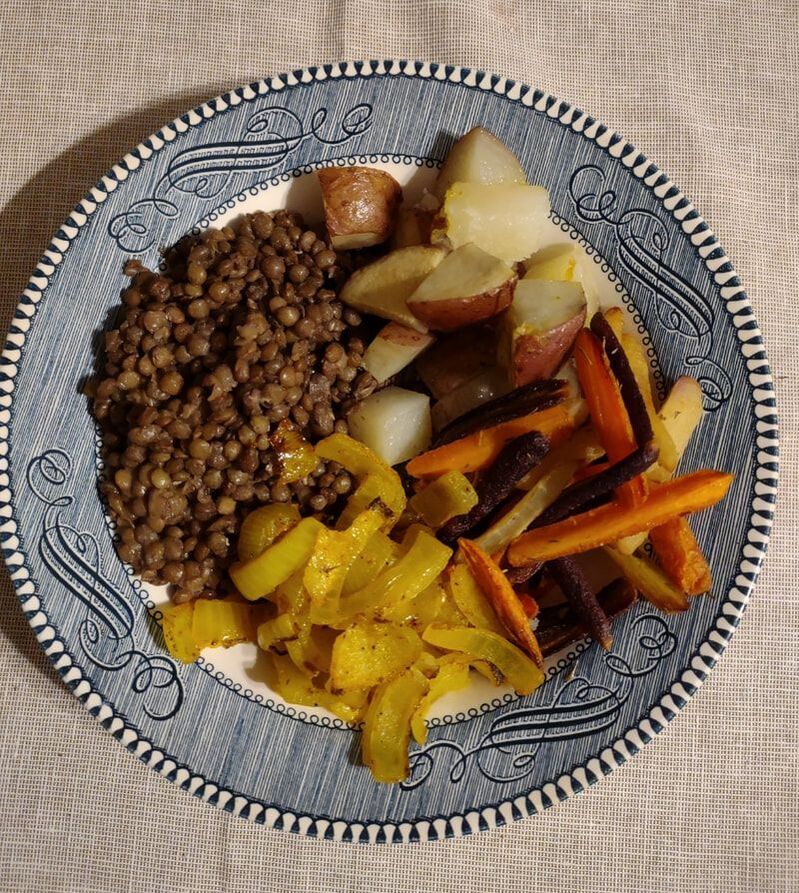 My bowl right before nomming. It's also a great and inexpensive way to feed a crowd. To turn it into dinner party fare, I recommend starting with a salad of baby greens with sliced Bosc pears and a sprinkling of walnut oil and pear vinegar, and serving the lentil bowls with either whole grain toast or garlic bread. Finish with a very French cheese course or simple baked apples, fruit crisp, or custard dessert (like clafoutis). This recipe is, of course, quite accidentally vegan. I did not develop it with the intent that it would be vegan, it just happens to be completely delicious without meat, eggs, or dairy. And since French food was all the rage during the First World War, I thought it a very apt addition to the Meatless Monday list. I hope you enjoy it as much as I do! If you make this recipe, share your thoughts in the comments, or tell me your favorite lentil dish! The Food Historian blog is supported by patrons on Patreon! Patrons help keep blog posts like this one free and available to the public. Join us for awesome members-only content like free digitized cookbooks from my personal collection, e-newsletter, and even snail mail from time to time! Don't like Patreon? Join with an annual membership below, or just leave a tip! |

AuthorSarah Wassberg Johnson has an MA in Public History from the University at Albany and studies early 20th century food history. Archives
July 2024
Categories
All
|
 RSS Feed