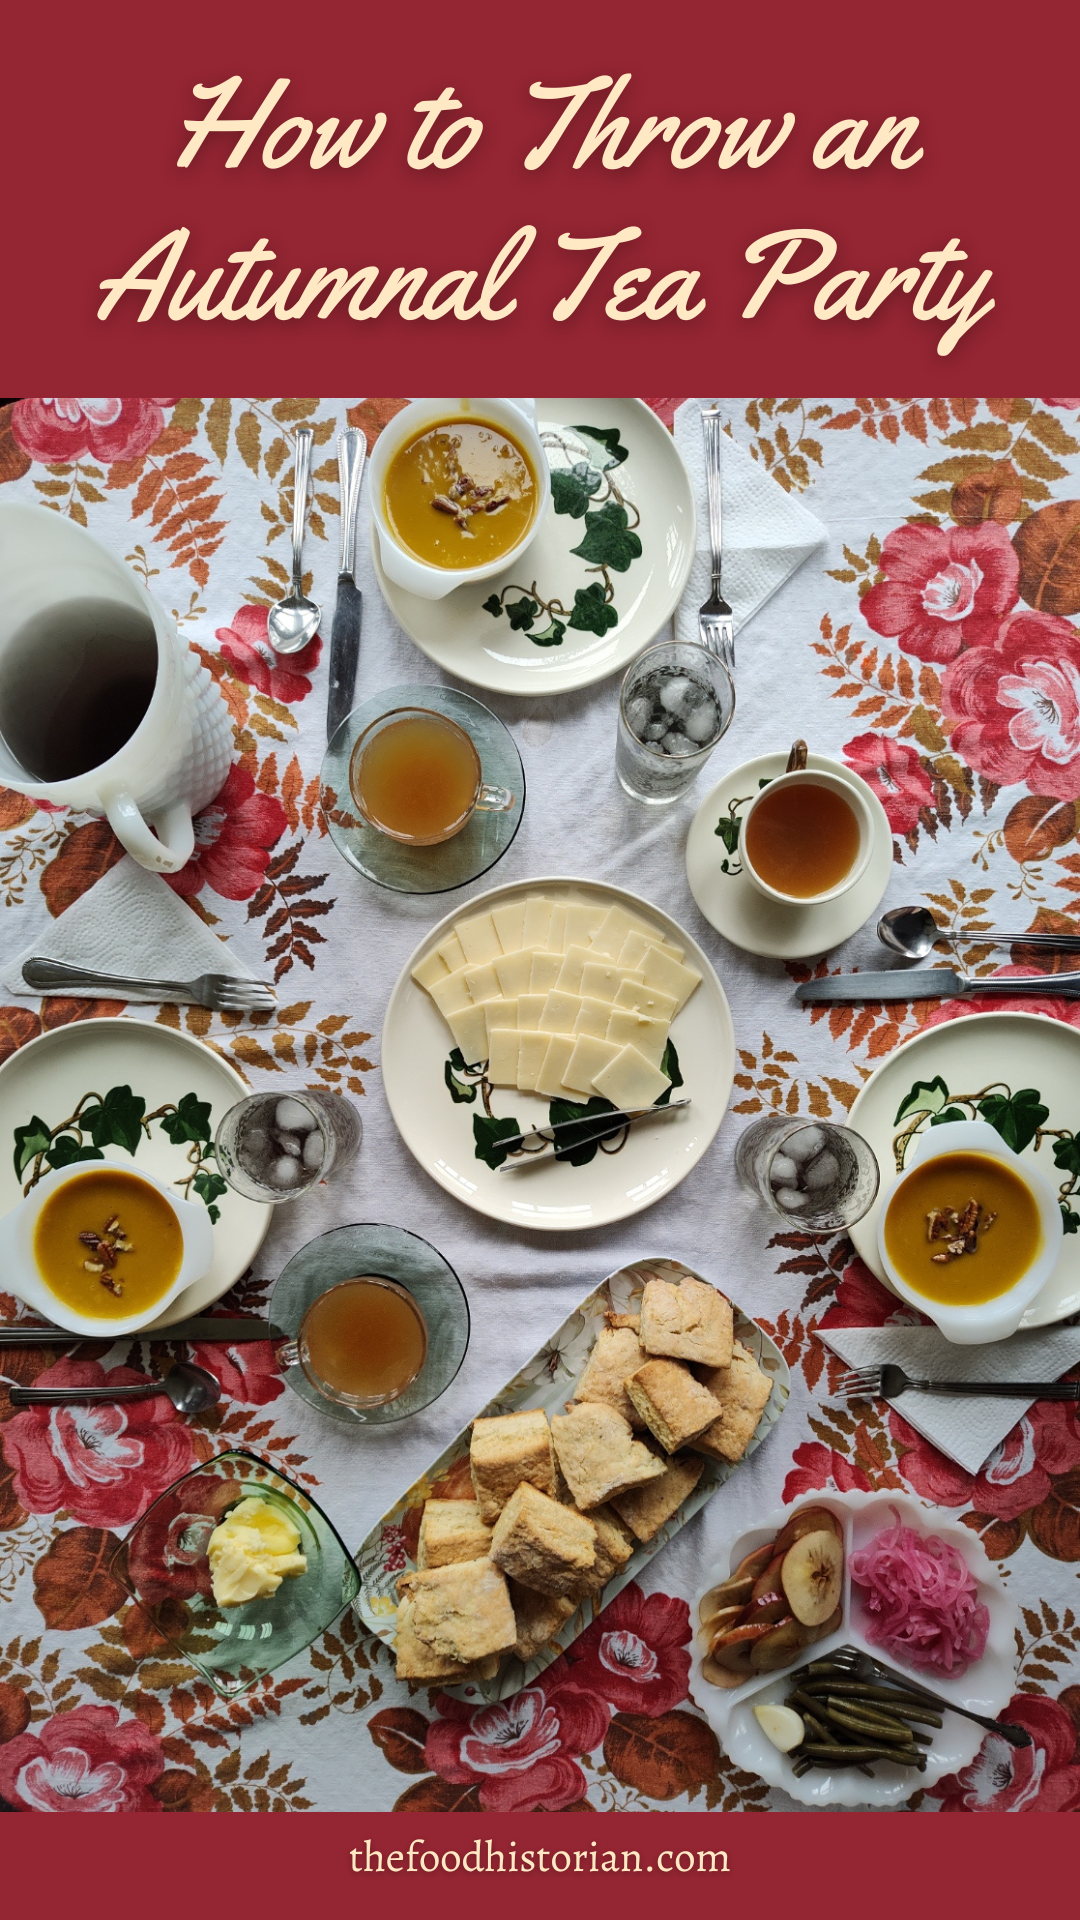
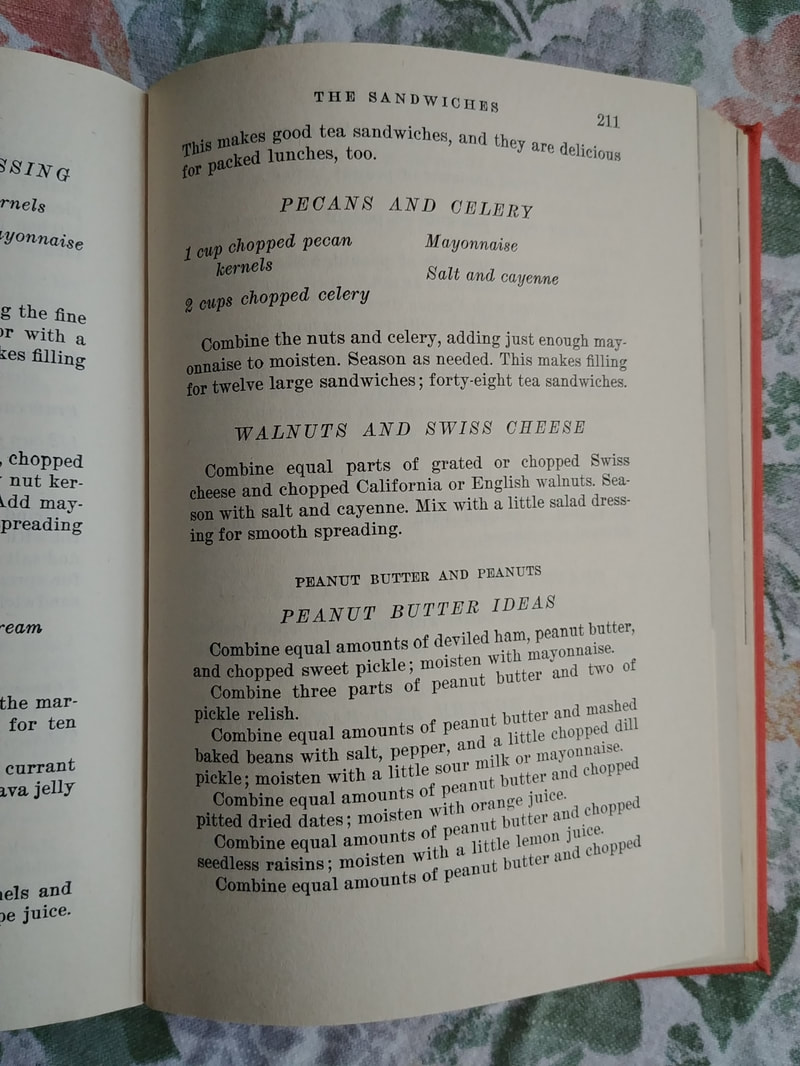
 This article comes at the request of Ramona, who wanted to know more specifically about how to construct a cheese or charcuterie board, I think, but being a food historian, I had to delve into the history first. She also asked about this several months ago, but it took me a while to finish the research. So Ramona, I hope this arrives in time for your holiday party planning! Of course, anyone who has been paying attention to social media and/or entertaining in the last few years has probably run across a "charcuterie board" or two. Or perhaps even the "shark coochie" and related spelling mishaps. Business Insider has cataloged the modern phenomenon, with some speculation about its popularity, should you care to read it. But as any good host knows, when you're having a big party of a mixed group, nothing goes over better than beautifully plated, delicious food that people can graze on all evening. But its modern popularity is really rooted in several different historical influences. First, let's talk ingredients. Charcuterie - from the French chair, meaning "meat" (or really, "flesh") and cuit, meaning "cooked," really defines a whole range of processed and cured meat products. Serious Eats has a great introduction to all the French meats included in the term "charcuterie." Most European nations have their own variations - Germans like all sorts of sausages and soft meat spreads. Italians love their cured pork and sausages. The Spanish and Portuguese add smoked fish and seafood to their sausages. Even the British have their own versions. Americans also have their own cured meats, including hams, summer sausage, beef jerky, and liverwurst. But these are generally seen as less "fancy," and therefore less likely to have a place of prominence on the vaunted board. Cheese is also crucial. In fact, the charcuterie board trend likely started as the cheese plate trend. Cheese, of course, is highly dependent on the country of origin, and when you serve it, or if you serve it at all, also varies. Again, traditional American cheeses like Colby, Monterey jack, brick cheese, and various cheddars are not considered as "fancy" as European cheeses, which often take precedence on the plate. Modern charcuterie boards also tend to have assorted nuts, dried fruits, crackers, and breads alongside the cured meats and cheeses and are generally accompanied by wine. So let's look at some of the history behind the evolution of the modern charcuterie board. A History of the Cheese Course "Still-Life with Fruits, Nuts, and Cheese," by Floris van Dyck, 1613. Frans Hals Museum. In the United States we are highly influenced by both British and French traditions when it comes to meals. In late 18th century America, dinner in wealthy households was often served in multiple courses with removes in between, but unlike what we maybe think of today, where dishes are served one at a time, "French" style service, put all the food for each remove on the table at the same time. The term "remove" comes from the practice of removing all the dishes between courses. Today Americans often start a meal with a salad, but in the French tradition, the salad comes at the end of the meal, with the cheese course. In British traditions, a multi-course meal also ends with a cheese course, but there's dessert first. The French either end with the cheese course and no dessert, or have dessert after cheese. The Brits end with cheese because it was almost always accompanied by fortified wines like Port or Madeira and encouraged less formality at the end of the meal and allowed guests to linger. (To recap: British = dessert, then cheese; French = cheese, then dessert.) In Colonial America, an upper-class dinner was likely followed by a cheese course with port or Maderia, nuts, and fruit. George Washington in particular was fond of both Madiera and walnuts, and enjoyed them by the bowlful after dinner, sometimes even eating pickled black walnuts, which were pickled green as an accompaniment to cheese. Cheese courses continued to be popular for formal dinners throughout the 19th century in British and American households. In French households, the cheese course is much more universal, across classes, but cheese is something of a religion in France, so that's not surprising. 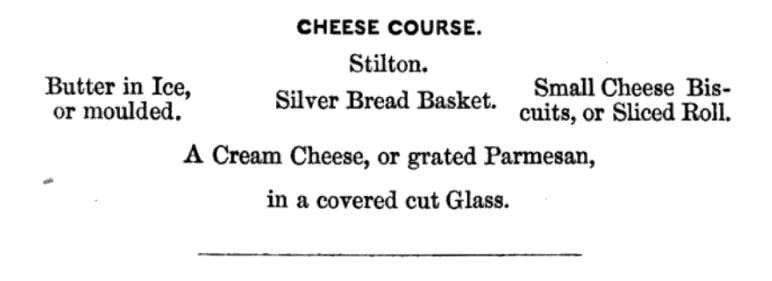 "Cheese Course. Stilton, Butter in Ice, or moulded. Silver Bread Basket. Small Cheese Biscuits, or Sliced Roll. A Cream Cheese, or grated Parmesan, in a covered cut Glass." from "The Practical Cook," 1845. The Practical Cook, English and Foreign: Containing a Great Variety of Old Receipts, Improved and Remodelled; and Many Original Receipts in English, French, German and Indian Cookery. With Copious Directions for the Choice of All Provisions, the Laying Out a Table, Giving Small and Large Dinners, and the Management of a Cellar by Joseph Bregion and Anne Miller was published in 1845. It offers several options for a cheese course, including the table layout, as pictured below. The course outlined above calls for Stilton, generally a blue cheese, bread and butter, "small cheese biscuits," which was likely similar to cheese pennies (a cheddar-based part-cracker, part-shortbread), "or sliced roll," and "a cream cheese, or grated Parmesan, in a covered cut Glass." 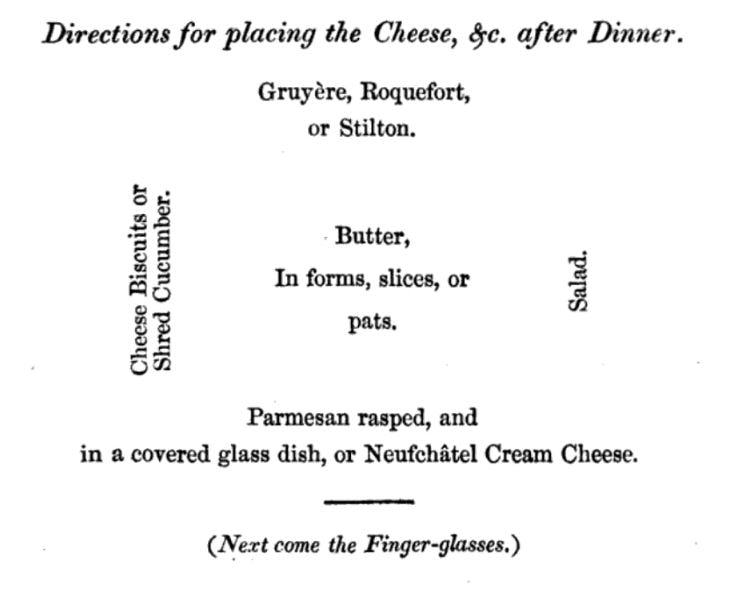 "Directions for placing the Cheese, &c. after Dinner." From "The Practical Cook," 1845 - a textual layout of what to serve for a cheese course and how to lay it out on the table. This other menu, which also includes the layout of the table, includes French Gruyere or Roquefort (another blue) in lieu of Stilton, specifies Neufchatel cream cheese, not to be confused with American neufchatel, which is a type of cream cheese we know as an ingredient in dips or cheesecake. The Neufchatel listed here is an mold-ripened, somewhat grainy, soft cheese from France. Once again the Parmesan is listed as grated, which I find interesting. Is it sprinkled on buttered bread? Eaten with a spoon? It's not perfectly clear. This menu also calls for either "shred cucumber" and/or salad to accompany the course. 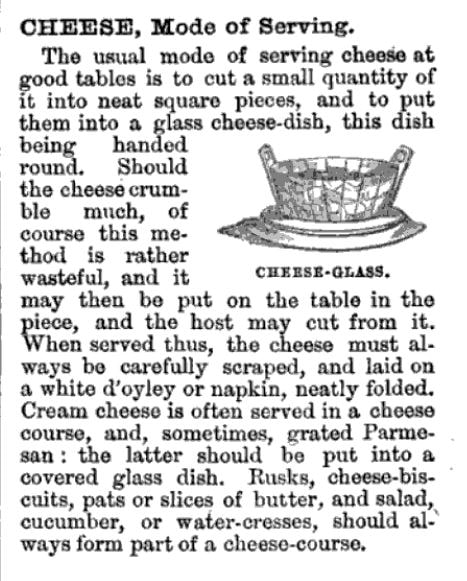 "Cheese, Mode of Serving," From "Mrs. Beeton's Dictionary of Every-day Cookery," by Isabella Beeton, 1865. By 1865, cookbook authors like Mrs. Beeton were offering up serving advice. In her Mrs. Beeton's Dictionary of Every-day Cookery Isabella recommends cutting the cheese "into neat square pieces, and to put them into a glass cheese-dish, this dish being handled and round." Of course this works well for medium-aged cheeses, but "Should the cheese crumble much, of course this method is rather wasteful, and it may then be put on the table in the piece, and the host may cut from it." She closes by noting that "Rusks, cheese-biscuits, pats or slices of butter, and a salad, cucumber, or water-cresses, should always form part of a cheese-course." Rusks are similar to biscotti in that they are twice-baked and hard, but could be in nearly any shape and may not be sweetened. The salad, cucumber, and watercress were clearly present to cut the richness of the cheeses. By the end of the 19th century, cheese courses were quickly being replaced by dessert courses. Although formal menus continued to list cheese, nuts, and fruit as the final course, the emphasis was placed on increasingly fancy desserts, including cakes, molded ices, and ice creams. For ordinary Americans, particularly those not producing their own cheeses, dinner was followed by dessert and nothing else, except, perhaps, a bowl of popcorn by the fireside. Ploughman's Lunch "The Harvesters" by Pieter Brueghel the Elder, 1565. Metropolitan Museum of Art. Charcuterie boards have antecedents from the working class side of life as well. Throughout Europe, cheeses, bread, and either wine or beer, often accompanied by cured meats, fruits, and/or pickled vegetables were standard peasant laborer fare. These were all portable, did not have to be kept cool, and required few utensils and no plates to eat. In France, country pate or rillettes with mustard, butter, cheese, and baguette went with wine. In Italy, it was salami, an aged cheese like Parmesan or Pecorino, bread, and olive oil with wine. In Germany, smoked meats with pickles or sauerkraut, dark bread, and butter and/or cheese went well with beer of all kinds. But perhaps the most famous iteration of these is the English "ploughman's lunch." Although the term was not part of the broader cultural lexicon until the 1950s, the idea of a "ploughman's lunch" dates back to the Medieval period, when agricultural laborers subsisted largely on cheese, bread, and beer, often accompanied by raw or pickled onion, especially when eating out in the fields. In the 18th and/or 19th century, mustard and sometimes fruit such as apples or pears were added to the list. By the 20th century, a "ploughman's lunch" could include all of the above plus hard boiled eggs, lettuce, and sausage or pork pies. The ease of preparation made it very popular fare in local pubs, where it continues to be a popular lunch today. Coming to AmericaThe cheese course persisted in wealthy households and hotels until the 20th century, but home consumption of cheese on its own was not as common, with a few exceptions. Welsh rarebit, cheese toasts, cheese canapes, and cheese crackers were all favorite snacks, but all involved toasting or melting the cheese on the crackers. Serving cold or room temperature cheese was far less common. Today, charcuterie boards are usually used for parties. In the 1910s, the burgeoning trend was the cocktail party. "Invented" in 1917 by St. Louis socialite Clara Walsh, the cocktail party allowed for large groups of people to consume lots of booze and finger foods in a socially informal setting over a relatively short period of time. The 1910s and '20s were also the time when midnight suppers - usually hosted at home after the theater or concerts - proliferated. Midnight suppers usually featured easy, informal meals like welsh rarebit or shrimp wiggle that could be made in a chafing dish, or cold meats with bread for dainty sandwiches with a cold bottle of beer from the icebox, or hot coffee with cake. Between cocktail parties and midnight suppers, more informal dining made its way into the American social lexicon. 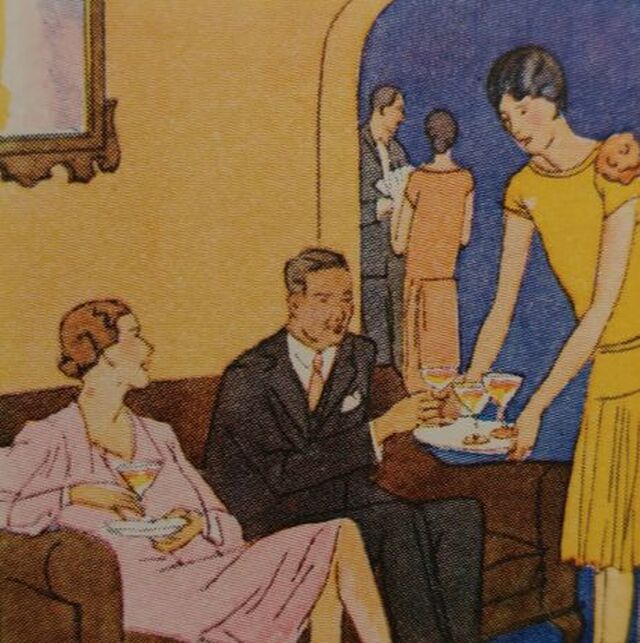 Illustration of a cocktail party (or possibly pre-dinner cocktails) from "Electric Refrigerator Recipes and Menus" by General Electric Company, 1927. Fashionable meals continued to become increasingly informal during the 1920s, '30s, and '40s. After World War II, an interest in European cuisines proliferated with returning GIs. Americans "discovered" French cheeses and Italian cured sausages, Greek olives and German rye. But the biggest party fad of the 1940s and '50s was the smorgasbord, which bears a distinct similarity to modern charcuterie boards. A direct inspiration of Scandinavian smorgasbords, which were essentially a buffet of open-faced sandwich fixings, the American smorgasbords were adopted with almost the same alacrity as Scandinavian design, mid-century. 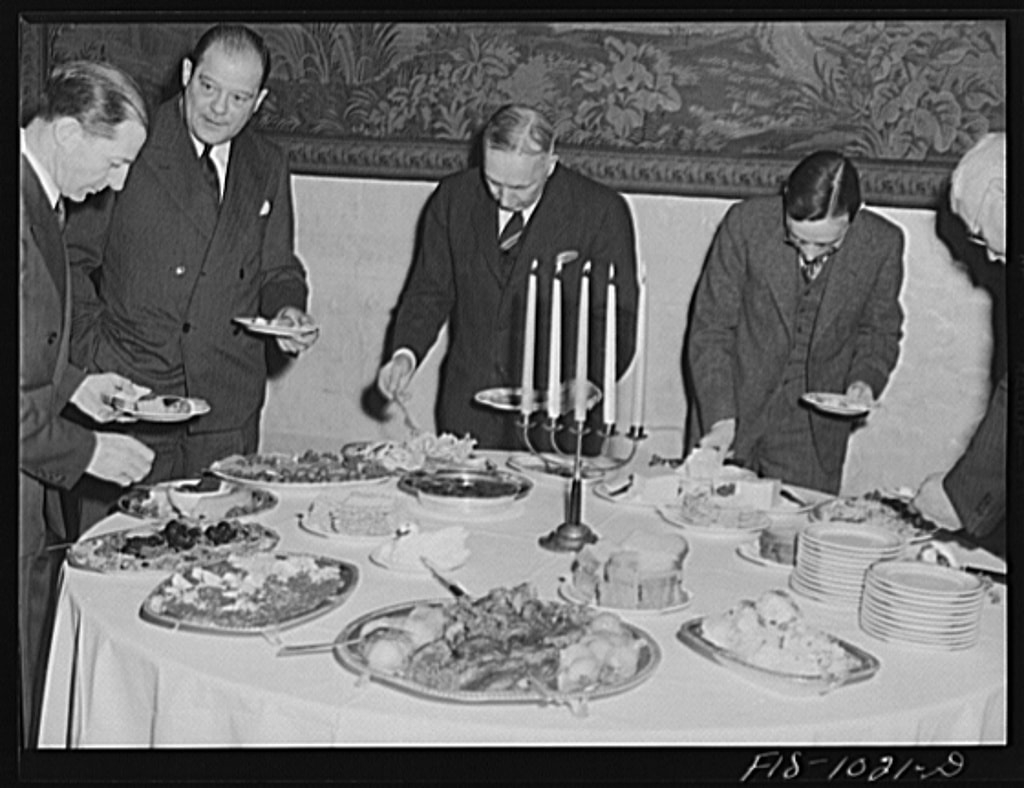 Members of the Swedish Club of Minneapolis, MN partake of a smorgasbord before meeting, March, 1942. Library of Congress. At the same time, Americans were rediscovering raw vegetables in the 1940s (popularized in part thanks to the discovery of vitamins between 1912 and 1945), and the crudité platter came into vogue. Raw vegetables, or sometimes blanched and marinated, generally served with a creamy dip, came to deck home buffet tables and supper club dining rooms alike. The classic "relish tray," I grew up with at holidays combined crudité (usually, raw carrot and celery sticks with ranch) with green and black olives, and sweet and dill pickles. In a cut glass, compartmentalized tray, of course (there are silver versions, too). Fancy dinner parties might include carrot curls, celery fringe, and radish roses as a garnish. 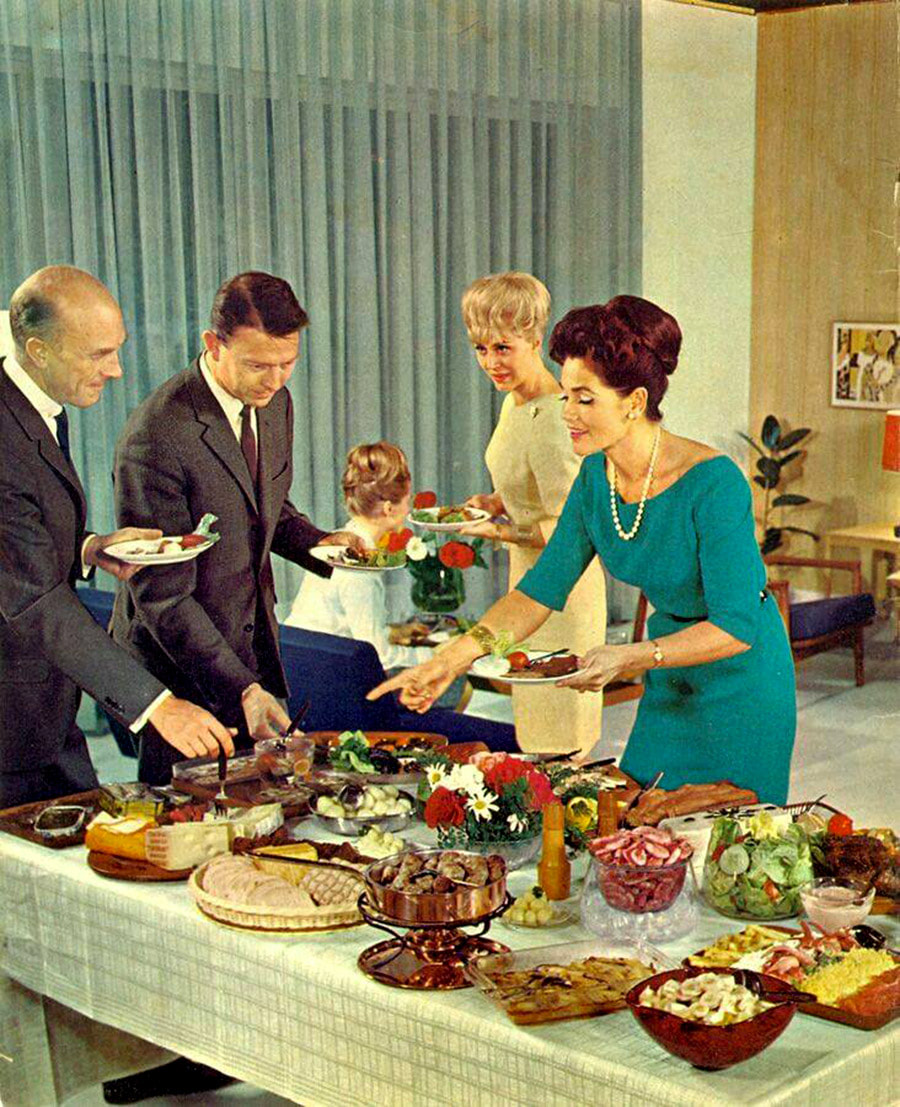 A late 1950s/early 1960s home smorgasbord/buffet party. By the 1970s, the informal party had almost completely supplanted the formal dinner party. Fondue parties, French onion dip with potato chips, and grilling were de rigeur for home entertaining. And while crudité and relish trays never really went away, it wasn't until the 1990s that the charcuterie board began to make a resurgence as Americans rediscovered wine and peasant food. Bread with olive oil and olives with salty cheeses and rustic Tuscan reds, or fancy French cheeses with pate, crackers, and merlot, started to be consumed by ordinary Americans, as grocery stores diversified their offerings and specialty food stores could be found in more and more American cities. Charcuterie Boards Today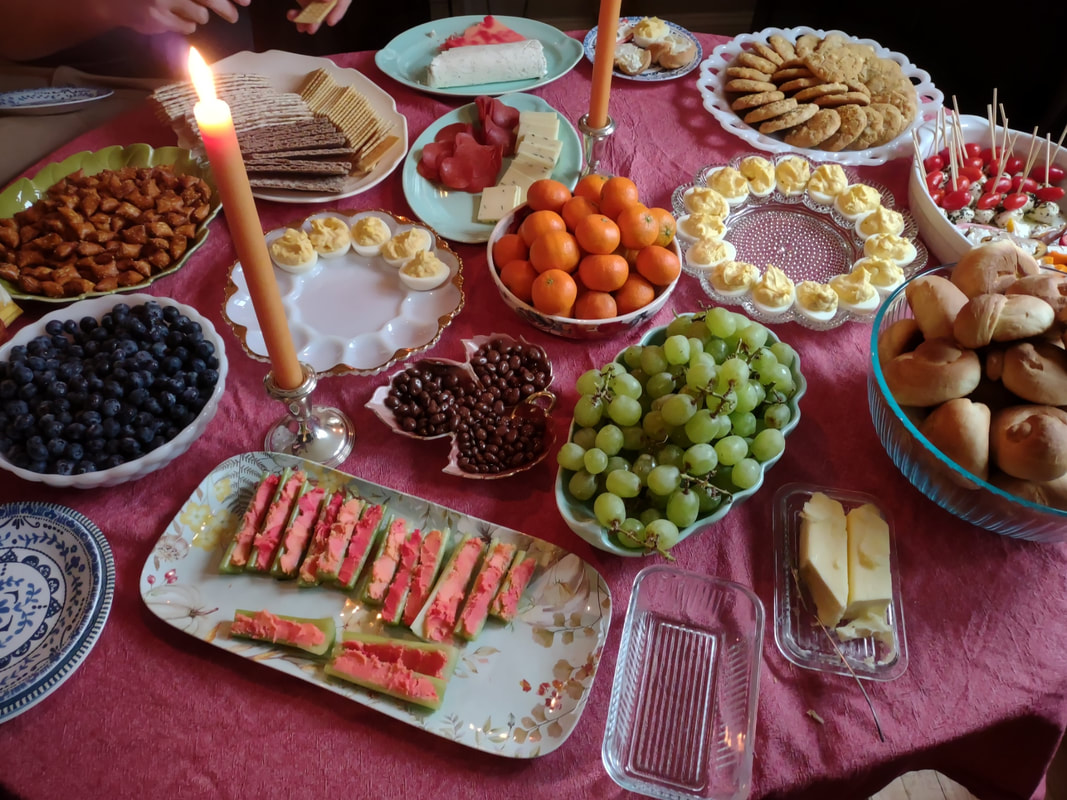 My version of a charcuterie "board" - i.e. my whole table, full of beautiful snacks. This was for a game night, so I tried to choose things that were bite-sized and would keep the fingers realtively clean. Which brings us to the present. Charcuterie boards in the 2020s are things of insanity and beauty. Complicated, overflowing, and with an eye more towards Instagram than whether or not guests can actually eat the stuff (how exactly does one eat a salami rose, for instance?), I find today's charcuterie boards to be needlessly complicated and expensive. However, they're not dissimilar from what people did in the past (radish roses, bowls made of hollowed-out cabbages and pumpkins, and tinting things coordinating colors, anyone? All very early 20th century), and they can be very easy and popular. When playing host, it's so much nicer to have a whole bunch of foods that people can nibble on at will and which don't require cooking or much advanced preparation. So, as a practiced home entertainer, here are my suggestions for how to build a balanced, delicious, and beautiful charcuterie board. 1. Ditch the board. Seriously. Who wants to store (and clean!) a wooden board the size of a small table? Just use the table! Coffee table, dinner table, whatever you want. Ceramic serving dishes are easier to wash and store and are prettier anyway. Hit up a thrift store for some inexpensive platters. Pick a color (white goes with everything) and you won't have to worry about matching. Unless you're really in love with wooden cutting boards. In which case, do what you love. 2. Know your guests. You don't want to serve ham to bunch of vegetarians, Jews, and Muslims. And you don't want to serve only cheese if your friends are lactose intolerant or vegan. Know your guests and plan accordingly. 3. Bring the balance. No one wants to eat only three different kinds of cheddar, just meat and cheese and nuts is too rich, and I've even seen dessert "charcuterie" boards, which is just too much sweet. Here's my suggestion for a balanced group of foods to serve. Choose at least one from each group.
4. Looks matter. Much as I hate to admit it, part of why people love charcuterie boards so much is that they're pretty. But it's not difficult to replicate an aesthetically pleasing look. Just make sure you have a variety of colors and textures (all brown and white is something you generally want to avoid), and arrange things nicely on your board or platter. Line crackers, sliced cheeses, and sliced meats in a line or a curve. Place berries and dips in pretty bowls and arrange foods around them. Fill gaps with nuts or chocolates or olives. Keep the wet stuff contained and keep cross-contamination to a minimum, especially with foods that might cause allergies (at a party earlier this summer with a friend, she couldn't eat any of the fruit, or the dip, because there were strawberries everywhere and someone had dropped a strawberry in the ranch dip - she's deathly allergic). Since the holiday season is upon us, here's a Christmassy one to get you started: Holiday Spread Assorted cured meats Baked brie with cranberry sauce OR Cream cheese mixed with grated parmesan or pecorino, black pepper, chopped dried cranberries, sliced scallions (optional) Plus sliced pepperjack and cheddar Assorted crackers (mix of butter and water crackers) Red and green vegetables with ranch Pimento-stuffed green olives, black olives, assorted pickles Hot spinach dip with cubes of peasant bread Dried and candied fruit with chocolate Assorted Christmas cookies Why are Charcuterie Boards So Popular?I've been thinking on this a lot. What is it about charcuterie boards that has made them dominate the home entertaining airwaves (and internet waves) for the last several years? For one, it does not take a lot of cooking prowess to put together a good charcuterie board. You serve most things either in their raw form (fruits, vegetables, nuts) or purchase them already lightly processed (cheese, cured meats, crackers, dried fruits, chocolate). And while you can choose to make some dips or desserts, most people are perfectly fine with store-bought. For two, charcuterie boards are all about aesthetic. If you served everything in its original packaging (think plonking the box of crackers and the cheese in plastic right on the table), it would not have nearly the mystique of a well-organized, beautiful board. The folks so popular in Instagram right now get popular because they know what they're doing. And while arranging is an art, once you learn the basics it's not a particularly difficult art. Have some diversity of color, group, layer, or line up things nicely, and try not to worry too much if most things are in piles instead of straight lines. For me, charcuterie boards aren't just the type of food the Lunchables generation wants to eat. It's a modern twist on a very OLD way of eating and celebrating and coming together. So whether you're into the Instagram-perfect board aesthetic, or you're like me and you put together a whole table full of food on thrifted serving dishes, charcuterie has been around for a long time, and I hope it continues to be around for decades to come. Happy snacking, happy holidays. The Food Historian blog is supported by patrons on Patreon! Patrons help keep blog posts like this one free and available to the public. Join us for awesome members-only content like free digitized cookbooks from my personal collection, e-newsletter, and even snail mail from time to time! Don't like Patreon? Join with an annual membership below, or just leave a tip!
1 Comment
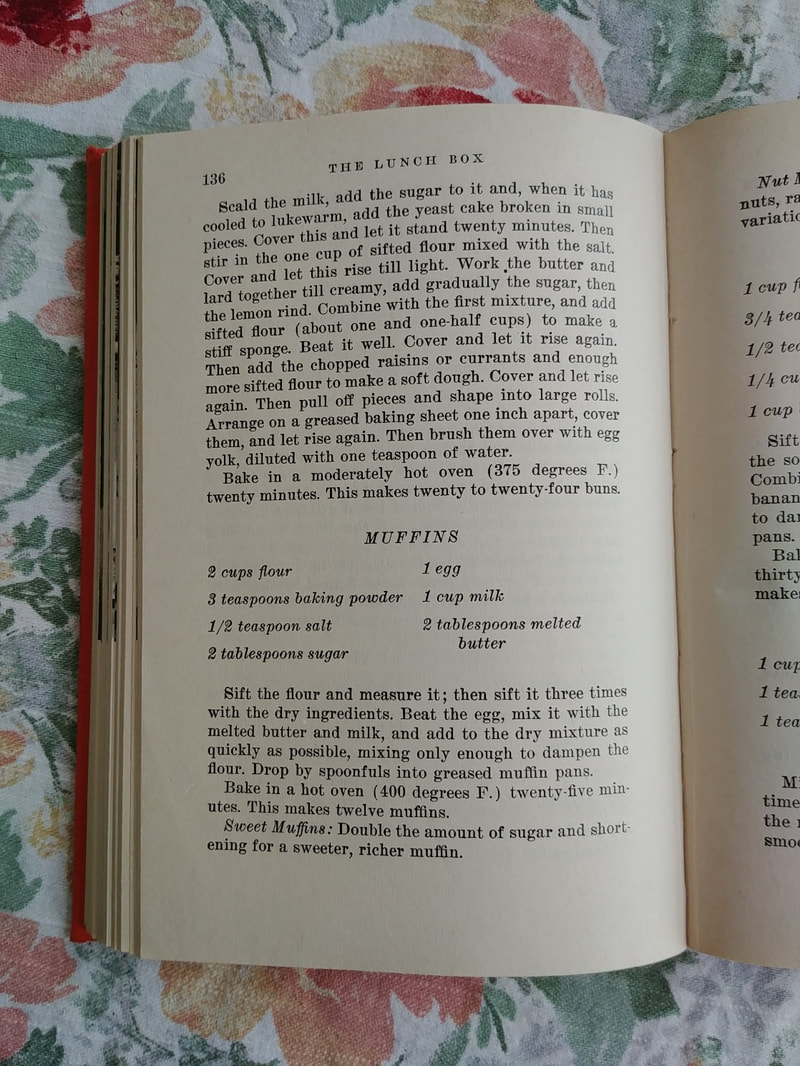
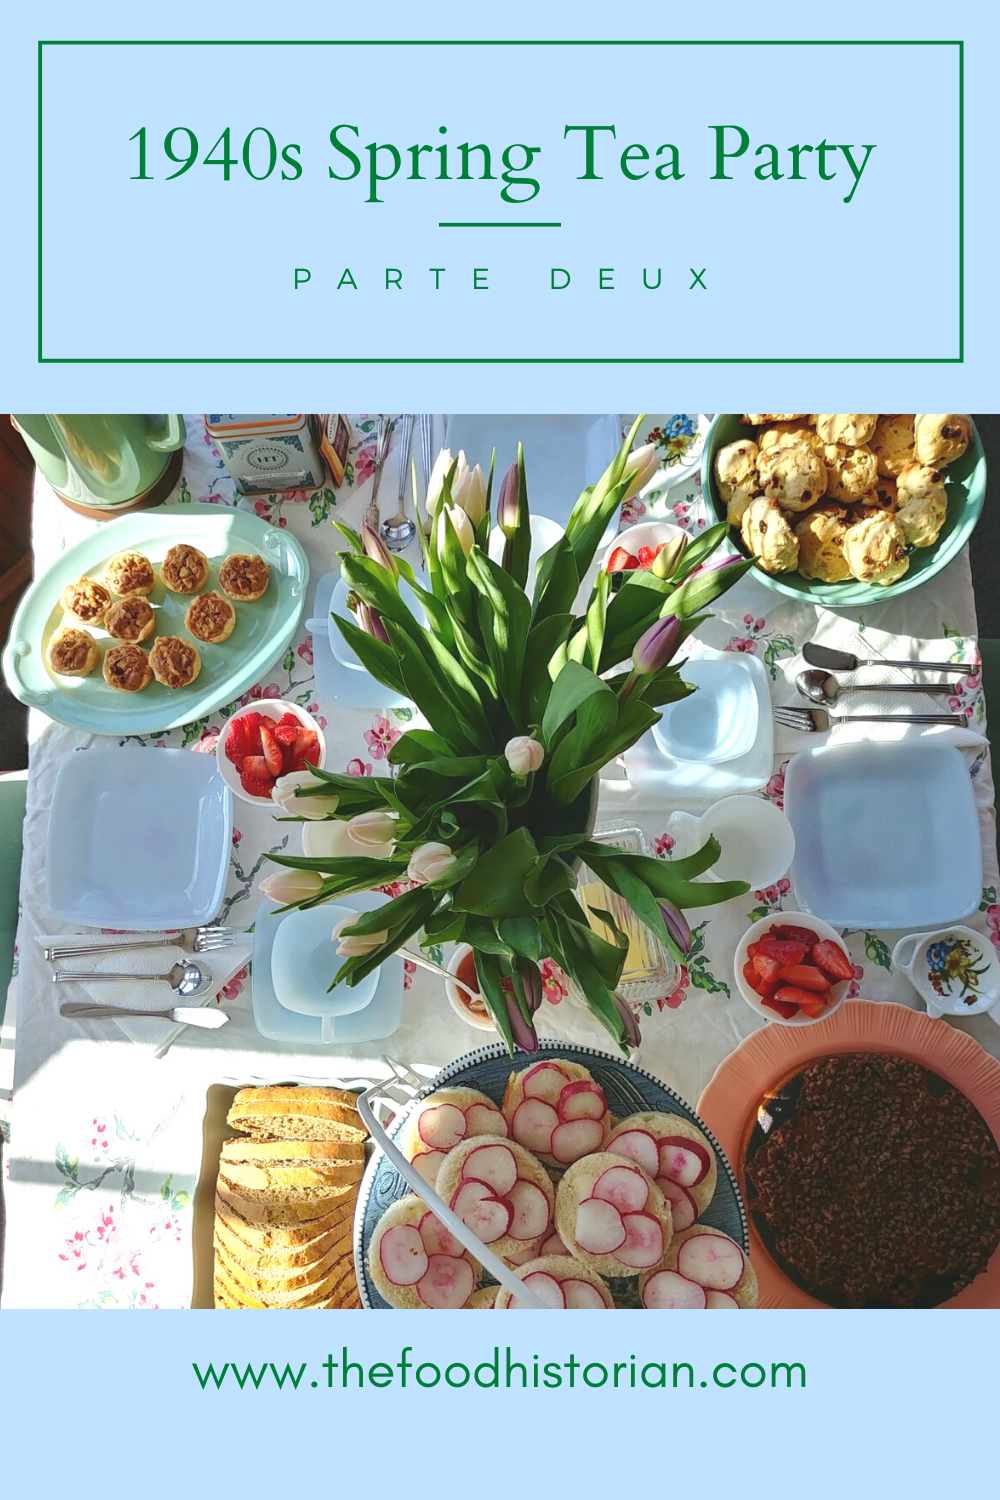 Spring has sprung, with daffodils nodding in the frosty air and trees starting to bud out. So it seemed apt to celebrate with another tea party! Once again, our tiny tea party with just one friend featured all-vegetarian recipes, since said friend is a vegetarian. And also because chicken salad, while delicious, seems lazy when you're looking for something new and interesting to try. This one featured recipes from a new cookbook acquisition, The Lunch Box and Every Kind of Sandwich by Florence Brobeck. My edition was published in 1949, although I believe the original was published sometime in the 1930s. 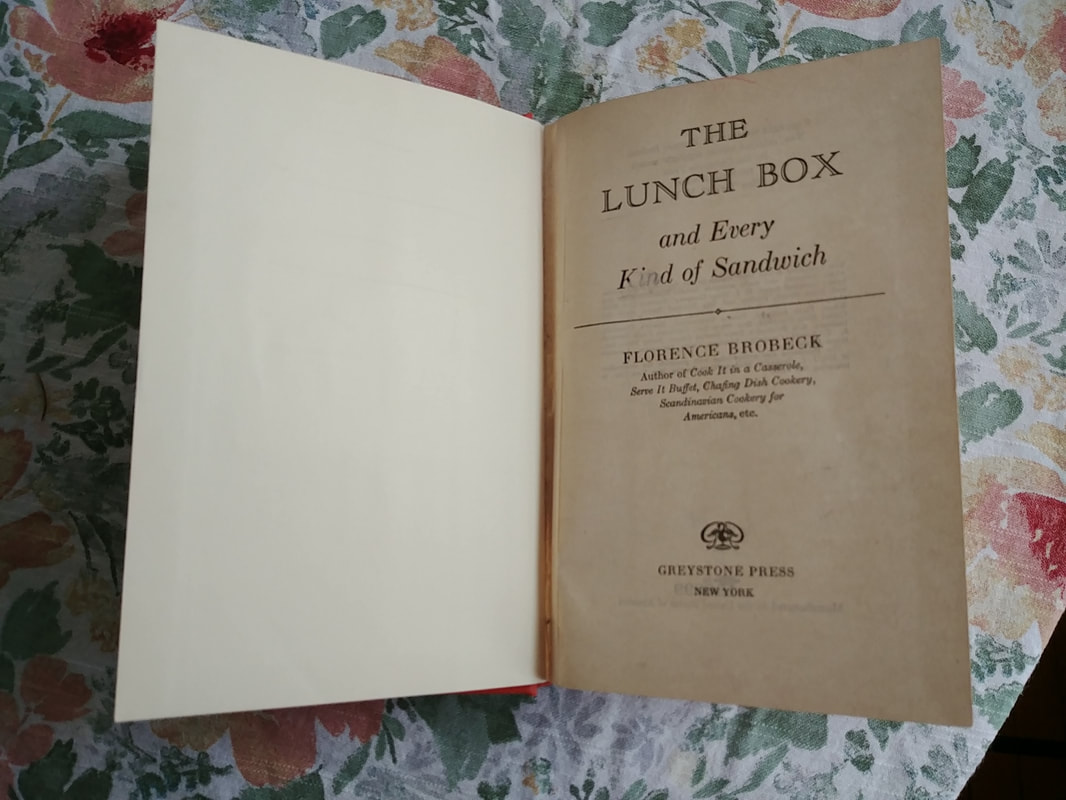 It's also a bright orange library binding without the original dust jacket. So no pretty cover to show off this time! Unlike last time, my ambitious list didn't go QUITE as planned. Adapting historic recipes can be like that. 1940s Spring Tea Party MenuOpen-Faced Radish and Butter Sandwiches on White Open-Faced Cucumber and Cream Cheese Sandwiches on Rye Blue Cheese, Pecan, and Celery Sandwiches on Whole Grain 1940s Whole Wheat Honey Quick Loaf 1940s "Plain Buns" with Butter and Jam Fresh Sugared Strawberries Strawberry Lazy Daisy Cake Walnut Tassies Hot Cocoa Tea with Cream and Sugar The Sandwiches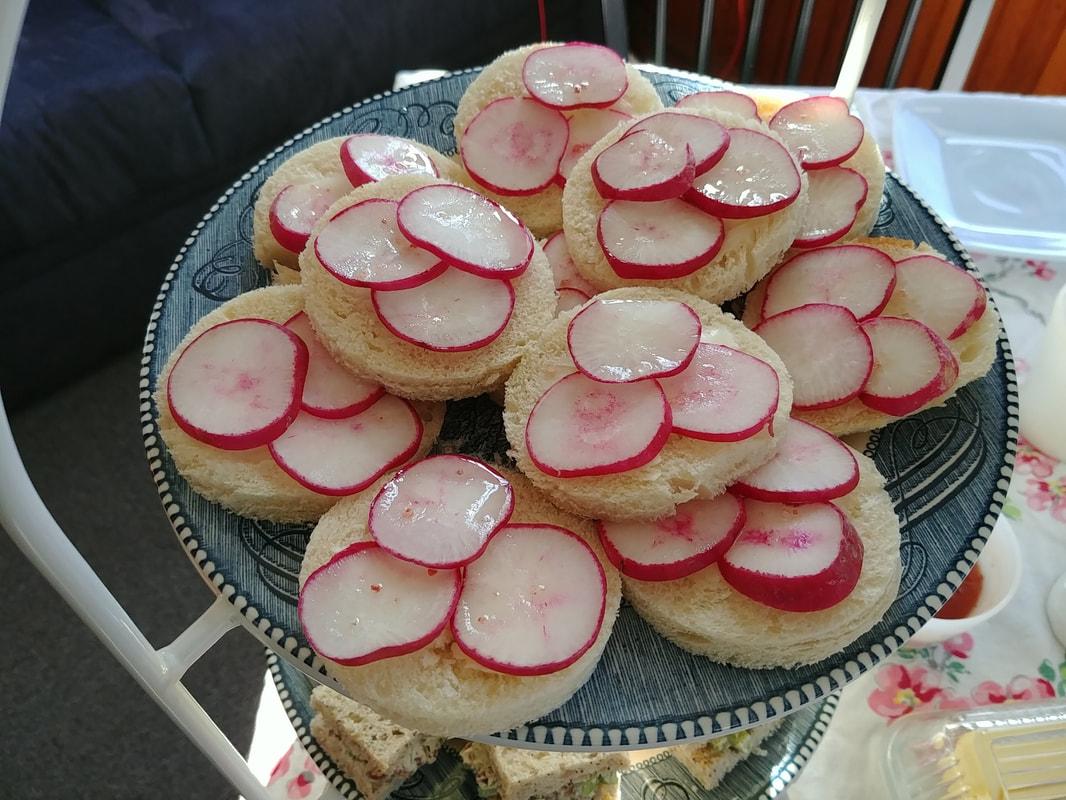 Rounds of buttered white bread topped with thinly sliced red radishes and a sprinkling of salt. Radish and butter sandwiches just scream spring to me, and they're very easy to put together. To make things extra fancy, cut sliced bakery bread (not the squishy kind from the bread aisle - hit the bakery and get peasant, sourdough, brioche, or in a pinch, French or Italian bread) with a cookie or biscuit cutter into rounds. Spread with soft butter, top with thinly sliced radishes, and a sprinkling of salt (I used pink Himalayan). The salt is what makes the radishes look wet, but adds a nice flavor. 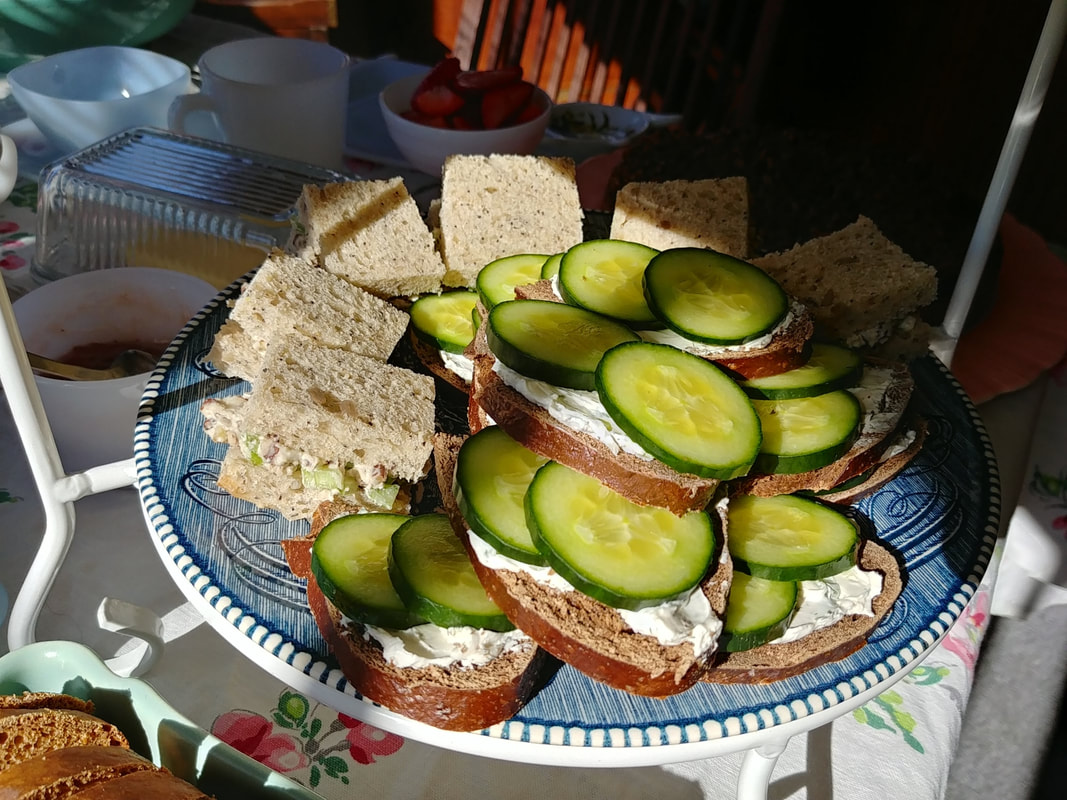 Squares of blue cheese celery pecan spread sandwiches, and open-faced cucumber sandwiches on dark rye. Open-faced cucumber sandwiches are equally easy. Make a cream cheese spread with softened cream cheese (15 seconds in the microwave does the trick), and thinly sliced scallions and dried dill. You can use jarred garlic or minced sweet onion instead of scallions. Spread it on any kind of rye bread. Top with English (a.k.a. seedless - even though they're not - or burpless) cucumbers. If you're hungry, top with another slice of bread spread with the cream cheese mixture, otherwise serve open-faced (which is prettier and more Scandinavian). If you're going really fancy, use fresh dill in the cream cheese and top each sandwich with a sprig of fresh dill.
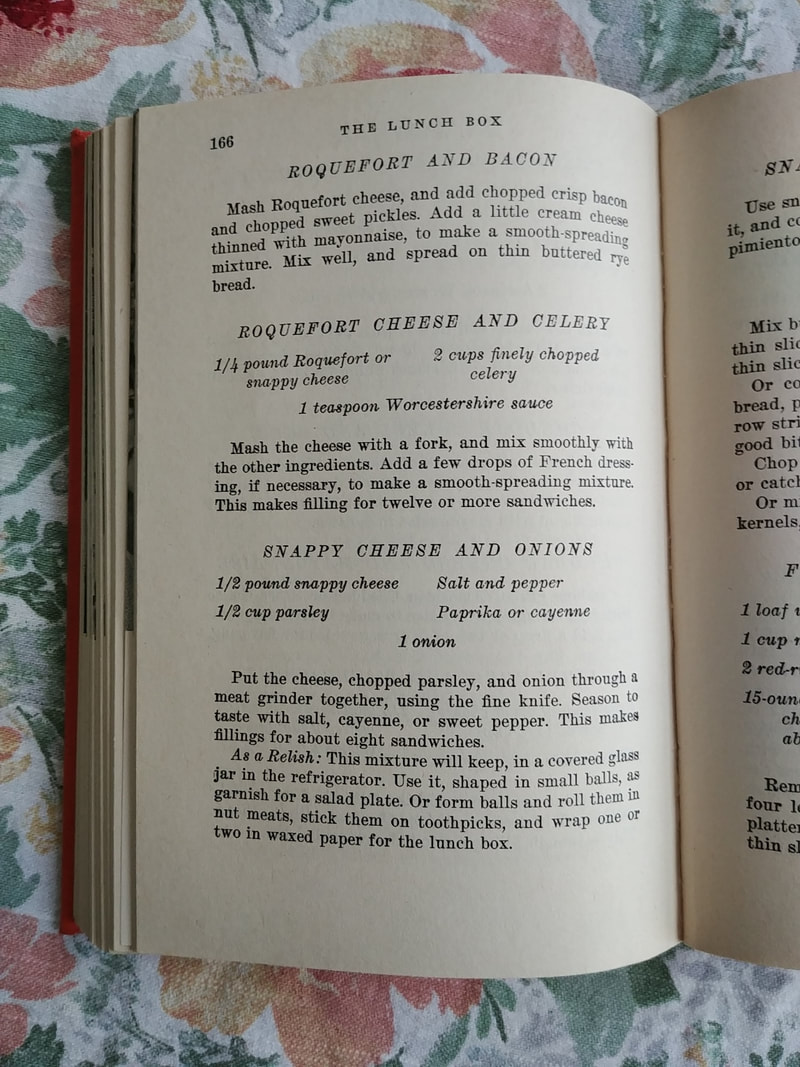
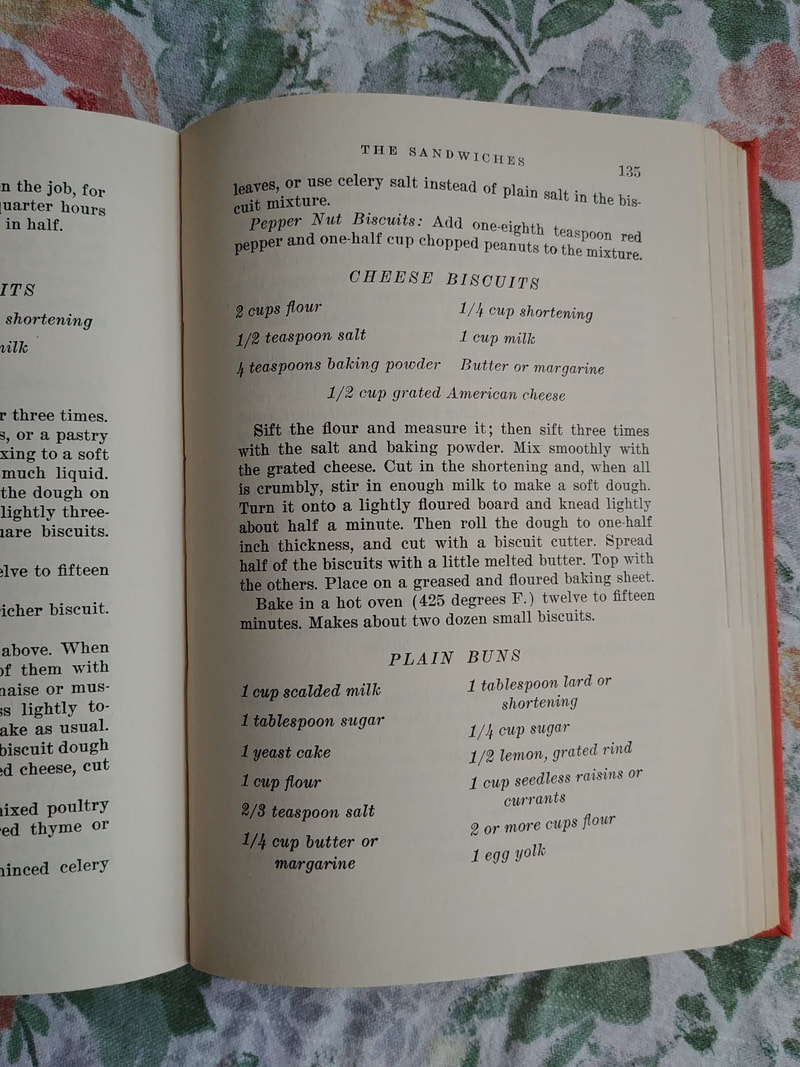
The little square sandwiches were a mashup of two recipes from the The Lunch Box - "Roquefort Cheese and Celery" and "Pecan and Celery" fillings. I decided to mash them up - literally - into one, slightly more interesting filling. I mixed a quarter pound of very soft blue cheese with about a cup each of diced pecans and finely minced celery, with a splash of Worcestershire sauce. It was a curious mixture. Next time I would probably add cream cheese to temper the blue cheese a little, and maybe add some scallions and/or smoked paprika. But otherwise it was quite nice on squares of thinly sliced whole grain bakery bread. Half the fun of tea sandwiches is the fun and dainty shapes you create. I always find it easier to slice the bread first, and then fill, but some people do it the other way around. Whole Wheat Honey Quick Loaf When one encounters a recipe entitled "Honey Bread," one expects it to taste of, well, honey. Instead, the spicing of this little quick bread leaves the impression of gingerbread more than honey. Curiously, the recipe also contains no fat. I was skeptical, but aside from an accidental overbaking (which I think dried it out), it turned out fairly decently, if scarcely tasting of honey. I followed this recipe pretty much to the letter. It makes a tall loaf with a springy crumb - not at all the crumbly, moist, cake-like texture we come to associate with most quick breads today. Much more like true bread texture than cake. Here's the original recipe: 2 cups flour (I used white whole wheat) 1 teaspoon baking powder 1 teaspoon soda 1 teaspoon salt 1 teaspoon ground ginger 1/2 teaspoon ground cinnamon 1 egg 1 cup milk 1/2 cup liquid honey Sift the flour and measure it; then sift three times with the dry ingredients (or if you're lazy, just whisk everything together). Beat the egg with the milk, and stir this into the dry ingredients alternately with the honey. Beat and pour into a greased loaf pan. Bake in a moderate oven (350 degrees F.) about forty-five minutes or until done. Tip out of the pan and cool on a rack. Serve with salted butter, honey butter, and/or jam. 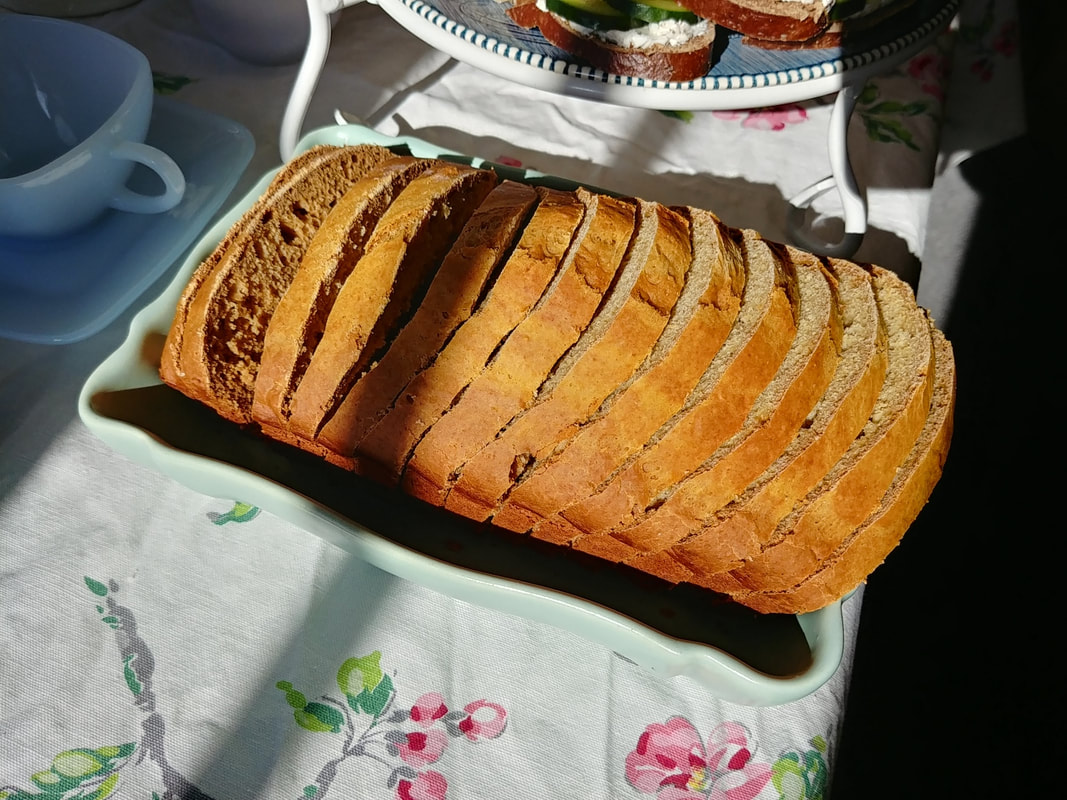 Sliced Whole Wheat Honey Bread, from the 1949 "The Lunch Box." 1940s "Plain Buns"
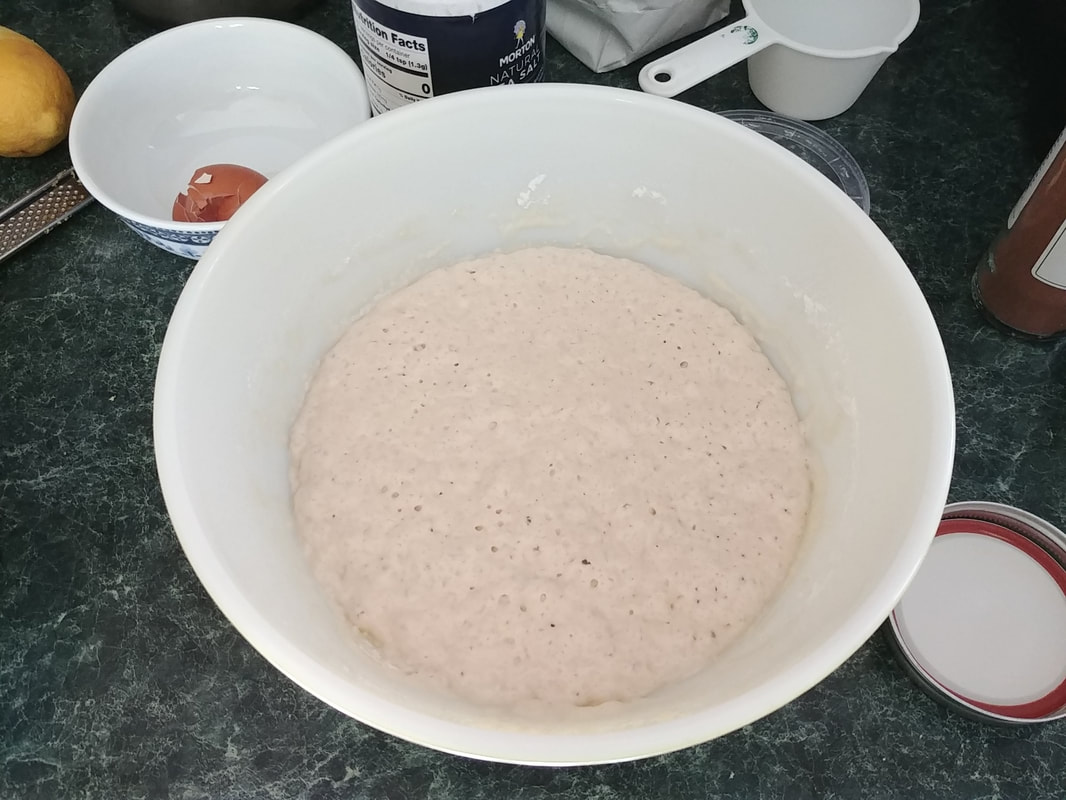
This recipe is deceptive. The title, "Plain Buns" is not accurate - flavored with lemon zest and currants (I used golden raisins), the flavor was surprisingly strong and delicious. Designed to be used with cake yeast, all I had was rapid rise yeast, so I think they got a little overproofed. I'm going to try making them with active dry yeast again, so I won't comment too much on what I did, and just give you the original recipe: 1 cup scalded milk 1 tablespoon sugar 1 yeast cake 1 cup flour 2/3 teaspoon salt 1/4 cup butter or margarine 1 tablespoon lard or shortening 1/4 cup sugar 1/2 lemon, grated rind 1 cup seedless raisins or currants (I used golden raisins) 2 or more cups flour 1 egg yolk Scald the milk, add the sugar to it and, when it has cooled to lukewarm, add the yeast cake broken into small pieces. Cover this and let it stand twenty minutes. Then stir in one cup of sifted flour mixed with the salt. Cover and let this rise until light. Work the butter and lard together until creamy, add gradually the sugar, then the lemon rind. Combine with the first mixture, add the sifted flour (about one and one-half cups) to make a stiff sponge. Beat it well. Cover and let it rise again. Then add chopped raisins or currants and enough more sifted flour to make a soft dough. Cover and let rise again. Then pull off pieces and shape into large rolls. Arrange on a greased baking sheet one inch apart, cover them, and let rise again. Then brush them over with egg yolk, diluted with one teaspoon of water. Bake in a moderately hot oven (375 degrees F.) twenty minutes. This makes twenty to twenty-four buns.
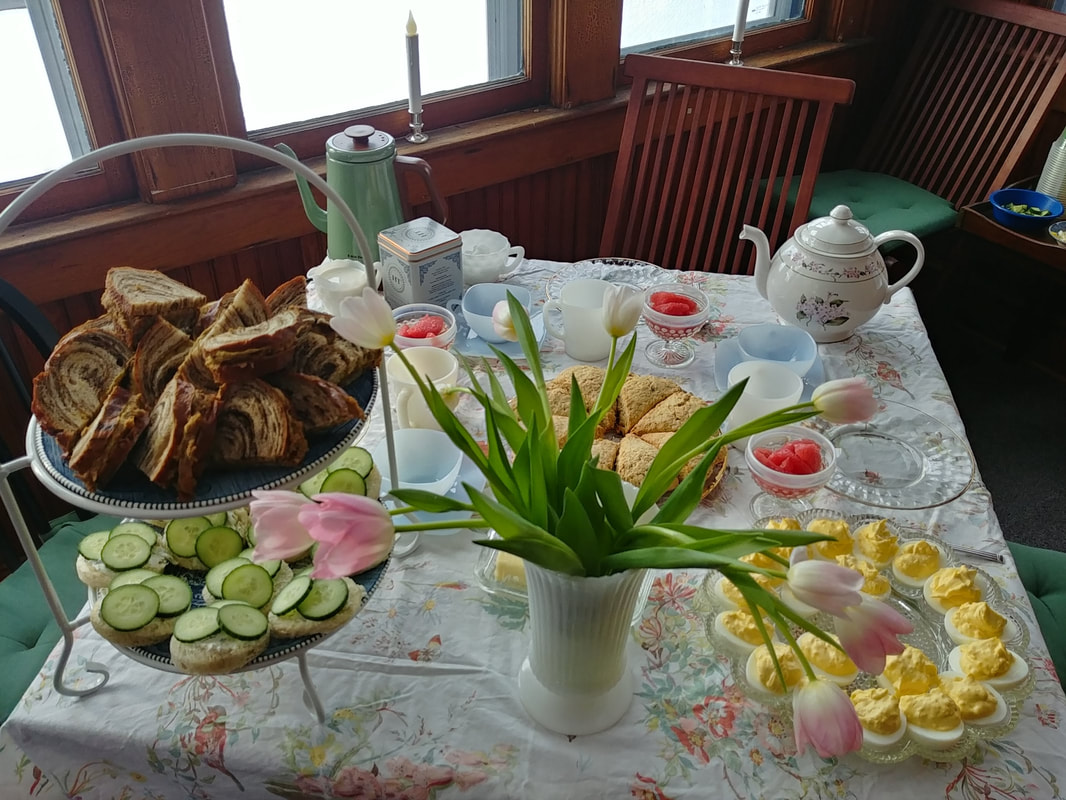
Obviously I didn't let rapid rise yeast go through fours separate rises! But I think it still overproofed a bit. I also forgot the egg wash! Which meant the buns looked a bit more like rocks. But they sure tasted good, and that's what mattered. If you enjoy the citrusy flavor of hot crossed buns, you'll love these. 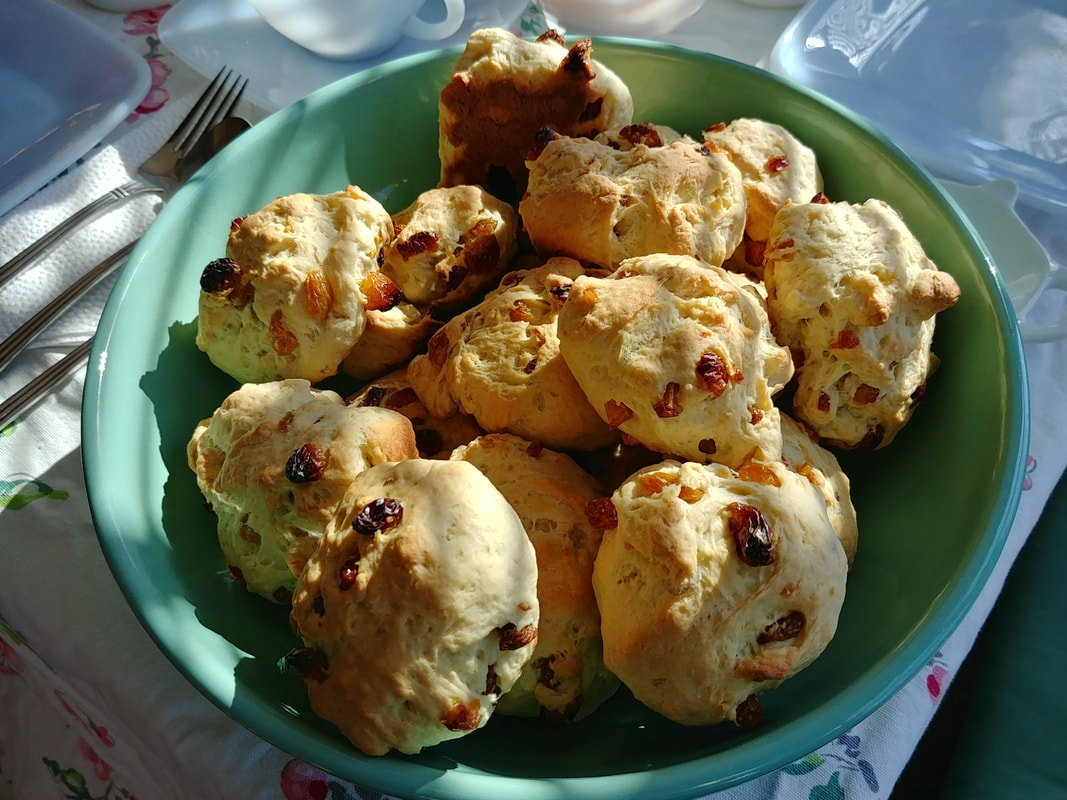 The finished "plain buns" which were anything but. Strawberry Lazy Daisy Cake & Walnut Tassies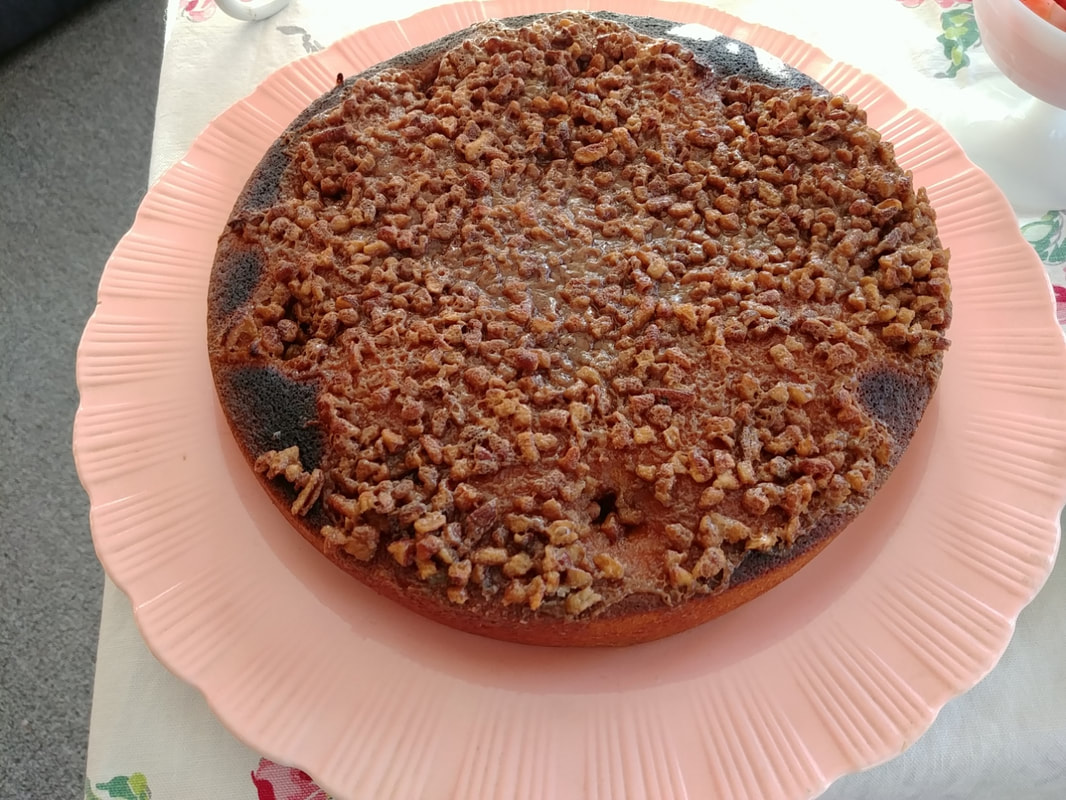 I left the strawberry lazy daisy cake a little too long under the broiler and the edges got a smidge burnt. I've made Strawberry Lazy Daisy Cake before, but this time I was somehow out of coconut, so I used chopped pecans for the topping as chopped nuts are the other traditional topping ingredient. Not QUITE as good as the coconut, but still yummy. 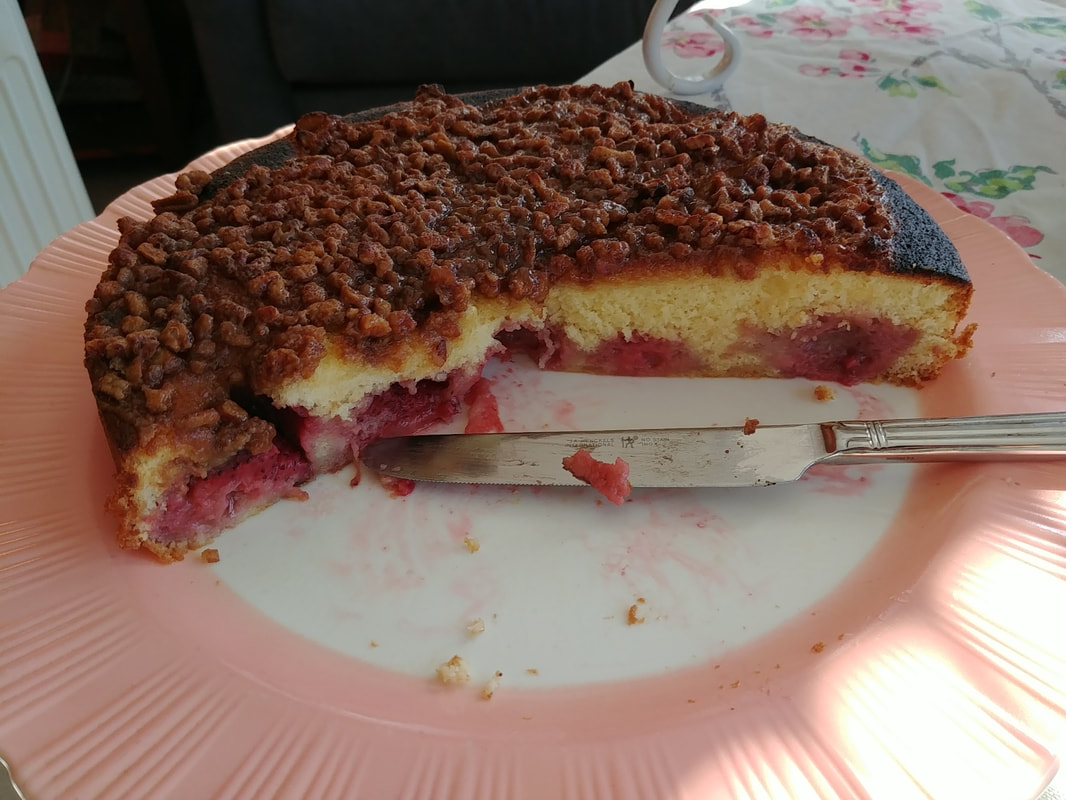 Strawberries on the bottom of the cut lazy daisy cake. 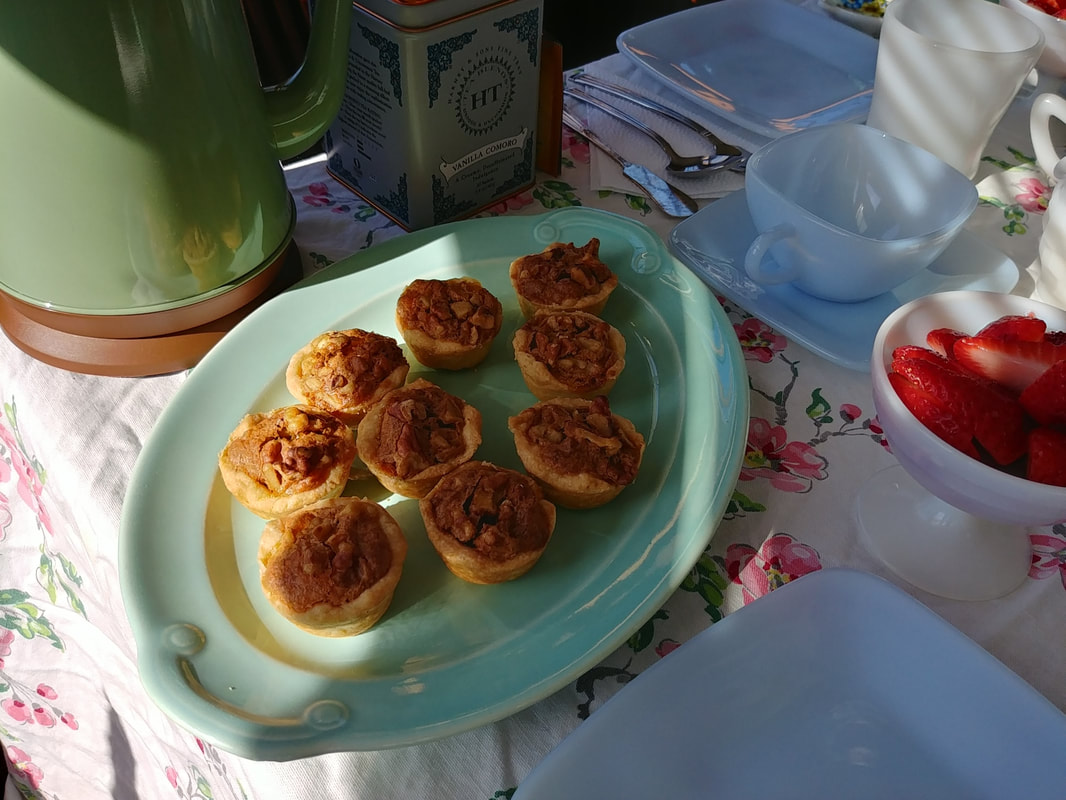 Delightfully buttery, crumbly, sweet walnut tassies. Sadly for you, I did not make the walnut tassies (my friend did), and thus cannot share the recipe. However, she, like I did, had to make some substitutions! For Walnut Tassies are supposed to be Pecan Tassies, but my friend was out of pecans, so walnuts it was. The original recipe is supposed to be like tiny pecan pies, but tiny walnut pies were equally good. 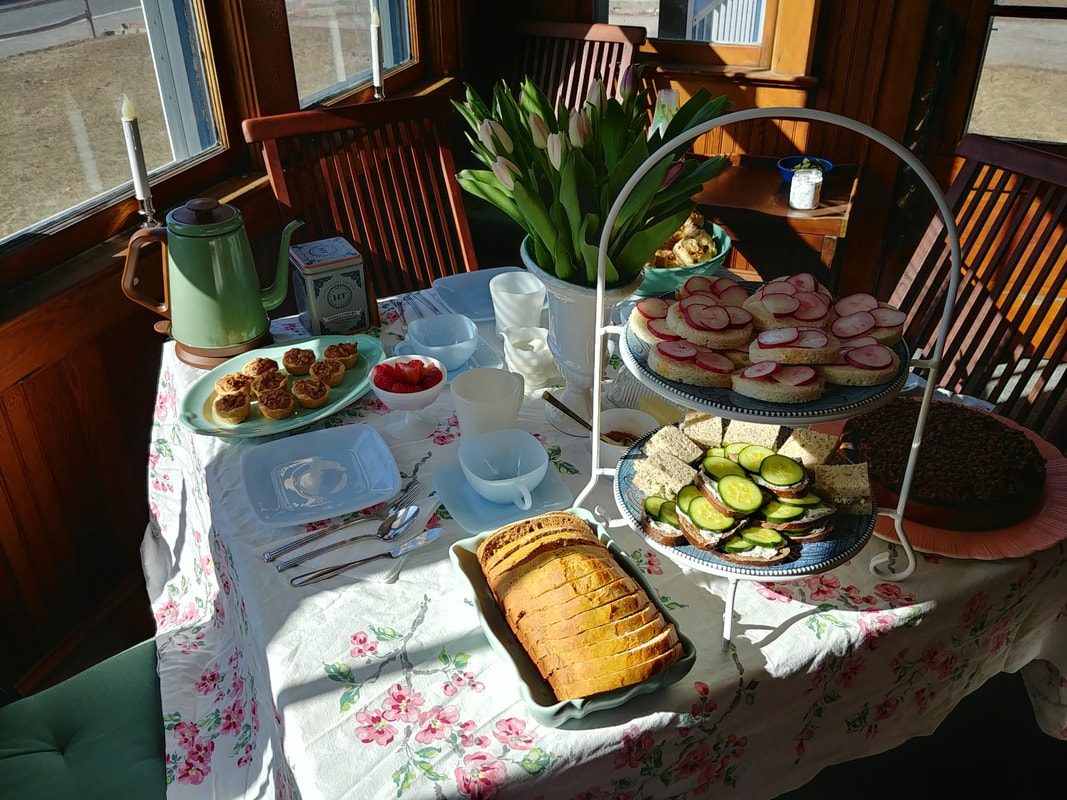 The full, 1940s tea party spread from one angle. 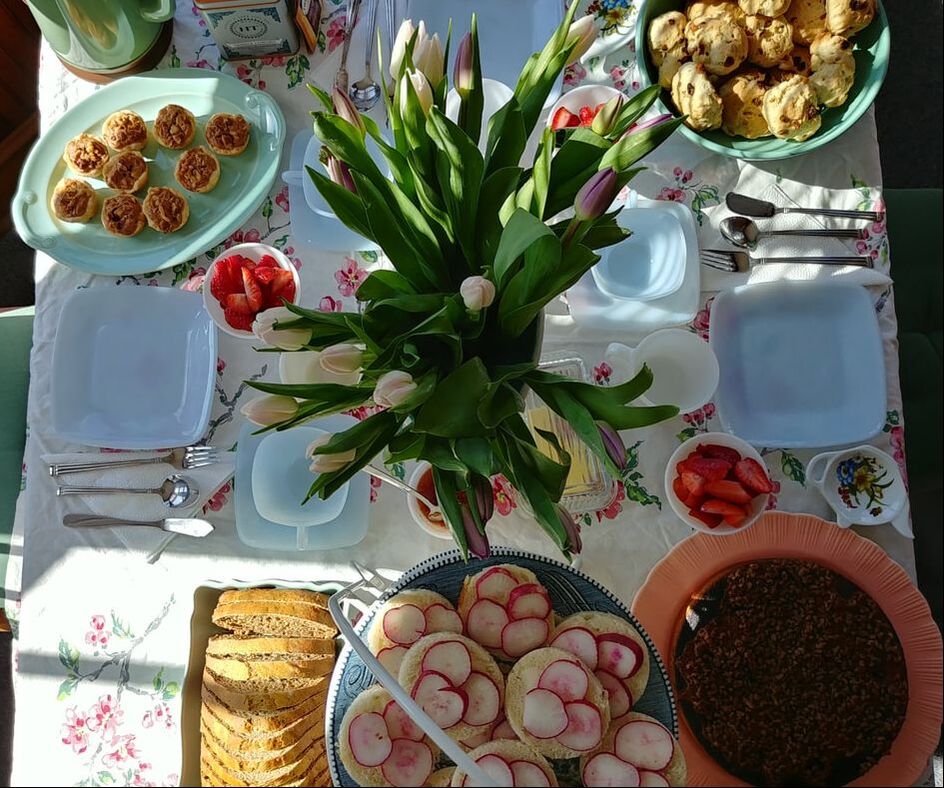 The full, 1940s tea party spread from above. One of the primary joys of tea parties, of course, is in the dishes. I've got my vintage Fire King Azurite Charm teacups and saucers, with newly acquired luncheon plates, some milk glass compotes with sugared strawberries in them, milk glass D ring mugs for cocoa, and assortment of vintage servingware in springy shades, on a vintage floral tablecloth. With tulips in the middle, of course. 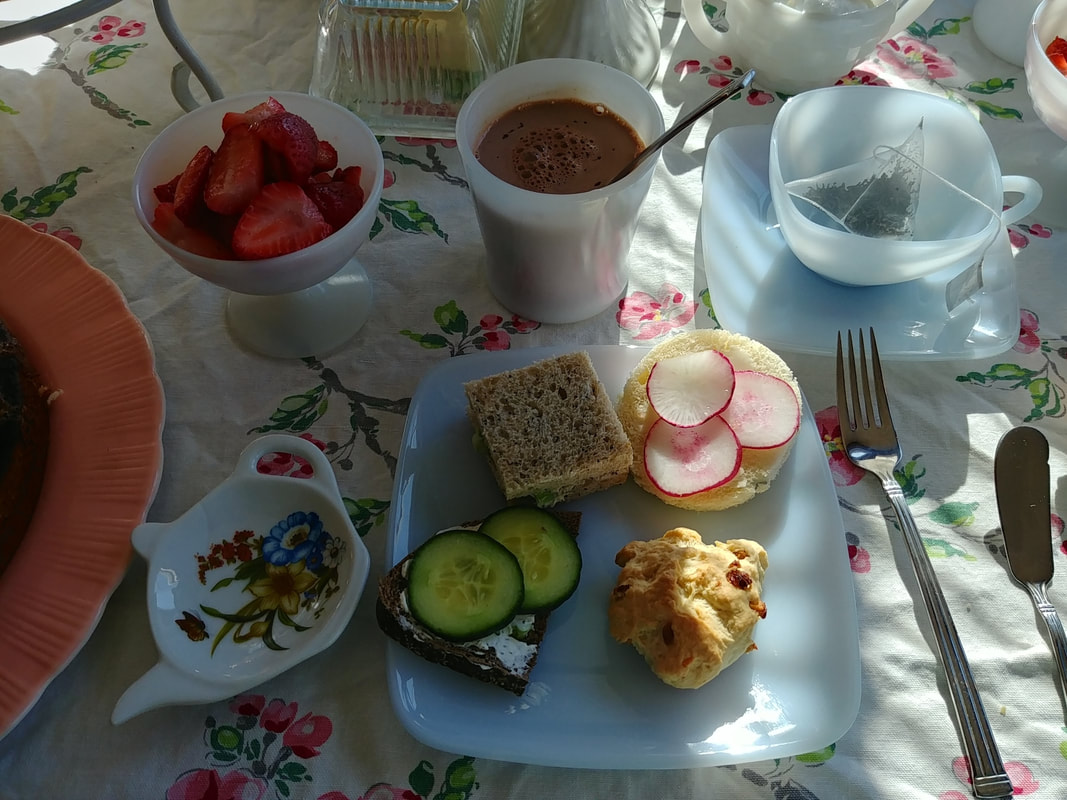 The savory course - one each of the sandwiches, a plain bun, strawberries, cocoa, and an as-yet-un-poured cup of tea. 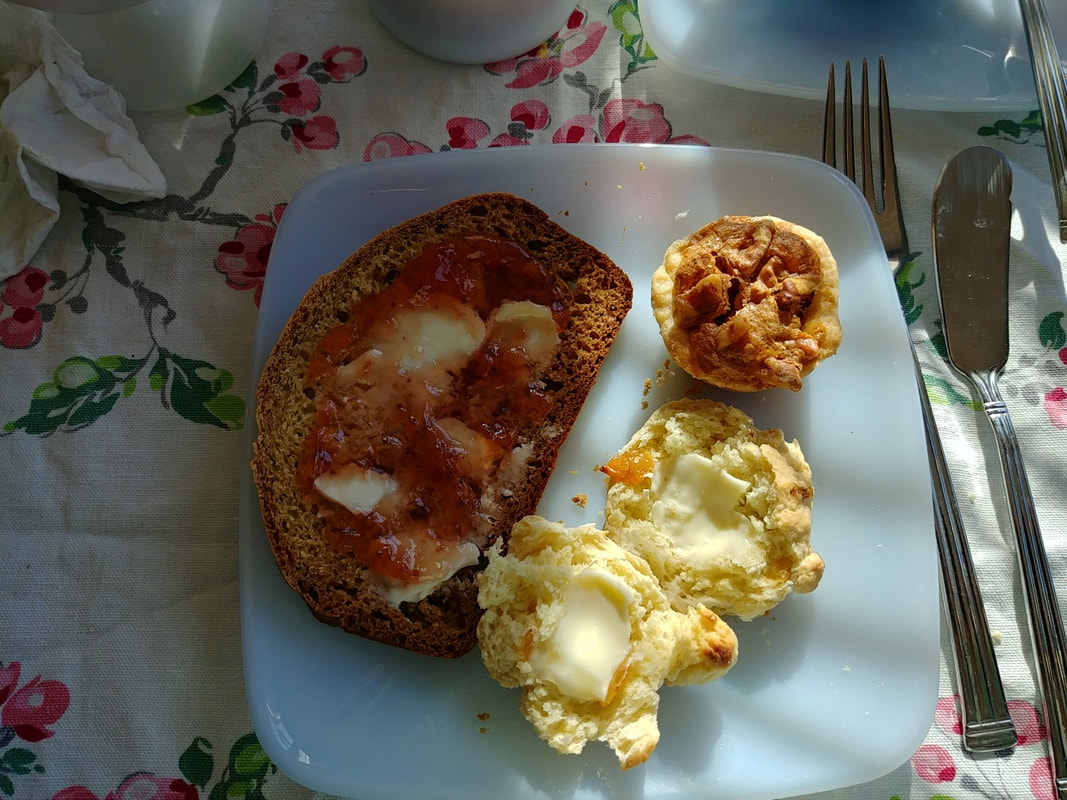 The sweet course - honey bread with butter and strawberry jam, a "plain bun" with butter, and a walnut tassie. 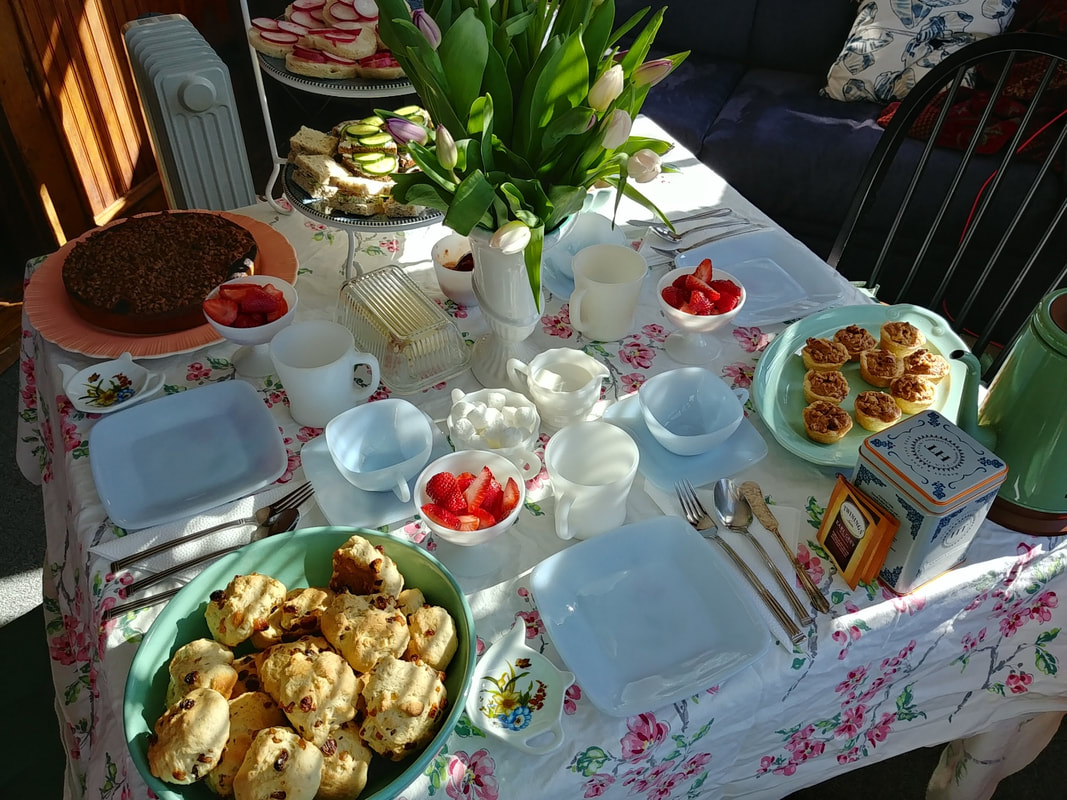 One last beauty shot of the table before eating. If you missed the last spring tea party, you can check it out here, with a promise of more to come! Have you had a tea party recently? What favorite food did you feature? Tell us in the comments! The Food Historian blog is supported by patrons on Patreon! Patrons help keep blog posts like this one free and available to the public. Join us for awesome members-only content like free digitized cookbooks from my personal collection, e-newsletter, and even snail mail from time to time! 
I love winter, don't get me wrong, and the frequent snowstorms and squalls we've been having here in New York have actually lifted my spirits more often than not. I vastly prefer fluffy white snow and prettily iced trees to muddy brown landscape and grey days. That being said, sometimes you just need to brighten your day, and this was exactly the little escape I needed. I spent the morning cooking and baking, a friend brought cookies and tulips, and we sat down to a delightful tea party, complete with my new favorite electric tea kettle. It was an excuse also to use some of my extensive collection of vintage glassware. I didn't match, but that was okay. Who can say no to hobnail compote dishes and Charm teacups?
Vegetarian Spring Tea Party Menu
Deviled Eggs
Lentilwurst Sandwiches with Mustard on Pumpernickel Cucumber Sandwiches With Herbed Cream Cheese on White Ruby Red Grapefruit Sections in Light Syrup Oatmeal Nutmeg Scones Citrus Yogurt Olive Oil Cake Chocolate Chip Cookies Hot Cocoa Assorted Tea with Cream and Sugar
I seriously considered making Earl Grey madeleines, and maybe cream biscuits with assorted jams, but with only three of us, this was plenty. We remarked on the funny thing about tea parties is that everything is fairly small, so it doesn't seem like much food, but it certainly fills you up quickly!
The menu was fairly easy. Our friend brought the cookies, the grapefruit was pre-sectioned from the refrigerated produce section of the grocery store. The most involved recipe was the citrus yogurt olive oil cake, which was okay, but not as nice as I had hoped, so I'm not going to include the recipe here. I made this tea party vegetarian in part because our friend is vegetarian, but also because vegetarian food just seems a bit lighter and more appropriate for a tea party. You can satisfy even the heartiest appetite with lentilwurst sandwiches - the mushroom/lentil mixture really does smell and even taste like sausage, thanks to the mix of herbs and spices. I first made lentilwurst back for our White Christmas themed party, and I've made it several times since. 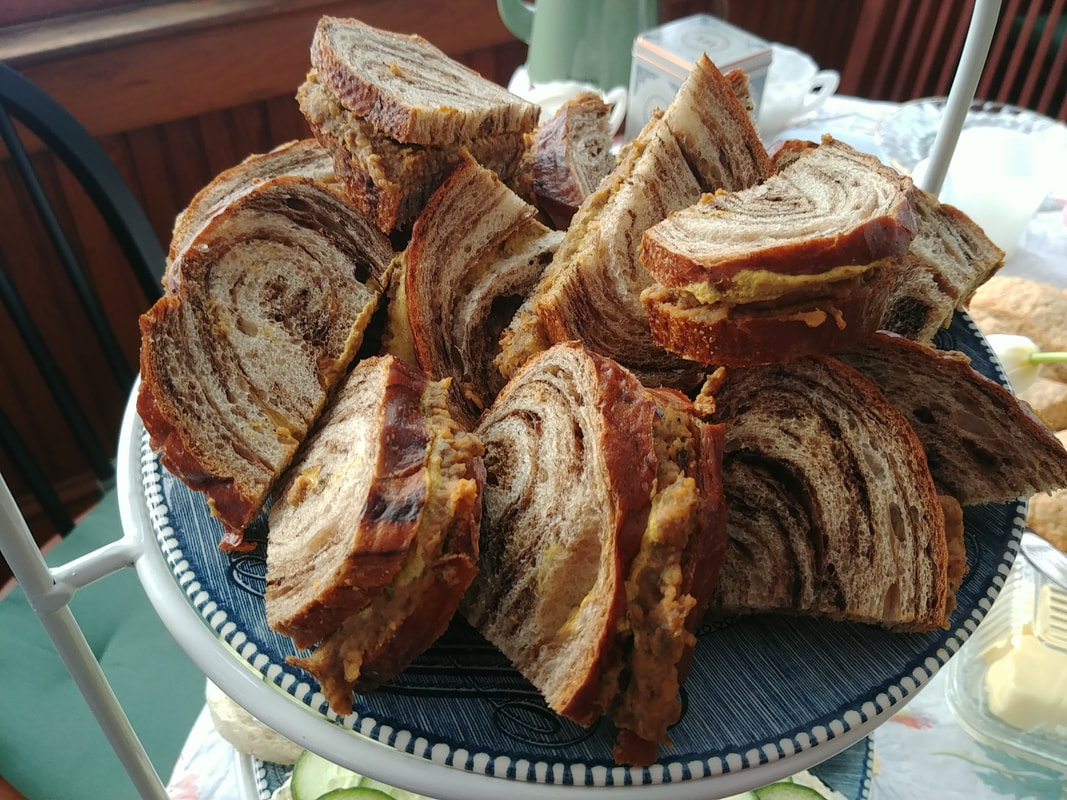
Lentilwurst with spicy brown mustard on swirled pumpernickel bread. Yum.
Cucumber Sandwiches
Herbed cream cheese and cucumber sandwiches on rounds of soft white sandwich bread.
What is a tea party without cucumber sandwiches? I went extra-fancy here and cut rounds out of the centers of soft white sandwich bread (the bakery kind, not the pre-sliced kind). Frankly, it didn't make a lot of rounds, so I left these open-faced. I'm saving the outer scraps for bread pudding later this week. The rest of the recipe is simple. You'll need:
1 package neufchatel cream cheese 2 scallions dried dill weed a tablespoon or two of milk, cream, or buttermilk 1 English (or burpless/seedless) cucumber white bread rounds Soften the cream cheese at room temperature. Thinly slice the scallions, white and green parts, and add to the cream cheese with the dill weed and liquid. With a fork, mash the lot together until well mixed. Spread onto the rounds of bread and top with thin slices of cucumber. If you want to be extra fancy, you could garnish with fresh dill or chives. The bread will dry out as you let it sit out, so try to do these sandwiches at the last minute, or cover and refrigerate them. Deviled Eggs Recipe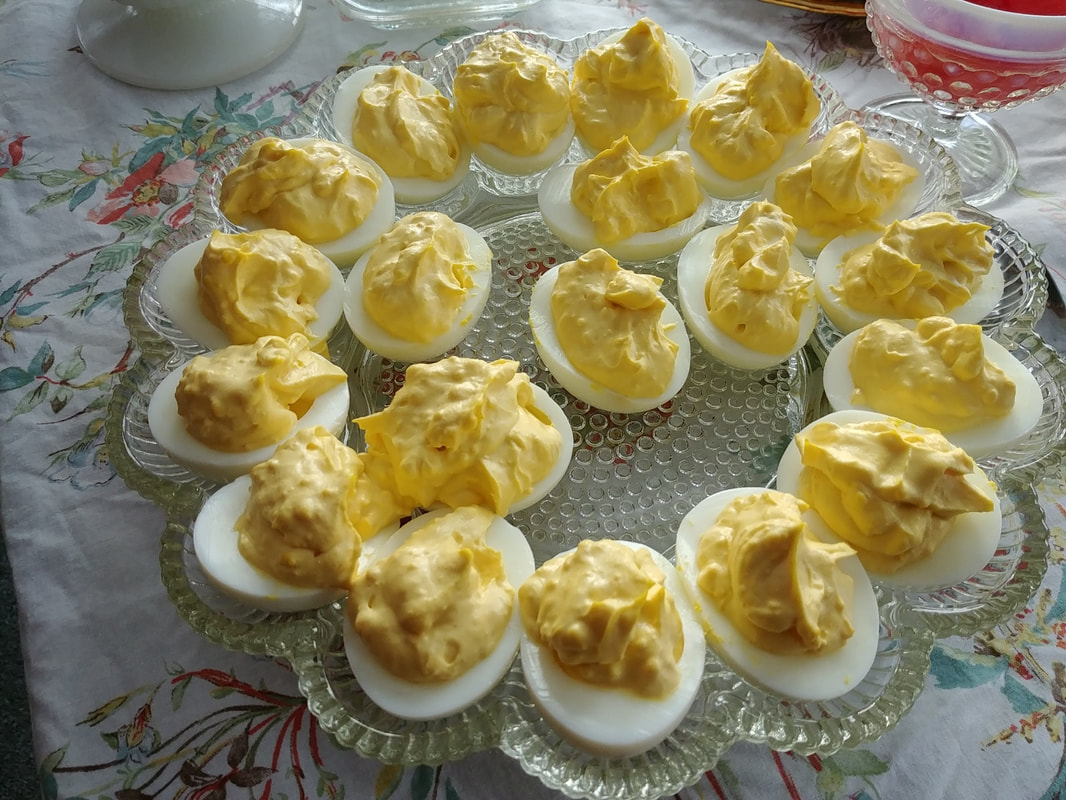
Deviled eggs are one of my favorites, but I find most deviled eggs that other people make to be rubbery and bland. There are three tricks to deviled eggs - don't overcook the eggs, boil the eggs the same day you plan to serve them, and make the yolk filling smooth, creamy, and generous.
12 large eggs 1/4 cup mayonnaise 1/4 cup sour cream 2 tablespoons Dijon mustard In a large pot, cover your eggs with cold water by several inches. Bring pot of cold water to a boil over high heat and let boil for 1-2 minutes. Then turn off heat, set a timer for 15 minutes, and let eggs continue to cook as the water slowly cools down. When the 15 minutes are up, remove the eggs to a bowl of ice water to stop cooking and cool down. Peel the eggs (crack them under water for easiest peeling), halve them, and remove the yolks. With a fork, mash the yolks finely until there are no chunks left and the yolk mixture is powdery. Then add 2 tablespoons Dijon mustard, and 1/4 cup each mayo and sour cream. Mix well. If the mixture seems dry, add another spoonful of mayo and sour cream, until the yolk mixture is fluffy, but not runny. Fill the eggs generously, in the hollow left by the yolk and pile some more on top. I just use a spoon and dollop, but you can fill a pastry bag or a plastic sandwich bag with the end cut off if you want something a little more polished-looking. If desired, garnish with paprika, black pepper, and/or chopped chives, but I like mine plain. Keep cool until ready to serve, and watch them fly off the tray. Oatmeal Nutmeg Scones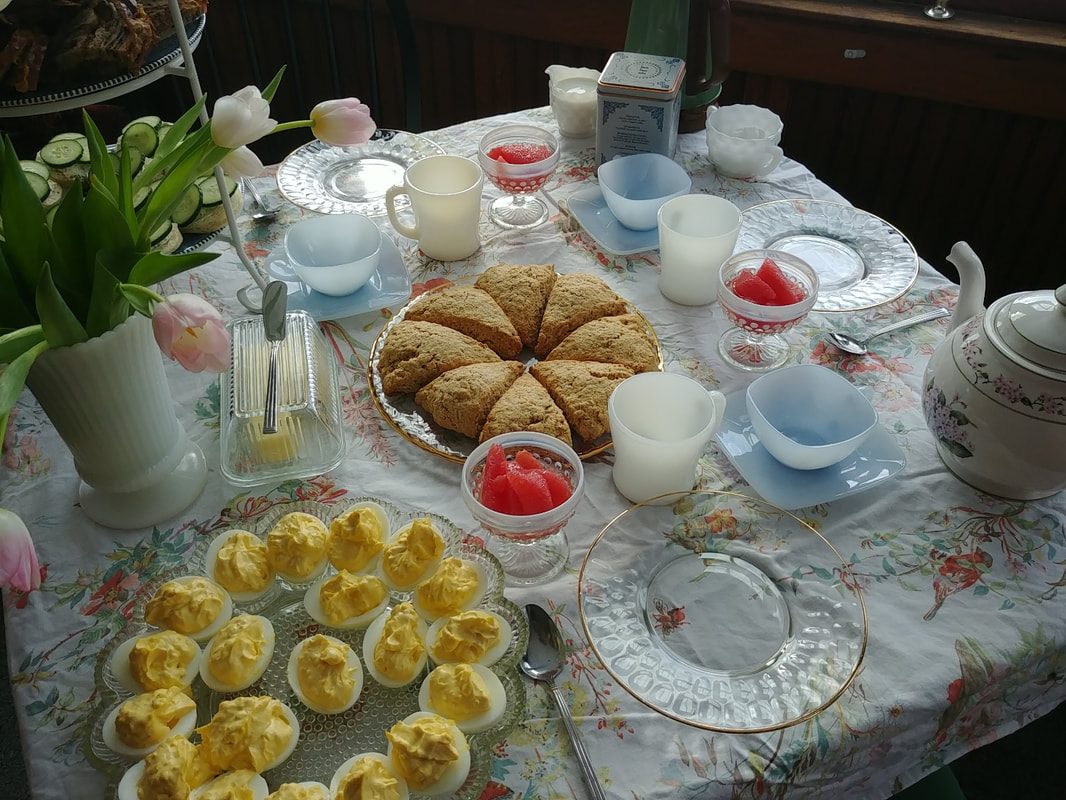
Oatmeal nutmeg scones in the center of our very pretty table.
Scones are another essential part of a tea party. These are my absolute favorite recipe, straight from the eminent Dorie Greenspan. I didn't make too many changes, except halfway through the recipe I realized I only had room temperature butter. Thankfully, my husband reminded me of the several pounds of butter in our chest freezer, so instead of cutting in cold butter like the recipe calls for, I grated frozen butter and mixed that in, which worked well. These scones have a nutty, toasty, nutmeg-y flavor and using fresh-grated nutmeg really makes a difference, although you shouldn't use quite as much as pre-ground nutmeg
1 egg 1/2 cup cold buttermilk 1 2/3 cup all-purpose flour (I used white whole wheat) 1 1/3 cup old fashioned rolled oats 1/3 cup sugar 1 tablespoon baking powder 1/2 teaspoon baking soda 1/2 teaspoon salt 1/4 teaspoon nutmeg 10 tablespoons cold, unsalted butter (1 stick, plus 2 tablespoons) Preheat the oven to 400 F. In a small bowl, whisk together the egg and oatmeal. In a larger bowl, whisk all dry ingredients together, than cut in butter (or used grated frozen butter). Add egg mixture and toss with a fork until mostly combined. Knead a few times until the remaining flour is absorbed, then pat into a round and cut into wedges. Bake 20-22 minutes or until golden. Cool for a few minutes before serving. Serve warm with plenty of salted butter. Perfect Tea
The one lovely thing about using an electric kettle for tea is you can have the kettle right at the table, which is what we did. Cooking at table with electric appliances was common in the 1930s and '40s, especially at breakfast. It was fun to be able to recreate that fashion today! Plus, being able to reheat the water right at the table certainly made a difference in refills.
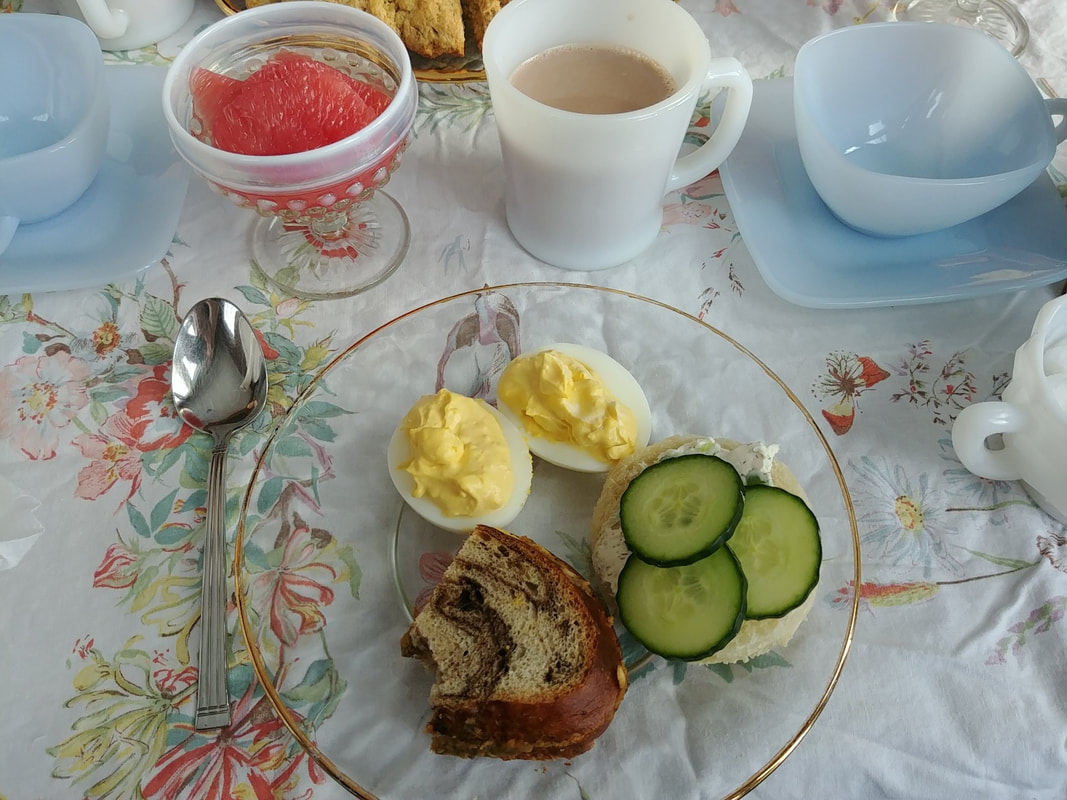
Serving one of the tea party, with my hobnail sherbet cup full of grapefruit, an Anchor Hocking D mug for hot chocolate, and Fire King azurite Charm teacup and saucer. The pretty little gold-rimmed plate was another thrift store find, as was the vintage tablecloth!
In all, this teensy little party was super fun, and I'm definitely having a tea party again! Something about getting out the fancy dishes, fresh flowers, a candle or two, an assortment of tempting little treats, and plenty of hot tea makes everything better. Plus I have plenty of other recipes to share. So many, in fact, I'm considering writing a little tea party cookbook. Would you be interested if I did?
Have you ever had a tea party? Do you have favorite tea cups and dishes? Tell us in the comments!
The Food Historian blog is supported by patrons on Patreon! Patrons help keep blog posts like this one free and available to the public. Join us for awesome members-only content like free digitized cookbooks from my personal collection, e-newsletter, and even snail mail from time to time!
 White Christmas (1954) is probably one of my favorite holiday films. I did not grow up watching it. In fact, my husband was the one who introduced me to it, but I fell in love. It's got everything - WWII, great relationships, music, dancing, everything wonderful and awful about putting on a show (former theater nerd, here), and of course, a heartwarming tale in a beautiful setting. Not to mention Bing Crosby's velvet voice. So when a friend, who had never seen White Christmas, suggested I make a dinner menu to go along with the film, I couldn't resist. She knew I'd done similar menus before (Star Wars and The Hobbit, respectively, both birthday parties I threw myself), but this one was fun because I could delve into all my vintage cookbooks for ideas. Now, there are a few foods mentioned or shown in the film. One of the first (and best) is the scene in the club car on the way to Vermont. Mentioned or shown foods include:
The other major scene is after hours, when sandwiches and buttermilk are the order of the day. Mentioned or pictured in this scene are:
Other foods shown include hotdogs by the fire and, of course, the General's enormous birthday cake. Clearly dinner is served in that scene, but it's difficult to see what. There was an added hiccup in all this menu planning - the friend in question is vegetarian. So guess what? A lot of that list is out the window! But I relish a good challenge, so I took to my cookbooks and got thinking. And here's what I came up with: 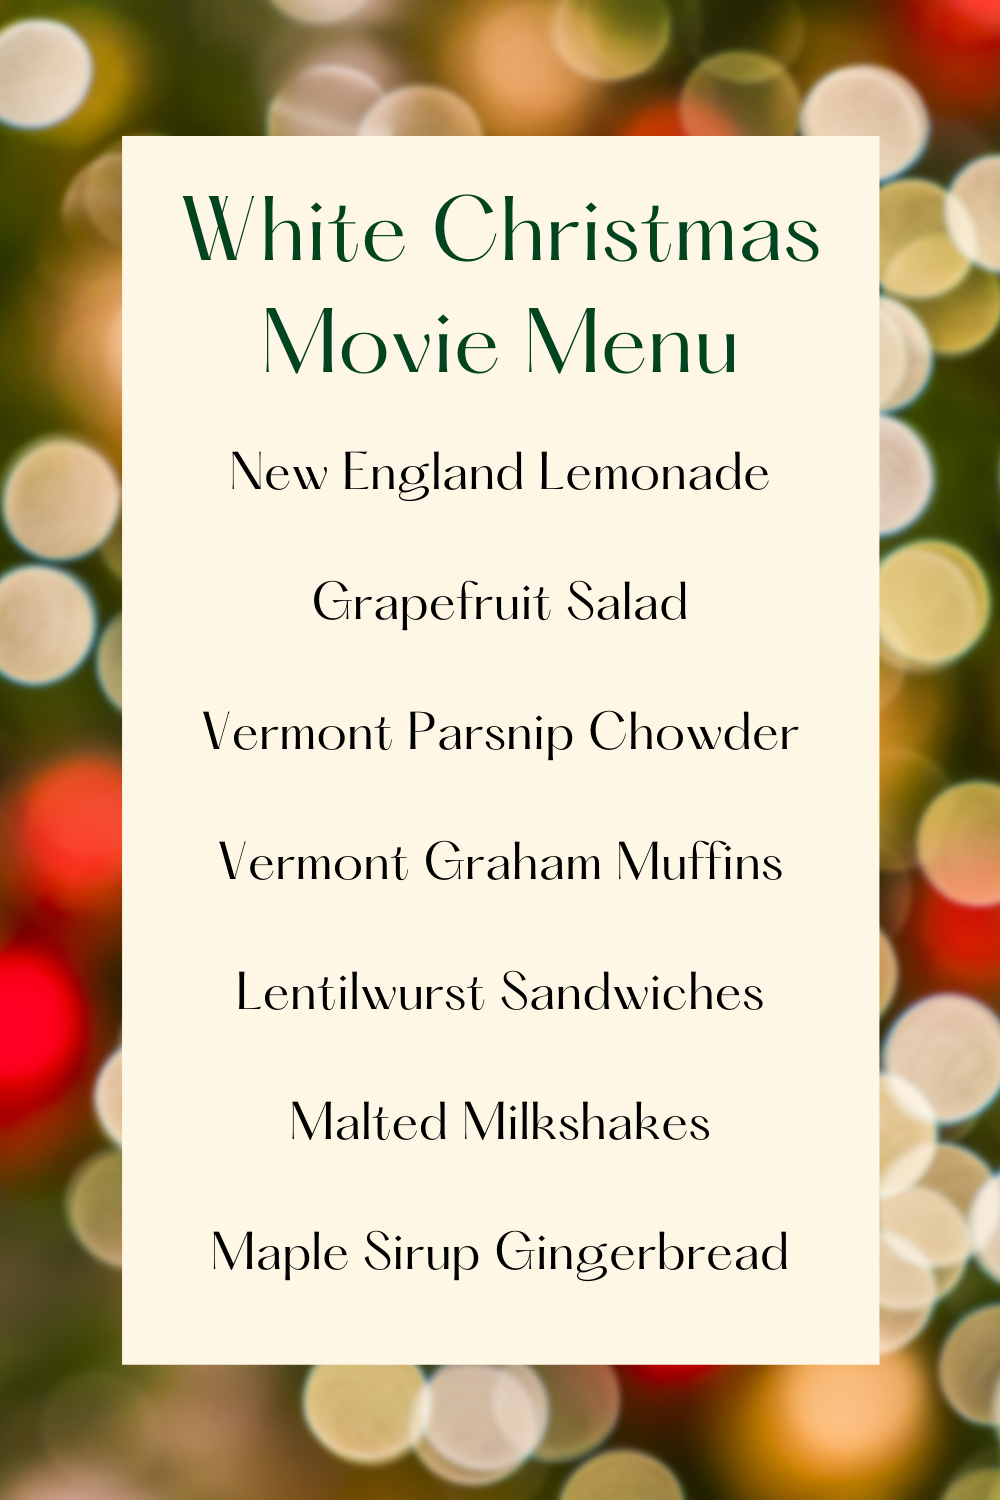 I based my recipes largely on the foods of the late 1940s, focusing on New England recipes. Because although White Christmas was released in 1954, and clearly takes place in the 1950s, it was influenced by the earlier (and slightly more racist) Holiday Inn, which came out in 1942. In addition, the WWII connection between Bob and Phil (a.k.a. Wallace & Davis), made me think this menu needed a little bit of a 1940s flavor. Here's the menu:
No, those aren't typos - "lentilwurst" is what I call vegetarian liverwurst and while everything was good, that was the surprise hit of the night. I wish I had made a double batch because it was gone almost instantly. Maple Sirup (also not a typo - that's how they spelled it in the cookbook) Gingerbread was another delightful (if rather expensive) hit. Thankfully, we did not eat the whole cake in one sitting, although two days later we're down to the last piece. In an effort to spare you from the world's longest blog post, I'm going to be posting the recipes each day this week (probably more than one per day) as their own blog posts. Don't worry - I'll link them back here as they're posted so you can always find everything in one spot. You should get the whole menu before the weekend - just in time to plan a White Christmas Dinner and a Movie of your own! Happy eating! Want to see more Dinner and a Movie posts? Make a request or drop your suggestions in the comments! As always, The Food Historian blog is supported by patrons on Patreon! Join us for awesome members-only content like free digitized cookbooks from my personal collection, e-newsletter, and even snail mail from time to time! 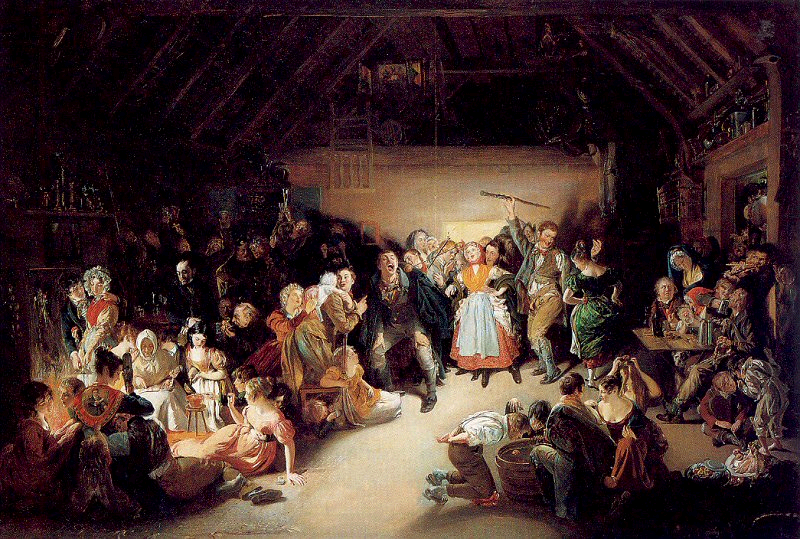
Snap-Apple Night, painted by Irish artist Daniel Maclise in 1833.
Thanks to everyone who joined us for Episode 22 of the Food History Happy Hour! This was a very special Halloween themed episode! We made the early 19th century Stone Fence cocktail, and talked about all sorts of historic Halloween traditions and foods, including the Celtic and Catholic origins of Halloween, Halloween games and divination, including Snap Apple (as illustrated above), donuts, party foods including gingerbread, grapes and grape juice, apples, pumpkins, color themed parties, decorations, including Dennison's Bogie Books, the history of trick-or-treating, and more!
Stone Fence Cocktail (19th Century - 1946)
There's all kinds of versions of this - I was first introduced to the Stone Fence in the Roving Bartender (1946), and of course it's in Jerry Thomas' "How to Make Mixed Drinks" (1862) also has a version, which is largely how it gets popularized in bars across the country. But mixing hard cider with brown liquor dates to much earlier, and the type of brown liquor depends on the region. Both of these recipes call for Whiskey/Bourbon, but I decided to go with spiced rum. Other versions also call for Angostura bitters or cinnamon, which is unnecessary if you use spiced rum, like I did.
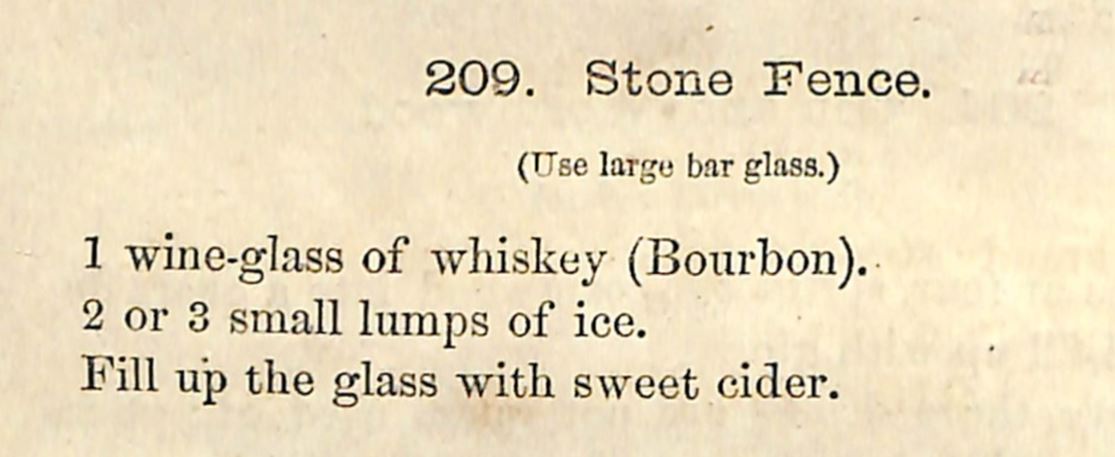
Recipe for the Stone Fence, from "How to Mix Drinks" by Jerry Thomas, 1862.
You'll note that the Jerry Thomas recipe actually calls for the use of sweet cider, which is unusual. Here's the original recipe:
(209) Stone Fence. (use a large bar glass) 1 wine glass of whickey (bourbon). 2 or 3 small lumps of ice. Fill up the glass with sweet cider. 
Stone Fence recipe from "The Roving Bartender" by Bill Kelly (1946).
I like the Bill Kelly recipe from the Roving Bartender a bit better. Here's the original:
Stone Fence. 1 oz. whiskey in a high ball glass Fill with hard cider. And of course, there's my own version! 1 oz. spiced rum Fill with hard cider (I used Strongbow Artisanal Blend) I did not use ice, because I was lazy, but if you don't make sure your hard cider is chilled for the best version. You could also turn this into a sort of flip by heating the hard cider (don't boil unless you want to lose the fizz and the alcohol content) and adding the spiced rum at the last minute. 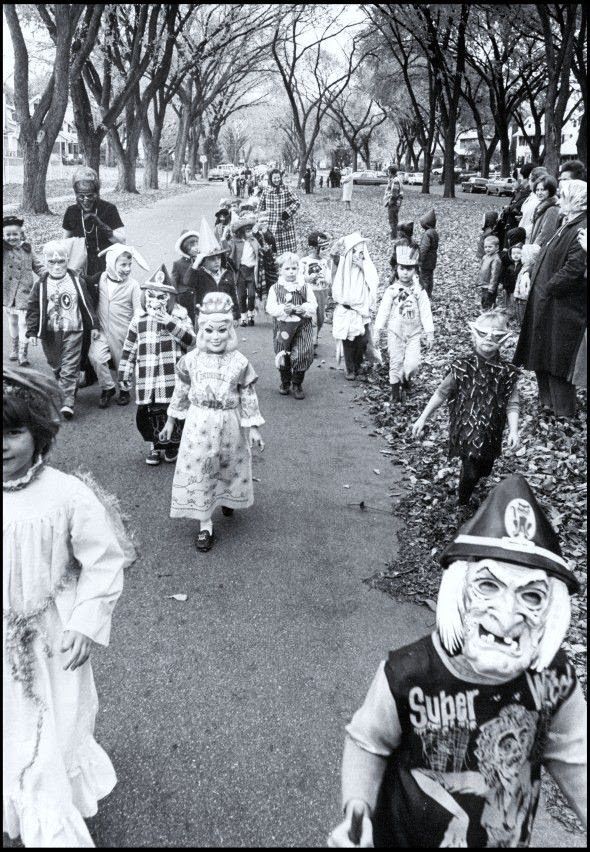
A great 1950s image of trick or treaters in a very suburban area. Note the mix of store-bought masks and homemade costumes.
Episode Links
I love Halloween and had a bunch of fun putting this together.
That's all for tonight! I hope everyone has a very Happy Halloween tomorrow and we'll see you in November for the next episode of Food History Happy Hour! 
Food History Happy Hour is supported by patrons on Patreon! Join us for awesome members-only content like free digitized cookbooks from my personal collection, e-newsletter, and even snail mail (like the Halloween packet) from time to time!
 The more I learn about food history, the more I realize that our modern concept of seasonal eating is a big wrong-headed. I've often prided myself on my delight in seasonal eats and trying to stick to what is available seasonally in my cooking. Meaning, no strawberries in December or tomatoes in March or pumpkin in June. And this in-the-moment feeling certainly was quite historic, particularly in spring and summer as waves of produce came to be eaten. However, historic cooks did a great deal of preserving throughout the year, especially in preparation for the winter holiday season. From pickling young walnuts in June, making cherry bounce in July, and starting the holiday fruit cake in August or September, canning and drying weren't the only food preservation activities going on, and many happened year-round. Of course, I'm not much of a canner or jammer, and I find the easiest way to preserve involves alcohol. Even though (ironically) we don't do a great deal of drinking in our house, having something other than beer and wine at a party is delightful, and punch is one of the best ways to showcase an interesting beverage for a crowd. As some of you may be aware, we plan a huge holiday party every year (hosting between 20 and 40 people), and Second Horse Punch has been a staple since the beginning, starting 10 years ago. We got the recipe from a friend, who works at another 18th century historic site. The original recipe reads thusly: ½ pint light-bodied West Indies Rum (a.k.a. light Puerto Rican or Cuban) ½ pint peach brandy ½ pint lemon juice 5 tablespoons bitters (Angostura is about the only kind left and this recipe uses about half a bottle) 4 tabelspoons brown sugar Stir thoroughly. Pour over a large block of ice. Add 2-3 pints effervescent mineral water. So what's with the name? It was supposedly invented by the Second Lighthorse Brigade and a rusty stirrup added to the punch purportedly improved the flavor. 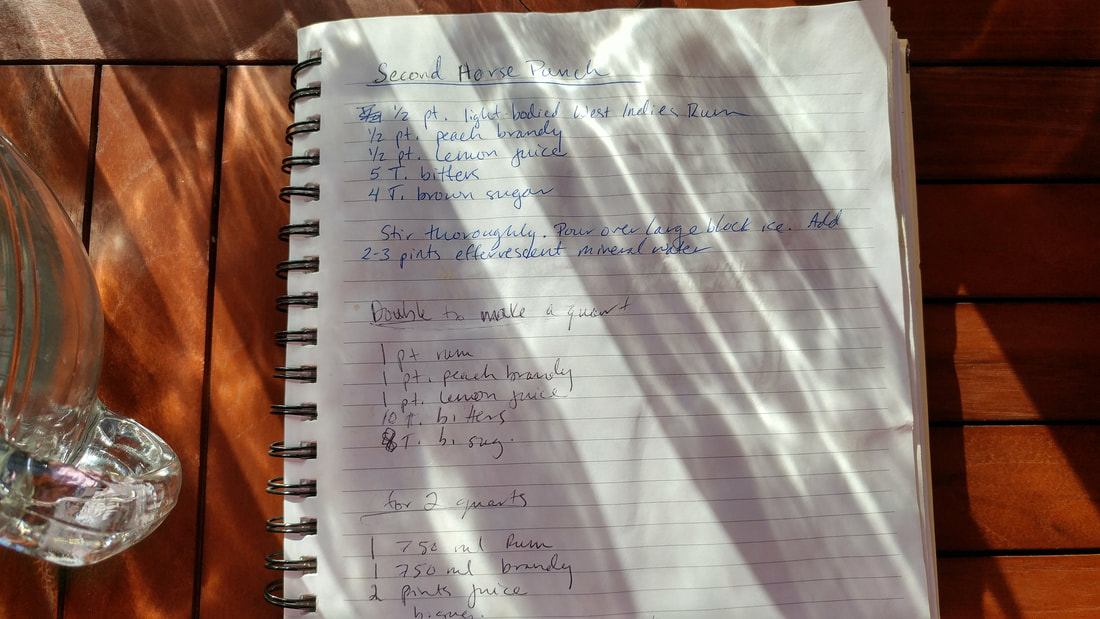 We are ginger ale addicts in our house, and the added sweetness is very nice - I think if you used mineral water (or sparkling wine) as the original called for, you would taste the alcohol too much. And to be honest, the best Second Horse Punch goes down so smoothly you don't realize how much you've downed. Although our ratio is 1:2 Second Horse Punch to ginger ale, the gentleman who gave us the recipe does a 1:1 ratio. That's a bit too strong for us! The key to a good Second Horse Punch is to let it age. The longer, the better. At minimum three months, preferably up two years. The longer it ages, the smoother it becomes. But, if you're going to let it age for that long, be sure to store it in glass. Quart mason jars are fine, if you don't have bottles. Our first big batch is actually in an old green glass wine jug. Second Horse PunchHere is our quadrupled recipe, which makes 3 quarts (not two, like my handwritten recipe says - I've since corrected it). 1 quart white rum 1 quart peach brandy 1 quart lemon juice 16 tablespoons brown sugar 2 bottles angostura bitters (which is actually only 16 tablespoons, not 20, but that's okay) Mix well - I recommend adding the brown sugar first - and pour into glass jars for storage. Label with the date so you know when best to mix it up for a delicious, not-too-sweet, spicy, delicious party punch. If you don't want to make 3 quarts, you can cut the recipe in half and use a pint mason jar for your measuring (which I did, but twice, because I didn't have a big enough pouring bowl). 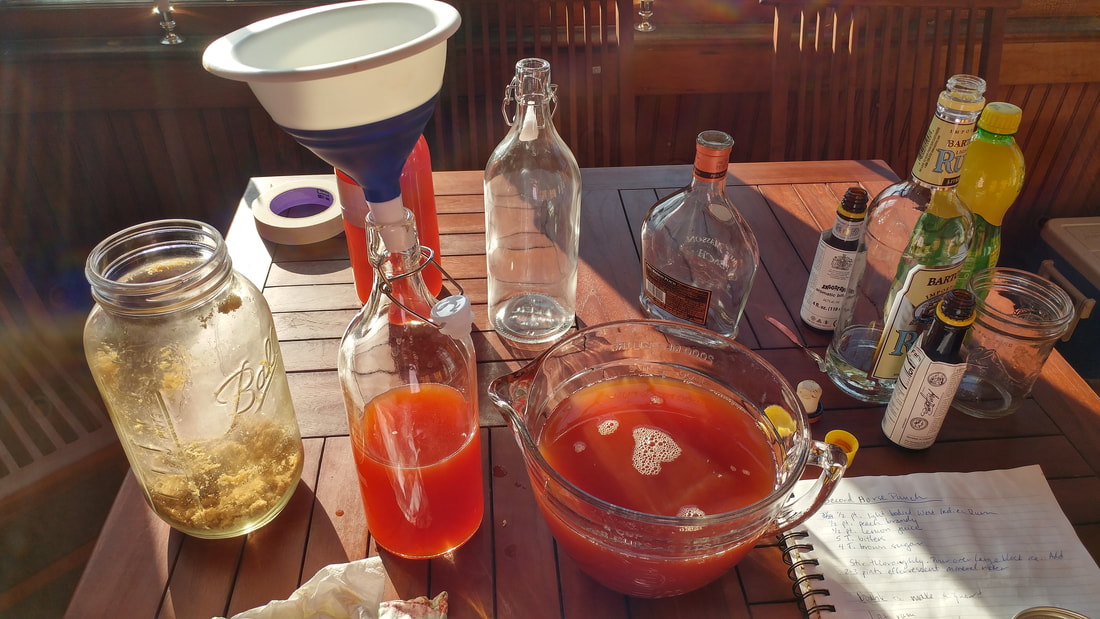  To make the finished punch, mix one part Second Horse Punch with two parts ginger ale and serve in a big punch bowl over ice. But only after you've let it age in a dark, cool place for at least 3 months! If you make some now, it should be quite nice by Christmas. And, as always, if you liked this post, consider becoming a member or joining us on Patreon. Members and patrons get special perks like access to members-only content. 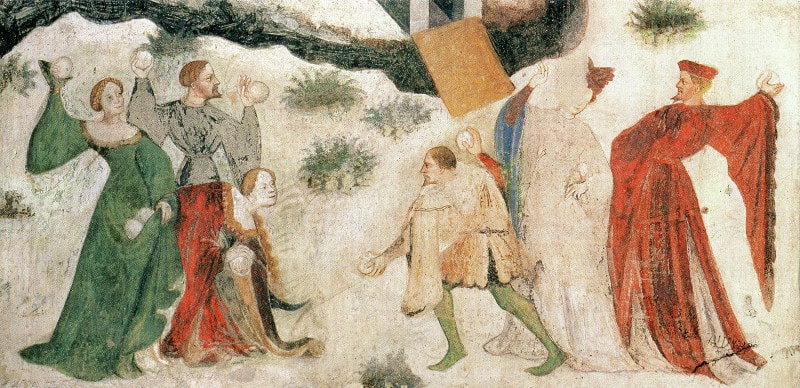 So I had myself a little Medieval-themed birthday. Let's be honest - I wanted to wear a pretty Elven Princess dress and a tiara for my 35th birthday (Middle Ages was definitely a pun that was used). I didn't decorate the house much, and to be honest you're lucky I snapped as many mediocre photos as I did (too busy having fun!). Food-wise, I tried to stay away from any Western Hemisphere foods, and to create dishes based on peasant foods, rather than the feast meals of European kings. Some were very ordinary, like store-bought peasant bread and cheese and roasted chicken legs. Some didn't turn out as well as I'd hoped, such as pease porridge with leeks (flavor was good, split peas didn't cook up as smooth as I would have liked - still some crunchy bits). But a few were real knock-outs, so I'm sharing them here. 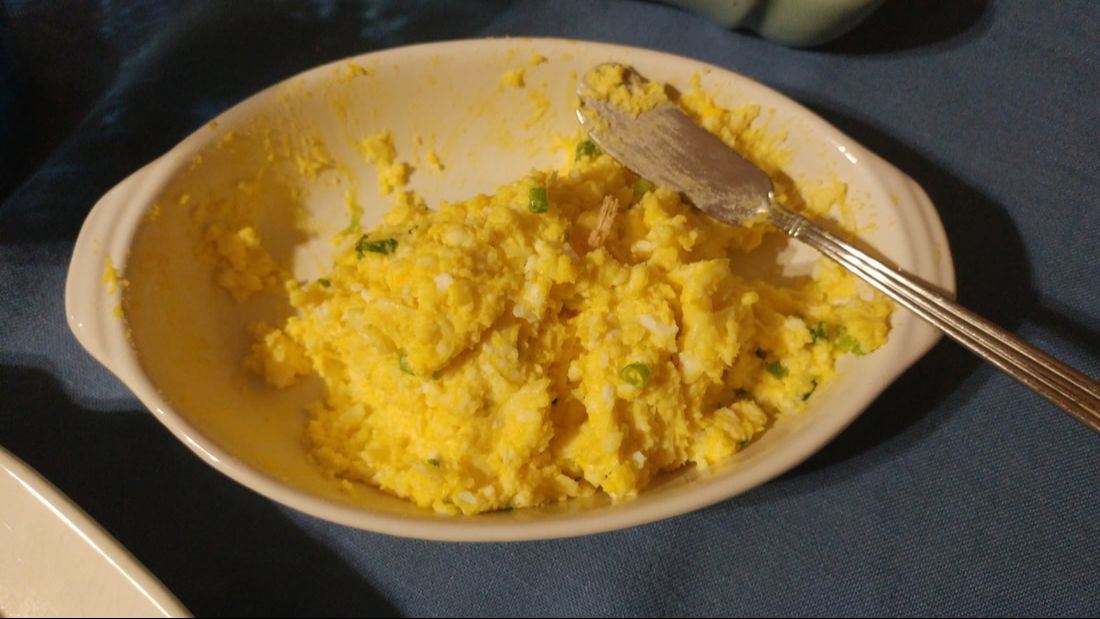 Pate a l'oeufsThis one is inspired by a Tamar Adler recipe by the same name, from her book Something Old, Something New. It's almost certainly a 19th or early 20th century recipe, but it SEEMED Medieval, so in it went. I thought it would be pretty good, and it was, but the party guests LOVED it. A surprise hit. 6 hardboiled eggs 2 tablespoons soft butter 1 cup shredded cheese (I used a mixture of sharp cheddar and jarslberg) 6 green onions/scallions, finely sliced dash olive oil a tablespoon or two of mayonnaise juice of half a lemon salt to taste Halve the hard boiled eggs to remove the yolks. Mash yolks with butter until they make a smooth paste. Finely mince the egg whites and add to yolk mixture with cheese and onions. Add olive oil to moisten and mix well. Add lemon juice and mayonnaise and mix again. Mixture should be thick - like a pate. Salt to taste and serve with crackers - sturdy ones like rye Wasa or Triscuits are best. 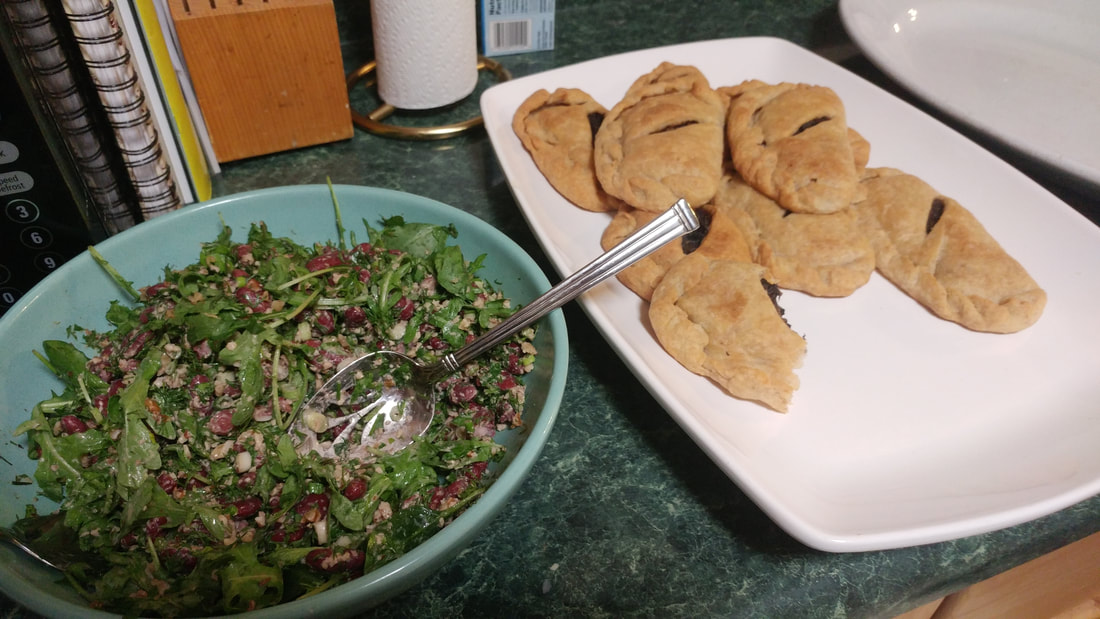 Left: Red Bean Herbed Salad. Right: the almost-gone Mushroom Pasties. Red Bean Herbed SaladThis is very loosely based on a similar dish from the nation of Georgia, where they love fresh herbs, garlic, and walnuts. I realize now that kidney beans are actually native to the Americas, so not really accurate to Medieval Europe. But still, shockingly delicious. I actually made it again tonight for dinner, and my husband loved it so much he ate nearly half the bowl. Lol. It's best when eaten with something rich and fatty - like the grilled cheese I made tonight, or like the mushroom pasties I made for the party. 2 cans red kidney beans, drained and rinsed 1 cup minced fresh dill 1/2 a bunch fresh parsley 1 generous handful arugula 1-3 cloves garlic (3 if you like it "spicy") 1 cup raw walnuts more olive oil than you would think more cider vinegar than you would think In a small food chopper, process the garlic, parsley, walnuts, olive oil, and cider vinegar (if you don't have a food chopper, mince the garlic and chop the parsley and walnuts before mixing with olive oil and vinegar). Pour over the beans and minced dill, toss with arugula, and serve at room temperature. Taste and add more vinegar if desired. Alternatively, you can add the arugula to the "sauce" with the parsley. Other options include adding fresh basil and/or cilantro - other popular Georgian flavors. But the dill is the real deal, so don't skimp unless you really hate the taste of dill. Mushroom PastiesI have a lot of vegetarian friends, so instead of making meat pasties, I decided to go with mushrooms. The pastry dough is my go-to for everything and comes from - believe it or not - an old Russian cookie recipe. It's impossible to overwork and although it's more tender than flaky, it's perfect for pasties and slab pies. I made it with half spelt flour so it tasted more authentically peasant-y. For the pastry dough (this will make double what you need for the pasties): 1 pound butter, very soft or melted 1 pound farmer cheese or pot cheese 4 cups flour Cream the butter and cheese, then mix in the flour. Knead until smooth. Let rest while you cook the mushroom mixture. For the mushroom mixture: 2 pints white button mushrooms 2 pints baby bella mushrooms 6 shallots 1 stick butter thyme salt white wine lemon juice In a wide pot (stock pot or dutch oven), melt the butter with the thyme (be generous - mine could have used more) over medium heat. Meanwhile, peel and slice the shallots and add them to the butter. Then rinse and finely mince the mushrooms (this will take a while by hand - feel free to pulse in a food chopper). Cook the mushrooms and shallots in the butter until all the liquid is absorbed (raise heat if necessary), then add white wine and lemon juice in batches, letting the mushrooms absorb between additions. Taste and add salt if necessary. Let cool before filling pastry. Preheat oven to 425 F. Take walnut-sized pieces of dough (about enough to fill your palm when you make a fist) and roll quite thin (not paper thin, but close). Add mushroom mixture, fold round in half, and crimp edges. Place on a large sheet pan and slash the top of the pasty to allow steam to escape. Repeat until the mushroom mixture is gone. This should make about 18 palm-sized pies. Bake 25-35 minutes, or until the crust is golden brown. With the leftover dough, make a pear custard slab pie! 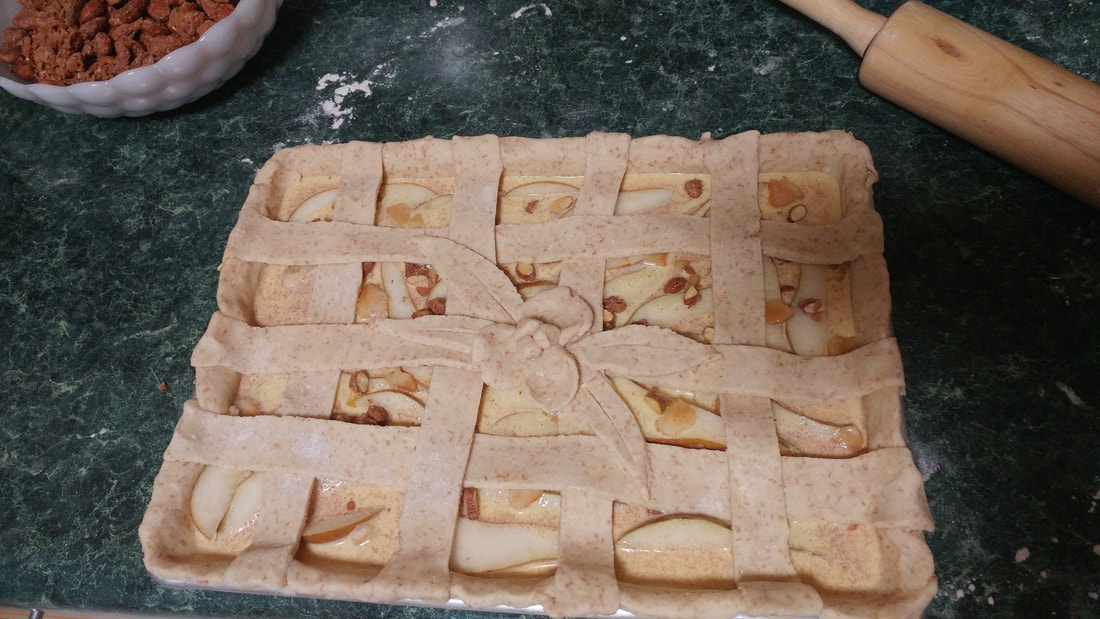 Very proud of my decorative work, although I realized after that I forgot to actually lattice that far left strip. Oh well - be distracted by the beautiful flower! Pear Custard Slab PieI was not planning to make this at all, but had some winter (Bosc) pears on hand. Not enough to really fill the pie though, so I added my classic quiche custard ratio spiked with a little sugar and cinnamon. It was a huge hit. I also had some bits of marzipan and candied almonds that I chopped up and added. It seemed Medieval-y enough and everyone loved it. 2 Bosc pears, cored and thinly sliced half a batch Russian pastry crust (above) 2 eggs 2/3 cup milk a tablespoon or so of sugar ground cinnamon to taste Optional: bits of marzipan 1/4 cup candied almonds, chopped Preheat oven to 425 F. Roll the pastry into a sheet large enough to fit a jelly roll pan (1/4 sheet pan). Trim the edges and use the extra dough for the lattice and decorations. Layer the pears in the pan, add marzipan and almonds, if using. Whisk the eggs with the milk, sugar, and cinnamon, then pour over the pears. Add the latticework and bake 30-45 minutes, or until the custard is set and the crust is golden brown.  Cooling after baking - so pretty!  Approximately 10 minutes after serving. Candied AlmondsWhat Medieval party is complete without candied almonds? This was a super-simple recipe I lifted from the internet. It didn't turn out quite as nicely as I would have liked - the sugar-egg-white mixture made the coating more powdery, which meant lots of wasted powder got left in the pan. And definitely you'll want to use parchment paper on these bad boys, or be prepared to clean up a very stuck-on mess from your sheet pan. But, again, the party guests LOVED them. And while I didn't get a good stand-alone photo, if you're really curious, you can see them in the corner of the first pear custard slab pie photo (and, y'know, all candied almonds look largely alike). 1 pound raw shelled almonds 1/3 cup brown sugar 1/3 cup white sugar 1 teaspoon ground cinnamon 1/2 teaspoon salt 1 egg white Preheat oven to 300 F. Whisk egg white until frothy, add almonds and stir to coat, add sugars, cinnamon, and salt, and stir to coat. In a half sheet pan lined with parchment paper, pour the almond mixture out and spread evenly, so that the nuts are all in a single layer. Bake for 30 minutes, then let cool. (I did not stir like the original recipe called for, and it made a big slab.) When fully cool, break apart into individual almonds with hands (if necessary). Eat by the handfuls. Marzipan Stuffed Dates So pretty - so delicious! This is probably the most authentic of all the recipes and it couldn't have been easier. Of course, it helped that I used store-bought marzipan! 2 pints medjool dates 1 tube marzipan Cut dates halfway through, lengthwise, and remove the pits. Take a small bit of marzipan and shape into ovals big enough to fit into the center of the date. Close the edges together, but not so much that you can't see the marzipan. Then try not to eat them all. They are VERY sweet, but also an incredibly delicious dessert and they make everyone ask - why did we stop making these?  I took a picture of pitting the dates because I thought it was cool. Also, apparently some people do eat the pits - I thought they resembled pecans.  One last follow-up to the Very Vintage Halloween Party! I wanted to share my recipe for Pumpkin Cranberry Bread Pudding. My husband loves bread pudding, but it can be a tricksy thing. Lots of recipes call for baking it in a water bath (too much work!), others end up making a bread pudding that is dry or too dense or otherwise flavorless. This recipe I adapted from my conventional bread pudding recipe, which calls for cinnamon and raisins. The key is to soak all the bread without being too runny, so add more milk if you need to. Pumpkin Cranberry Bread Pudding2 1/2 cups milk 1/4 cup butter 3 eggs 1 can (15 oz) pumpkin puree (or 2 cups homemade pureed pumpkin) 1/2 cup sugar 1 teaspoon pumpkin spice (or cinnamon with a pinch of clove and nutmeg) 1/4 teaspoon salt 1 loaf of unsliced bread (I prefer day-old challah) 1/2 cup dried sweetened cranberries Preheat the oven to 350 F. Heat the butter and milk over medium heat until the butter is just melted (stir occasionally to accelerate the melting). Remove from heat. Tear the bread into bite-sized pieces and fill a 9"x13" ungreased pan (I prefer glass) In a separate bowl, mix the eggs, sugar, spices, and pumpkin. Stir in cranberries, then fold in bread in stages until all is well-soaked. Add more milk at this stage if you need to. Pour the bread mixture into the ungreased pan and bake 40-45 minutes, or until a knife inserted 1 inch from the edge comes out clean. No need for a water bath or to cover it! Serve warm or cold with plenty of whipped cream. 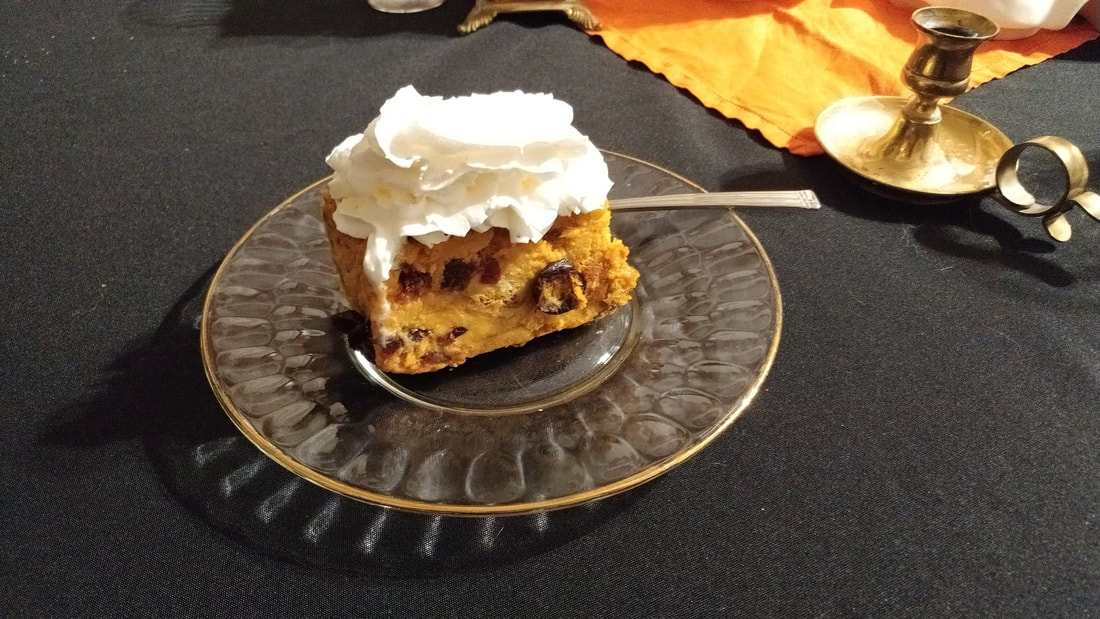 The best part about this bread pudding? Not only was it quick and easy to make the morning of the Halloween party, it also made SEVERAL converts to bread pudding. Lol. A number of people at the party mentioned that they either didn't like bread pudding and liked this one, or that it was the best bread pudding they'd ever had. Plus, it doesn't suffer much from storage in the fridge (if anything it just gets more moist) and is perfect for just about any fall gathering, including, (gasp!) Thanksgiving! So hope you enjoy this recipe and happy fall baking! If you want more party ideas, recipes, and other vintage food fun, consider becoming a member of The Food Historian! You can join online here, or you can join us on Patreon! Members get access to members-only sections of this website, special updates, plus discounts on future events and classes. And you'll help support free content like this for everyone. Join today!
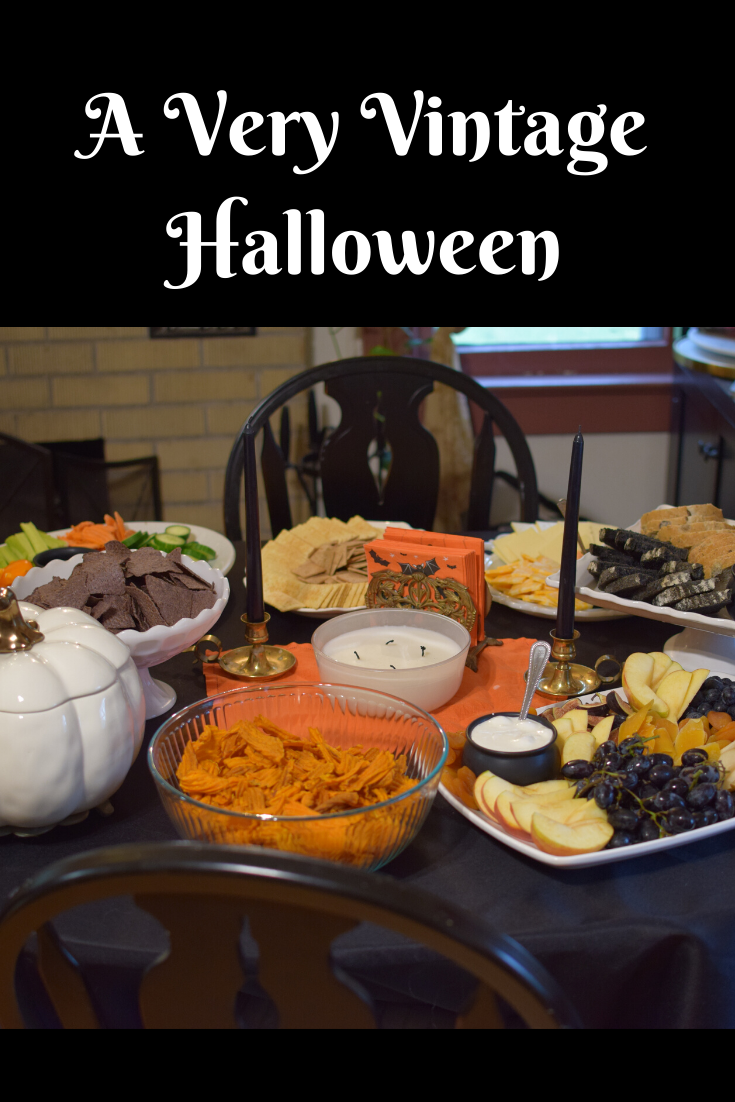 Halloween is a distinctly American holiday. Although it may have its roots in Great Britain, lots of wonderful traditions started right here in the U.S. In particular, Halloween parties became very popular in the 1920s, helped in part by the work of a crepe paper company called the Dennison Manufacturing Company. Starting in the 1920s they published a series of "Bogie Books," which were part advertisement, part instruction manual on how to use their products to craft your own Halloween decorations, costumes, and party favors to throw the perfect party. Few Bogie books have been digitized, as they are insanely popular collector's items, as are the paper goods the Dennison company produced. However, via the Library of Congress, the Internet Archive has a digitized copy you can peruse! Chock full of fantastic images like this one: 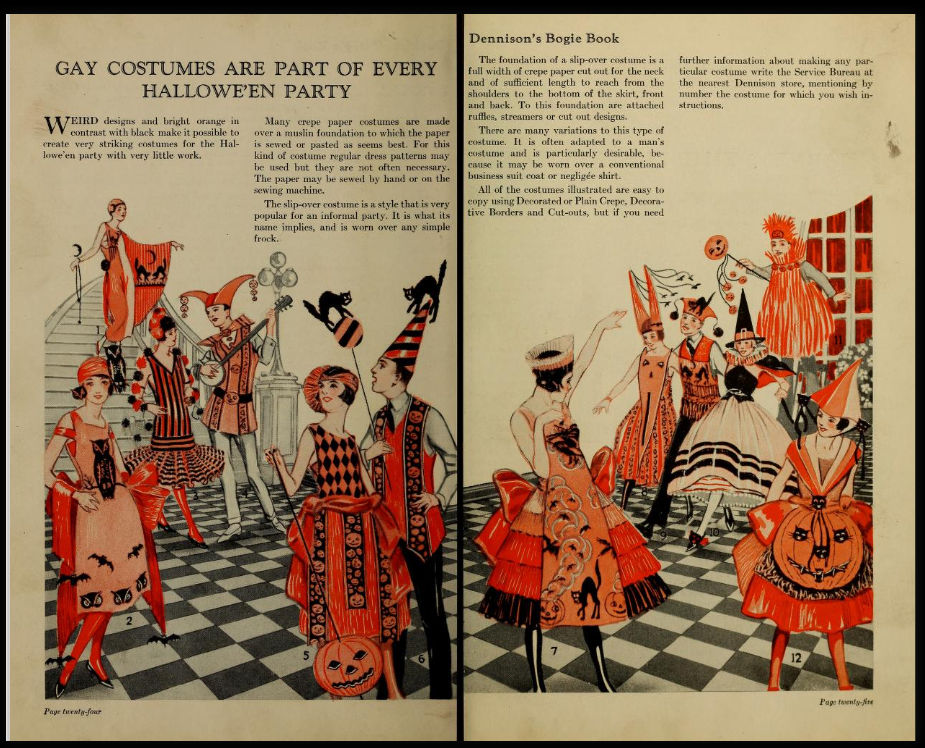 There are other Halloween party-planning gems out there as well. Mary Blain's "Games for Hallow-e'en" from 1912 is lovely for party ideas, with lots of historic divination games perfect for this time of year. Halloween is one of my favorite holidays. I love to decorate, dress up, and feed people. So it's no surprise that throwing a vintage-inspired Halloween part was right up my alley. When I said I wanted to dress up as a spiritualist medium, a friend suggested making the whole party 1920s and '30s themed! So I did. Costumes in the theme were required and some folks really outdid themselves. Sadly (or perhaps, wonderfully), most of my guests are usually so busy chatting and eating and having a good time, that we never have the chance to do games or activities! I did take some inspiration from the Bogie Books, however, as paper decorations definitely played a leading role.  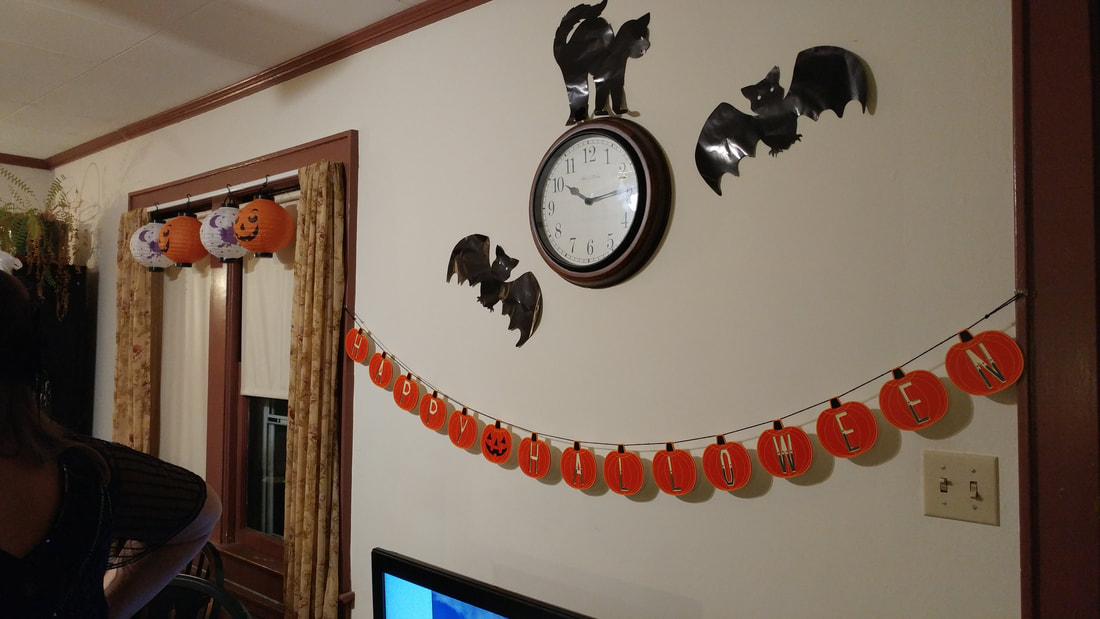 Paper garland, bats and cat, and paper lanterns, a la Bogie Book. Halloween parties in the early 20th century might have had elaborate decorations and games, but the food usually hearkened back to simpler times. Very seasonal, the suggestions usually included nuts, apples, pumpkins, corn, and other autumnal foods. Gingerbread, popcorn, and apples - fresh, roasted, or as dumplings - evoked the Colonial era. Sweets, including candied apples, popcorn balls, cookies, fudge, and other candies were often homemade, although plenty of store-bought confections were certainly available. Halloween parties were usually the purview of the young, so food was teenager-friendly and included sandwiches, pickles, and many of the aforementioned treats. Simple was considered best. With that in mind, and channeling an early 20th century home economist, I made sure all the food was color themed in orange, white, and black! And because I had a lot of events and late work nights leading up to the night of the party, I tried to simplify things to help-yourself snacks.  Before the guests arrived. 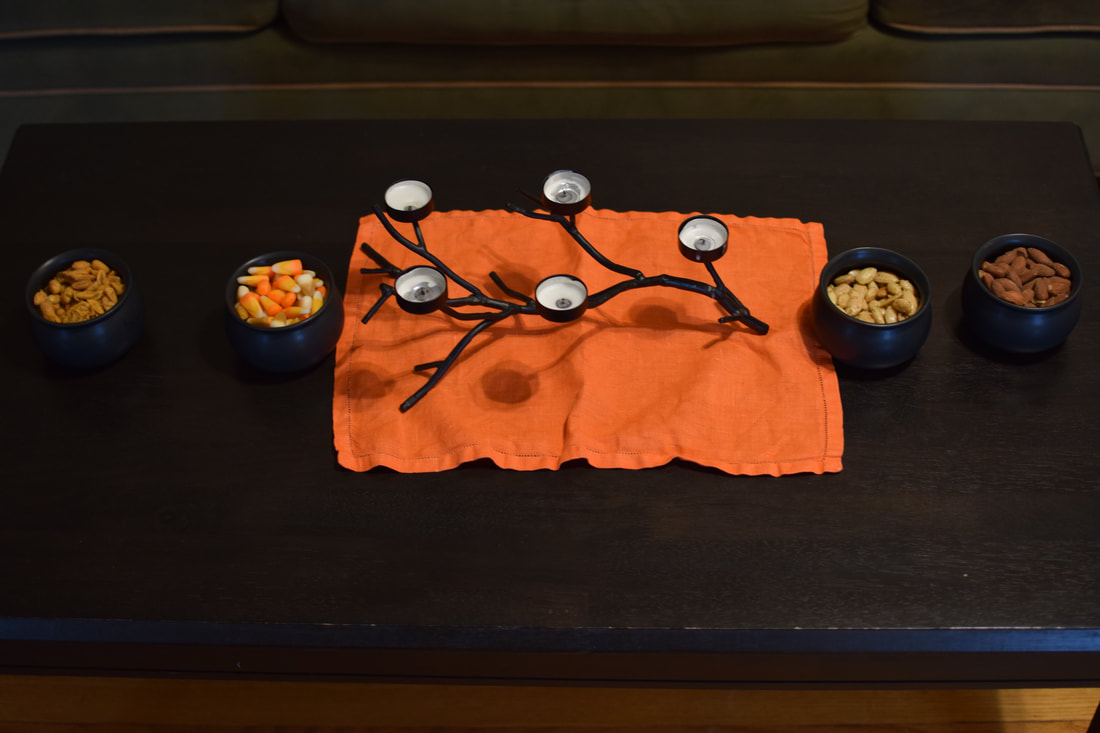 The orange and black theme is easier to maintain when your coffee table is already black. We had:
The smash hit of the evening was blue cheese dip with sweet potato chips. And everyone, even people who claimed not to like bread pudding, loved my bread pudding. Because I make the best. :D It was a bit of a scramble, but I was able to get all the fruit and veggies chopped and all the dips made (with a few exceptions) in like, two hours. Three, if you include the time to make and bake the bread pudding. Stay tuned for more recipes, but here are two: the easy-peasy blue cheese dip (seen here in the cute white pumpkin baking dish), and the roasted garlic white bean dip. 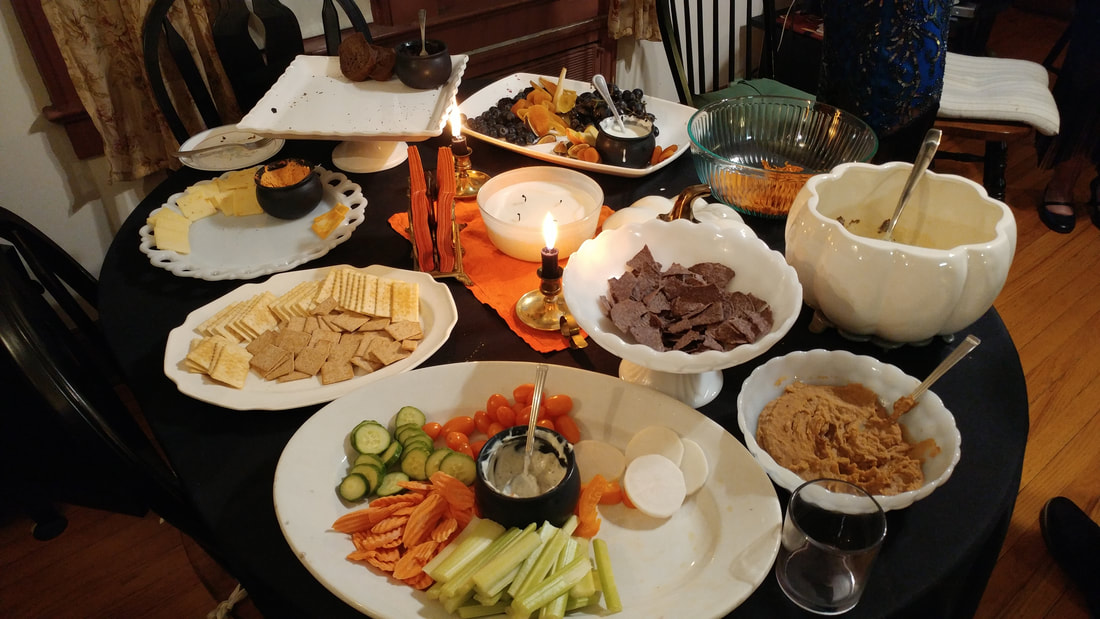 After the guests. Some nibbling continued after this, but we were all quite full by this point. Hot Blue Cheese DipNo messy combining mixing cold cream cheese with this one. Just heat, stir, and serve! 3 packages (16 oz.) neufchatel cream cheese 2 packages (8 oz.) Castelano or other very soft creamy blue cheese (or gorgonzola dolce) about a handful shredded mozzarella cheese Place blocks of cream cheese, blue cheese, and mozzarella in an oven proof dish. Bake at 350 F, uncovered, until cheese is soft and melty. Stir thoroughly to combine. Serve hot or room temp with plenty of sweet potato chips. Roasted Garlic White Bean DipFull disclosure: I tried to "roast" garlic cloves overnight in the crock pot and it mostly did NOT work. Even on low. But no time called for desperate measures. Cloves got hard/almost burnt. Worked well enough for the dip, though. I just fished the crunchy ones out before sending through the food chopper. I would recommend making roasted garlic in the oven or using whole heads of garlic instead. This also makes a LOT. So feel free to cut the recipe in half if you're not feeding a crowd. 2-4 heads of garlic, roasted and removed from skins 2 double cans cannellini beans, drained olive oil Process the beans and roasted garlic in stages with the olive oil until smooth. Add to crockpot and keep warm. Serve warm or room temperature with blue corn chips or pita chips. If you wanted to spice things up a bit, some dried thyme or fresh basil or parsley (or all three!) would not be remiss. 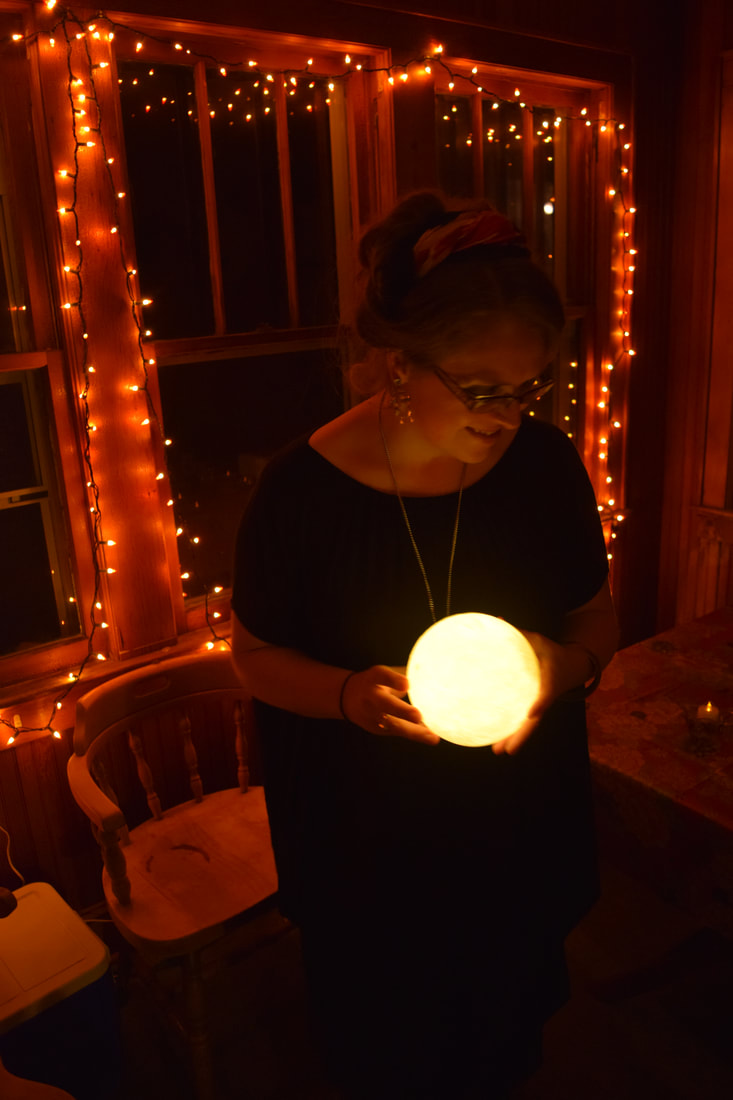 Bonus photo: me in my Halloween costume - 1920s spiritualist medium - with my favorite 3-D printed light-up moon! If you want more party ideas, recipes, and other vintage food fun, consider becoming a member of The Food Historian! You can join online here, or you can join us on Patreon! Members get access to members-only sections of this website, special updates, plus discounts on future events and classes. And you'll help support free content like this for everyone. Join today!
|

AuthorSarah Wassberg Johnson has an MA in Public History from the University at Albany and studies early 20th century food history. Archives
September 2023
Categories
All
|


 RSS Feed